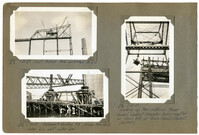
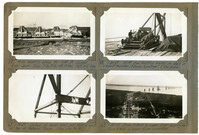
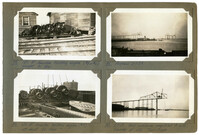
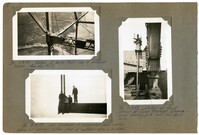
Image #54 (2.75" x 4.5"): "1-20-29. West anchor Arm completed to L6."; Image #55 (2.75" x 4.5"): "1-20-29. Falsework footing #3 driven thru dock. Under L6, west anchor arm."; Image #58 (4.5" x 2.75"): "1-20-29. Looking up thru material tower toward viaduct traveler being erected on Span 1D, of Drum Island Viaduct. (see #57).";Three 4.5" x 2.75" B/W photos numbered 54, 55, 58
Image #59 (4.5" x 2.75"): "1-20-29. Temporary tower bracing between anchor bent on Pier 4 (left) and bent 1D of Drum Island Viaduct (right). Note the different batter of the two bents, also the diagonal cable bracing, with turnbuckles (Frank Stengel)."; Image #56 (2.75" x 4.5"): "1-20-29. 100 HP Gasoline Hoist #7. Used on viaduct traveler."; Image #60 (2.75" x 4.5"): "1-20-29. Setting shoes on Pier 2.";Three 4.5" x 2.75" B/W photos numbered 56, 59, 60
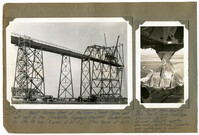
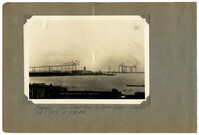
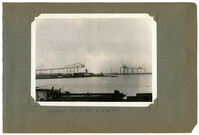
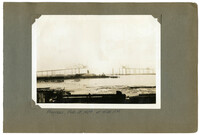
Unnumbered Image (5" x 7"): "1-28-29. West Anchor arm of the Town Creek Span and east end of the Charleston Approach Viaduct. Anchor arm is 256 ft. long (8 panels at 32 ft.). Stair tower at left."; Image #66 (4.5" x 2.75"): "1-30-29. Main bearing shoe, Pier 2, Town Creek Span. 5' 0" x 5' 9" = 28.75 [square feet]. Des. Load = 1,813,000# = 438 # [per square inch]. Erec. Load = 1,089,000# max. (suspended span cantilevered to center). Lower shoe 3' 4" high.";One 4.5" x 2.75" B/W photo and one 5" x 7" B/W photo. Smaller photo numbered 66.
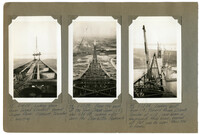
Image #61 (2.75" x 4.5"): "1-23-29. Progress - Town Creek Span. Taken from office tower."; Image #62 (2.75" x 4.5"): "Progress - Town Creek & Drum Island (right). 1-26-29."; Image #63 (2.75" x 4.5"):"1-28-29. West anchor arm complete."; Image #64 (2.75" x 4.5"): "1-28-29. Viaduct traveler starting erection of Drum Island Viaduct. span traveler not yet erected.";Four 4.5" x 2.75" B/W photos numbered 61, 62, 63, 64
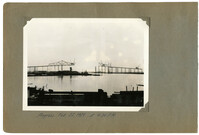
Image #65 (2.75" x 4.5"): Main bearing shoes for 1050 ft. Cooper River Span. Base 7' 3" x 8' 6". Wt. 10 tons. Ab't. 4' 6" high."; Image #68 (2.75" x 4.5"): "1-30-29. 100 HP Gas. Hoisting engine on deck of viaduct traveler. 3 Drums & swinger. (Tom Kane)"; Image #67 (2.75" x 4.5"): "1-30-29. Detail of boom heel and foot of mast at top of Material Tower. (See also No. 86)"; Image #69 (2.75" x 4.5"): 1-30-29. Drum Island & Cooper River - looking east. Piers 5 to 13 in Cooper River completed.";Four 4.5" x 2.75" B/W photos numbered 65, 67, 68, 69
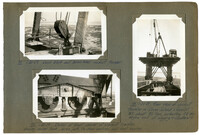
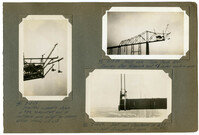
Image #70 (2.75" x 4.5"): " 1-30-29. Lead block and boom heel - viaduct traveler."; Image #72 (2.75" x 4.5"): "1-30-29. Detail at front corner of viaduct traveler, showing swivel truck, 40 ton jack, tie-down anchors, and front bearing."; Image #73 (4.5" x 2.5"): "1-30-29. rear view of viaduct traveler on Drum Island Viaduct. Wt. about 80 tons, including 25 ton engine and all rigging & counterw't.";Three 4.5" x 2.75" B/W photos numbered 70, 72, 73
Image #71 (4.5" x 2.75"): "1-30-29. Looking west across Town Creek from west end of Drum Island Viaduct. Just before erection of Span Traveler B. Trusses 24 ft. c. to c."; Image #74 (4.5" x 2.75"): "1-30-29. Driving a batter pile for falsework footings with a No. 2 Vulcan steam hammer hung from a derrick boom."; Image #75 (4.5" x 2.75"): "1-30-29. Pier 12, Cooper River. Elev. top = 50.1 ft. above mean low water. Carries the 270 ft. deck truss spans.";Three 4.5" x 2.75" B/W photos numbered 71, 74, 75
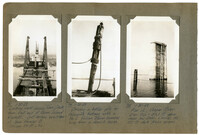
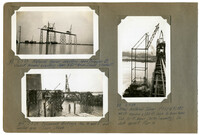
Image #76 (2.75" x 4.5"): Temporary top chord links between U13 and U14, carrying diaphragms for hydraulic jacks - Town Creek Span."; Image #77 (2.75" x 4.5"): "End view of links shown in #76."; Image #78 (2.75" x 4.5): "End view of top chords U12 U13 at U13. (see #87).";Three 4.5" x 2.75" B/W photos numbered 76, 77, 78
Image #79 (2.75" x 4.5"): "150 HP Gasoline hoisting engine (#5 or #6). Weight 31 tons."; Image #80 (2.75" x 4.5"): "100 HP Gasoline hoisting engine (#7). Weight about 26 tons."; Image #81 (2.75" x 4.5"): "Progress 2-1-29."; Image #82 (2.75" x 4.5"): "2-7-29. West cantilever completed to L12. Traveler at L10. Town Creek.";Four 4.5" x 2.75" B/W photos numbered 79, 80, 81, 82
Image #83 (2.75" x 4.5"): "2-7-29. Material Tower erecting Span Traveler B. Viaduct traveler erecting Span 5D - Drum Island Viaduct."; Image #84 (2.75" x 4.5"): "2-7-29. Falsework footings Nos. 4 and 5, east anchor arm - Town Creek."; Image #85 (4.5" x 2.75"): "2-7-29. Steel material Tower F067 & F0187. 40 ft. square x 130 ft. high to boom heels. Two 70 ft. boom (30 ton capacity). On dock opposite Pier 4";Three 4.5" x 2.75" B/W photos numbered 83, 84, 85
Image #87 (2.75" x 4.5"): "2-7-29. Top chords U12 U13 showing joint at U13 and temporary jacking links. Note eye bar hangers."; Image #88 (2.75" x 4.5"): "2-13-29. Bottom chord joint L13 - Town Creek. End joint of suspended span."; Image #89 (4.5" x 2.75"): "2-13-29. Assembly of top chord U12 U13, hanger, U13 L13 and joint L13 at end of suspended span.";Three 4.5" x 2.75" B/W photos numbered 87, 88, 89
Image #90 (4.5" x 2.75"): "2-13-29. Erecting assembly shown in #89, completing end of cantilever arm except for dummy bottom chords L12 L13."; Image #91 (2.75" x 4.5"): "2-13-29. West side - Town Creek Span. Removing steel falsework bent #1 under anchor arm."; Image #92 (2.75" x 4.5"): "2-14-29. Joint and floorbeam at L13 ( = Lo joint of suspended span. See #93).";Three 4.5" x 2.75" B/W photos numbered 90, 91, 92
Image #86 (2.75" x 4.5"): "Detail at boom heel - top of material tower. (See also #67)."; Image #93 (2.75" x 4.5"): "2-14-29. End floorbeam of suspended span erected before last (dummy) bottom chord of cantilever arm is in place."; Image #94 (2.75" x 4.5"): "2-14-29. Detail at front corner of Span Traveler, showing screw bearing jack and tie-down-rods.";Three 4.5" x 2.75" B/W photos numbered 96, 93, 94
Image #95 (2.75" x 4.5"): "2-15-29. Looking down Drum Island Viaduct toward Cooper River. Viaduct Traveler C erecting."; Image #98 (2.75" x 4.5"): "2-22-29. From the peak of the Town Creek Span (U8), elev. 235 ft. looking west down the Charleston Approach."; Image #99 (2.75" x 4.5"): "2-22-29. Looking east from U8, toward Drum Island Traveler at L13, rear boom in foreground. Main boom, boomed out flat, can be seen thru the A-frame.";Three 4.5" x 2.75" B/W photos numbered 95, 98, 99
Image #100 (4.5" x 2.75"): "2-22-29. From U15, on suspended span, looking back at cantilever arm. Traveler is at L13."; Image #101 (4.5" x 2.75"): "2-22-29. View from deck of traveler looking back thru portal and sway bracing of cantilever arm."; Image #102 (4.5" x 2.75"): "2-22-29. View from roof of Traveler A, west cantilever arm, looking east toward Pier 3.";Three 4.5" x 2.75" B/W photos numbered 100, 101, 102
Image #103 (2.75" x 4.5"): "2-22-29. Boomed out, between top chords U14 U16."; Image #104 (2.75" x 4.5"): "2-22-29. Joint U13 - End of the cantilever arm."; Image #105 (2.75" x 4.5"): "2-22-29. Temporary links U13 to U14, b't'n. cantilever arm and suspended span."; Image #112 (2.75" x 4.5"): "2-23-29. Field telephone - top of stair tower at Pier 4.";Four 4.5" x 2.75" B/W photos numbered 103, 104, 105, 112