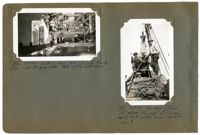
A color photograph of a parade float sponsored by the Agricultural Society of South Carolina, Charleston County Department of Natural Resources, and the Charleston Agricultural and Industrial Fair (November 11-16, 1929). The three are 'Partners Promoting Progress.' The float participated in a parade celebrating the opening of the John P. Grace Memorial Bridge (also known as 'the old Cooper River Bridge'). Five girls dressed as field hands ride the float alongside a pyramid decorated with vegetables: Julia Frampton, Annette Remington, Rosa Belle Blank, Louise Brown, and Isabel Frampton (one may not be pictured). Special attention is paid to the iodine in vegetables and its health benefits.
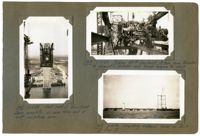
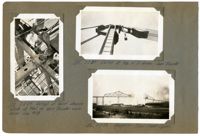
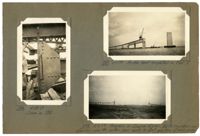
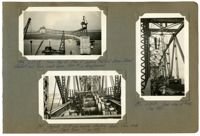
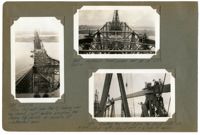
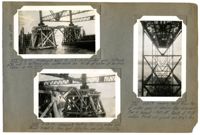
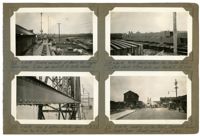
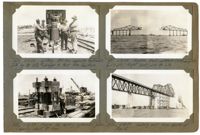
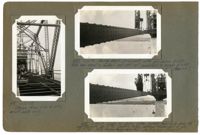
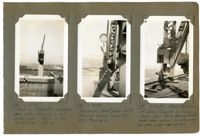
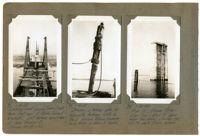
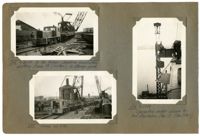
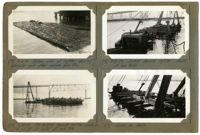
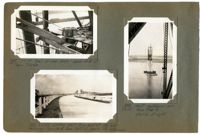
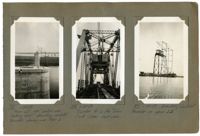
Image #147 (4.5" x 2.75"): "3-11-29. West half of Town Creek Span complete, as seen from end of east cantilever arm."; Image #148 (2.75" x 4.5"): "3-11-29. Picking 150 HP Gas. Hoist, 31 tons, from traveler to dismantle traveler and lower engine to deck."; Image #149 (2.75" x 4.5"): "3-11-29. Erecting material tower on dock at Pier 13.";Three 4.5" x 2.75" B/W photos numbered 147, 148, 149
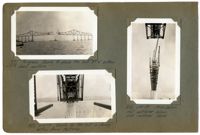
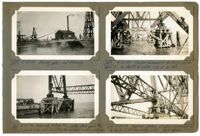
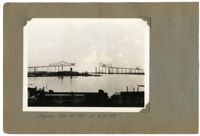
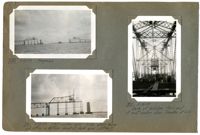
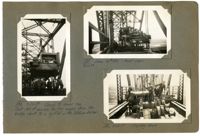
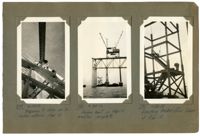
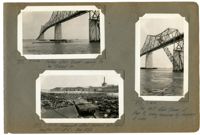
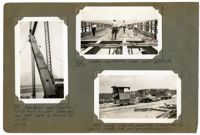
Image #474 (4.5" x 2.75"): "6-21-29. Erecting the last bottom chord section L19' L21', north truss, east half of suspended span."; Image #475 (2.75" x 4.5"): "6-21-29. Connecting the closing bottom chord at L21'."; Image #476 (2.75" x 4.5"): "6-21-29. Closing B.C. joint L21'. Note 6" [diameter] pin and slotted hole with 7" movement for adjustment, temperature, etc.";Three 4.5" x 2.75" B/W photos numbered 474, 475, 476
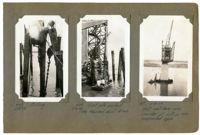
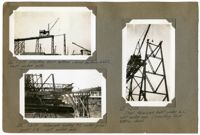
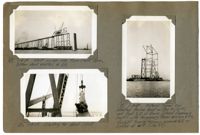
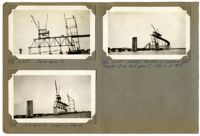
Image #471 (2.75" x 4.5"): "Progress. Ready to place the last 87 1/6" bottom chord section."; Image #472 (2.75" x 4.5"): "6-21-29. Ready for the last or closing bottom chord sections."; Image #473 (4.5" x 2.75"): "6-21-29. From below. West cantilever, below. East cantilever, above.";Three 4.5" x 2.75" B/W photos numbered 471, 472, 473
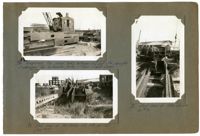
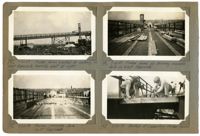
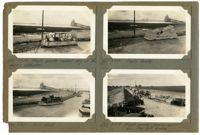
Image #320 (2.75" x 4.5"): "5-17-29. Setting timber forms for concrete deck, East Approach."; Image #321 (4.5" x 2.75"); "5-17-29. Bowed plates in expansion joint at 9E on the East Approach. Taken to illustrate shop error. report made to V.B. & Iron Co."; Image #322 (2.75" x 4.5"): "5-17-29. Progress in Cooper River.";Three 4.5" X 2.75" B/W photos numbered 320, 321, 322
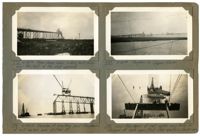
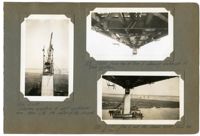
Image #372 (2.75" x 4.5"): "5-29-29. Looking down from U10, over Pier 8. Elev. = 280 ft. above water. Note lighter with steel."; Image #373 (4.5" x 2.75"): "5-29-29. Top chord U8 U10 just entered into joint at U8 and ready to be pulled in and connected. Span 9.";Two 4.5" x 2.75" B/W photos numbered 372, 373
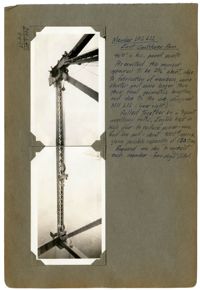
Image #399 (2.75" x 4.5") and Image #400 (2.75" x 4.5"): "Member U12 L12 East Cantilever Arm. 96'-0" c. to c. panel points. As erected this member appeared to be 3 1/2" short, due to fabrication of members, some shorter and some longer than their final geometric lengths, and due to the sub-diagonal M11 L12 (lower right). Pulled together by a 7-part auxiliary falls. Engine kept in high gear to reduce power - max. lead line pull = about 9000 [pounds], approx., giving possible capacity of 130 tons. Required one day to connect each member - two days total.;Two 4.5" x 2.75" B/W photos numbered 399, 400
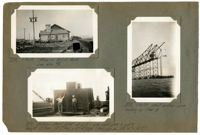
Image #336 (2.75" x 4.5"): "5-18-29. Office in A.C.L. Yard. See also #1."; Image #337 (2.75" x 4.5"): "Bottom chord joint at L10 - over main piers 8 and 9. Weight 13 tons. 12'-7" long x 12'-4" high (Main gas. pl. 108" x 1" x 12'-7")."; Image #338 (4.5" x 2.75"): "5-21-29. West anchor arm landing on Pier 8.";Three 4.5" x 2.75" B/W photos numbered 336, 337, 338
Image #113 (2.75" x 4.5"): "2-23-29. East anchor arm. Traveler Bat L4 Truss erected to L6."; Image #114 (2.75" x 4.5"): "2-23-29. West side - Town Creek Span. Traveler A at L15."; Image #115 (4.5" x 2.75"): "2-23-29. West side - Town Creek Cantilever.";Three 4.5" x 2.75" B/W photos numbered 113, 114, 115
Image #133 (4.5" x 2.75"): "3-3-29 Detail of lead sheave block at heel of span traveler main boom. See #108."; Image #135 (2.75" x 4.5"): "3-3-29. Detail at top of A-frame. Span traveler."; Image #136 (2.75" x 4.5"): "3-3-29. Progress - Town Creek Span.";Three 4.5" x 2.75" B/W photos numbered 133, 135, 136
Image #258 (2.75" x 4.5"): "4-23-29. Driving piles and framing."; Image #260 (2.75" x 4.5"): "4-23-29. Falsework footing #16, under deck span #10. Two (2) plumb piles and six (6) battered piles under each col."; Image #259 (2.75" x 4.5"): "4-23-29. Timber falsework footings under Span 10. Av. depth of water = 25' at low tide."; Image #261 (2.75" x 4.5"): "4-24-29. typical detail of steel falsework col. on ton of 2-200 ton wedge jacks. Deck spans.";Four 4.5" x 2.75" B/W photos numbered 258, 259, 260, 261
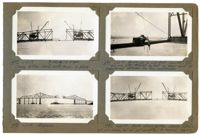
Image #244 (2.75" x 4.5"): "4-18-29. Span 5 completed. Viaduct Traveler at left being removed by stiffleg derrick, which it has set up in front of it."; Image #245 (2.75" x 4.5"): "4-18-29. Spans 11 and 12 completed."; Image #246 (4.5" x 2.75"): "4-23-29. Erecting Span 10. Taken from near Pier 12, looking west toward Pier 11, anchor pier 10 and main piers 9 and 8.";Three 4.5" x 2.75" B/W photos numbered 244, 245, 246
Image #284 (4.5" x 2.75"): "4-30-29. Same as 283."; Image #287 (2.75" x 4.5"): "5-1-29. Anchor bent completed on Pier 7."; Image #288 (2.75" x 4.5"): "5-2-29. Progress in Cooper River. Both travelers are standing over the anchor piers - ready to start erection of main span.";Three 4.5" x 2.75" B/W photos numbered 284, 287, 288
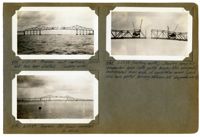
Image #248 (4.5" x 2.75"): "4-23-29. Span 5 completed and working on Span 6."; Image #249 (4.5" x 2.75"): "4-23-29. From top of anchor pier 7, looking west toward Span Traveler B erecting Span 6." Image #250 (4.5" x 2.75"): 4-23-29. From top of viaduct at bent #12E, looking west. Town Creek Span in distance.";Three 4.5" x 2.75" B/W photos numbered 248, 249, 250
Image #76 (2.75" x 4.5"): Temporary top chord links between U13 and U14, carrying diaphragms for hydraulic jacks - Town Creek Span."; Image #77 (2.75" x 4.5"): "End view of links shown in #76."; Image #78 (2.75" x 4.5): "End view of top chords U12 U13 at U13. (see #87).";Three 4.5" x 2.75" B/W photos numbered 76, 77, 78
Image #272 (2.75" x 4.5"): "4-28-29. Town Creek Span, looking east from near the end of west approach."; Image #273 (2.75" x 4.5"): "4-28-29. Progress in Cooper River."; Image #274 (2.75" x 4.5"): "4-29-29. Traveler A erecting end floorbeam of west anchor arm at Pier 10."; Image #275 (2.75" x 4.5"): "End floorbeam of west anchor arm hung on stringers of deck span. First steel erected on anchor arm.";Four 4.5" x 2.75" B/W photos numbered 272, 273, 274, 275
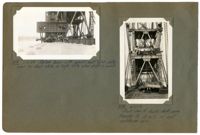
Image #194 (2.75" x 4.5"): "3-27-29. From top of Pier 6, looking toward Drum Island viaduct and Town Creek Span. Pier 5 in foreground."; Image #195 (2.75" x 4.5"): "Second 150 HO gas. Engine starting down thru deck of Town Creek Span. (See 188)"; Image #196 (4.5" x 2.75"): "3-28-29. rear view of #195. (See 188)";Three 4.5" x 2.75" B/W photos numbered 194, 195, 196
Image #79 (2.75" x 4.5"): "150 HP Gasoline hoisting engine (#5 or #6). Weight 31 tons."; Image #80 (2.75" x 4.5"): "100 HP Gasoline hoisting engine (#7). Weight about 26 tons."; Image #81 (2.75" x 4.5"): "Progress 2-1-29."; Image #82 (2.75" x 4.5"): "2-7-29. West cantilever completed to L12. Traveler at L10. Town Creek.";Four 4.5" x 2.75" B/W photos numbered 79, 80, 81, 82
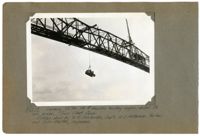
Unnumbered Image (5" x 7"): "Lowering 33 ton, 150 HP Gasoline hoisting engine, under its own power. Town Creek Span. Ridden down by W.E. Omohundro, Sup't., W.S. Patterson, Pusher, and John Shelton, Engineman.";One 5" x 7" B/W photo
Image #159 (2.75" x 4.5"): "3-13-29. The closing bottom chord joint at L17! Member on left has slotted hole at pin."; Image #160 (2.75" x 4.5"): " Closing joint at L17! 4" slotted hole allows erection of closing chord at any temperature."; Image #161 (2.75" x 4.5"): "3-13-29 Progress."; Image #162 (2.75" x 4.5"): "3-3-29. Closing bottom chords in place.";Four 4.5" x 2.75" B/W photos numbered 159, 160, 161, 162
Image #264 (2.75" x 4.5"): "4-24-29. Driving piles for falsework footings. Anchor Pier 10."; Image #266 (2.75" x 4.5"): "Progress in Cooper River. Looking north."; Image #265 (2.75" x 4.5"): "4-24-29. Typical group of piles pulled together for bracing & cutting off."; Image #267 (2.75" x 4.5"): "4-26-29. Loading cypress piles from car to lighter.";Four 4.5" x 2.75" B/W photos numbered 264, 265, 266, 267
Image #437 (2.75" x 4.5"): "6-13-29. Bottom chord L14 L16. Wt. 17 tons."; Image #438 (2.75" x 4.5"): "6-14-29. Turntable truck for turning long truss members end for end."; Image #439 (2.75" x 4.5"): "6-14-29. Turning 90 ft. chord with turntable trucks."; Image #440 (2.75" x 4.5"): "6-14-29. Turning 90 ft. chord with turntable trucks.";Four 4.5" x 2.75" B/W photos numbered 437, 438, 439, 440
Image #122 (2.75" x 4.5"):"2-24-29. West cantilever arm erected to L17 L18 - Traveler at L15."; Image #124 (2.75" x 4.5"): "2-25-29. Traveler A at L16, its farthest position."; Image #123 (2.75" x 4.5"): "2-24-29. East anchor arm erected to L6. Traveler at L6. Viaduct traveler at right."; Image #125 (2.75" x 4.5"): "2-25-29. East anchor arm at Pier 3.";Four 4.5" x 2.75" B/W photos numbered 122, 123, 124, 125
Image #126 (4.5" x 2.75"):"3-1-29. Starting erection of east cantilever arm, from L18, the center of the channel."; Image #129 (2.75" x 4.5"): "3-3-29. From top of Pier 2 showing underside of floor system."; Image #130 (2.75" x 4.5"): "3-3-29. Pier 3 and the Cooper River, from top of Pier 2.";Three 4.5" x 2.75" B/W photos numbered 126, 129, 130
Image #222 (2.75" x 4.5"): "3-30-29. An obstruction in the Chicken Creek channel. Note the water back in the woods."; Image #223 (2.75" x 4.5"): "3-30-29. The motor boat which was used to tow small rafts to the Santee Bridge."; Image #224 (2.75" x 4.5"): "3-30-29. 7 to 8 Ft. of water over the 'mainland' where piles were being cut."; Image #225 (2.75" x 4.5"): "3-30-29. A 90 ft. cypress tree, felled from a boat. Must be cleared and floated out.";Four 4.5" x 2.75" B/W photos numbered 222, 223, 224, 225
Image #218 (2.75" x 4.5"): "3-30-29. Negro wood-cutters enroute home for the week end."; Image #219 (2.75" x 4.5"): "3-30-29. A hollow-log canoe. Duncan at the paddle."; Image #220 (2.75" x 4.5"): "3-30-29. Laurel Hill Island - water 2 to 3 ft. deep over the 5 ft. banks at normal stage. Most of the 85 ft. and 90 ft. piling came from here."; Image #221 (2.75" x 4.5"): "3-30-29. Chicken Creek - note height of water around the tree trunks.";Four 4.5" x 2.75" B/W photos numbered 218, 219, 220, 221
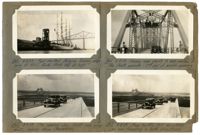
Image #561 (2.75" x 4.5"): "8-8-29. Four-masted Belgian Training ship lying at P.U.C. Dock. Masts 185 ft. high."; Image #562 (2.75" x 4.5"): "8-8-29. The opening day. First cars going east, coming from Charleston."; Image #562 (2.75" x 4.5"): "8-8-29. Free traffic till 4:00 P.M.! Cars now traveling in both directions."; Image #564 (2.75" x 4.5"): "8-9-29. Camera man ready to take movies of the floats parade - 2nd day of bridge opening.";Four 4.5" x 2.75" B/W photos numbered 561, 562, 562, 564
Image #422 (2.75" x 4.5"): "6-11-29. Traveler B (left) at L15 & truss to L16. Traveler A (east side) at L12 and truss to L14."; Image #423 (2.75" x 4.5"): "6-12-29. West cantilever arm complete except floor L16 to L17. Eye-bar hangers U17 L17 being erected."; Image #424 (2.75" x 4.5"): "6-12-29. Assembling eye-bars U17 L17 to joint L17 (See 420)."; Image #425 (2.75" x 4.5"): "6-12-29. Driving 10" pin at U17 with 500lb. overhauling ball - west cantilever arm.";Four 4.5" x 2.75" B/W photos numbered 422, 423, 424, 425
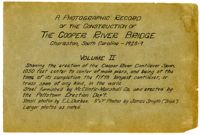
A Photographic Record of the Construction of the Cooper River Bridge; Charleston, South Carolina - 1928-29; Volume II; Showing the erection of the Cooper River Cantilever Span, 1050 feet center to center of main piers, and being at the time of its completion the fifth longest cantilever, or truss span of any kind in the world. Steel furnished by McClintic-Marshall Co. and erected by the Pottstown Erection Dep't. Small photos by E.L. Durkee. 5" x 7" Photos by James Smyth ("Irish"). Larger photos as noted.;Title Page, 6.75" x 10.125"
Image #298 (2.75" x 4.5"): "5-6-29. Our tank lighter and coal barge."; Image #299 (2.75" x 4.5"): "5-6-29. Traveler "B" moved out to L2. West anchor arm."; Image #300 (2.75" x 4.5"): "5-8-29. Second panel--west anchor arm complete. Traveler Bat L3, erecting portal bracing."; Image #301 (2.75" x 4.5"): "5-9-29. Traveler B erecting third falsework bent at L6, west anchor arm.";Four 4.5" x 2.75" B/W photos numbered 298, 299, 300, 301
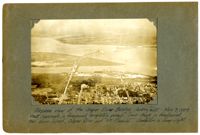
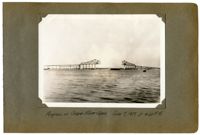
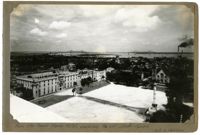
Unnumbered Image (5" x 7"): "Airplane view of the Cooper River Bridge - looking east. May 9, 1929. West approach, in foreground, completely paved. Town Creek in foreground, then Drum Island, Cooper River, and Mt. Pleasant. Charleston in lower right.";One 5" x 7" B/W photo
Image #487 (4.5" x 2.75"): "6-27-29. From U10 east (over Pier9) looking over top chord, just before erecting the closing top chords at middle of suspended span."; Image #490 (2.75" x 4.5"): "6-27-29. Hydraulic hand pumps set up at U17."; Image #491 (2.75" x 4.5"): "Erecting the first closing top chord U20' U22. U20 at right. U22, at left, = CL [center line] 1050ft. span.";Three 4.5" x 2.75" B/W photos numbered 487, 490, 491
Image #330 (2.75" x 4.5"): "5-18-29. Progress"; Image #331 (2.75" x 4.5"): "5-18-29. West anchor arm. Note stair tower and office on bottom chord of deck span - at Pier 7."; Image #332 (4.5" x 2.75"): "5-18-29. Deck of bridge from end of east anchor arm. Traveler at L6.";Three 4.5" x 2.75" B/W photos numbered 330, 331, 332
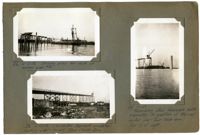
Image #448 (4.5" x 2.75"): "6-18-29. Pulling."; Image #449 (4.5" x 2.75"): "6-18-29. First pile pulled. Time required, about 15 min."; Image #450 (4.5" x 2.75"): "6-18-29. West cantilever arm. Traveler at L19 on the suspended span.";Three 4.5" x 2.75" B/W photos numbered 448, 449, 450
Image #419 (4.5" x 2.75"): "6-11-29. Expansion plate on East Approach showing bend in plane of plate due to punching and riveting along one edge only. Bowed 1 3/4" in 20 ft. Straightened by hammering along other edge."; Image #420 (4.5" x 2.75"): "6-12-29. Assembling eye-bars to bottom chord joint L17. (See also 424)."; Image #421 (4.5" x 2.75"): "6-12-29. Entering pin at U17 connecting eye-bars supporting suspended span to end of cantilever arm.";Three 4.5" x 2.75" B/W photos numbered 419, 420, 421
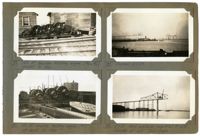
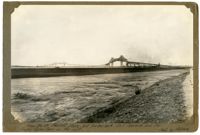
Image #208 (2.75" x 4.5"): "3-30-29. The Santee River Bridge, 2.2 miles long, between McClellanville & Georgetown, S.C."; Image #209 (2.75" x 4.5"): "3-30-29. 200 ft. Swing Span over the North Santee. All our piling came thru this channel."; Image #212 (2.75" x 4.5"): "3-30-29. The 'Chariot' - McC. M. Co's official car. Used by our piling inspectors in the Santee Swamps."; Image #213 (2.75" x 4.5"): "3-30-29. A negro 'mammy' storekeeper.";Four 4.5" x 2.75" B/W photos numbered 208, 209, 212, 213
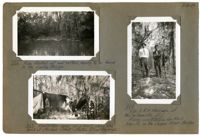
Image #226 (2.75" x 4.5"): "3-30-29. Piles floated out and rafted, ready to be towed to the Santee Bridge."; Image #227 (2.75" x 4.5"): "3-30-29. Woodcutters camp on a knoll along the bank of Chicken Creek - Santee River Swamps."; Image #228 (2.75" x 4.5"): "3-30-29. H.W. & R.H. Morrison of McClellanville, S.C. Piling contractors for McCl. Mar. Co. on the Cooper River Bridge.";Three 4.5" x 2.75" B/W photos numbered 226, 227, 228
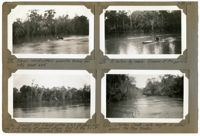
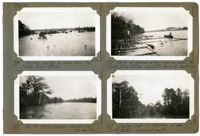
Image #214 (2.75" x 4.5"): "3-30-29. Flooded country as seen from the Santee River Bridge."; Image #215 (2.75" x 4.5"): "3-30-29. Rafts of cypress piling tied up below the Santee River Bridge - ready for towing to Charleston."; Image #216 (2.75" x 4.5"): "3-30-29. Up the North Santee - flooded over its banks."; Image #217 (2.75" x 4.5"): "3-30-29. Chicken Creek - a tributary of the North Santee - narrow and swift.";Four 4.5" x 2.75" B/W photos numbered 214, 215, 216, 217
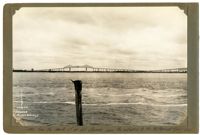
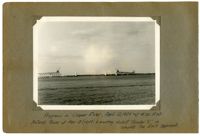
Unnumbered Image (5" x 7"): "From the Mt. Pleasant shore, but further back. East Approach and the Cooper River Span on the right. Photo by Melchers.";One 5" x 7" B/W photo
Image #333 (2.75" x 4.5"): "5-18-29. Falsework bent 31- L8 - East anchor arm. 16 Plumb piles and 10 battered piles under each col. 40 ft. of water at low tide. Taken at low tide. See also 355."; Image #334 (2.75" x 4.5"): "5-18-29. Falsework footing 32 - L6, anchor arm. Similar to bent 31. Max. load 20 1/2 tons per pile (D + L + Trav.)."; Image #335 (4.5" x 2.75"): "5-18-29. Looking west from top of anchor pier 10 showing steel falsework. Pier 9 beyond = 450 ft. Bents at 90 ft. centers. Flswk. cols. plumb and 37'-6" c. to c.";Three 4.5" x 2.75" B/W photos numbered 333, 334, 335
Image #26 (2.75" x 4.5"): " 1-3-29. Erecting first bottom chord section, L0L2, west anchor arm."; Image #27 (4.5" x 2.75"): "1-3-29. Steel falsework bent under L2, west anchor arm. connecting first bottom chord."; Image # 28 (2.75" x 4.5"): "1-2-29. Faslework footing #2 under panel point L4 - west anchor arm.;Three 4.5" x 2.75" B/W photos numbered 26, 27, 28
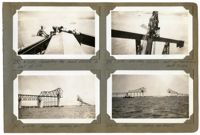
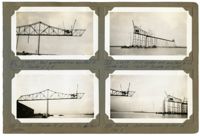
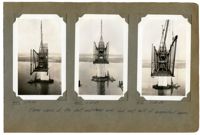
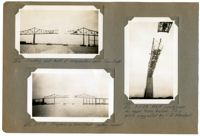
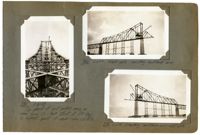
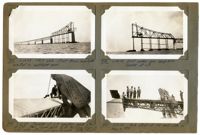
Image #460 (4.5" x 2.75"): "6-19-29."; Image #461 (4.5" x 2.75"): "6-20-29."; Image #462 (4.5" x 2.75"): "6-20-29."; "Three views of the west cantilever arm and west half of suspended span.";Three 4.5" x 2.75" B/W photos numbered 460, 461, 462
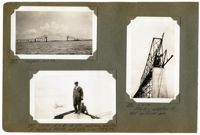
Image #518 (4.5" x 2.75"): "7-4-29."; Image #519 (4.5" x 2.75"): "7-4-29."; Image #520 (4.5" x 2.75"): "7-4-29."; "Three views showing conditions at time of R.H. McKnight's death. He was knocked from the top chord of the suspended span and fell to the deck below, July 3, 1929 at 10:45 A.M.";Three 4.5" x 2.75" B/W photos numbered 518, 519, 520
Image #268 (2.75" x 4.5"): "4-26-29. Twelve carloads of chords for Cooper River Span. 3 cars per load of 3 - 90 ft. chords."; Image #270 (2.75" x 4.5"): "4-26-29. Line of bottom chords - Spans 10, 11, & 12. From top of Pier 10, looking east."; Image #269 (2.75" x 4.5"): "4-26-29. 90 ft. Chord sections for Anchor Arm. Lightest chords 15 tons each and heaviest, 36 tons."; Image #271 (2.75" x 4.5"): "4-28-29. Looking up the West Approach toward Town Creek Span. Street paved (see #36).";Four 4.5" x 2.75" B/W photos numbered 268, 269, 270, 271
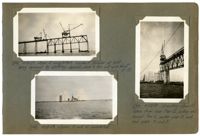
Image #150 (2.75" x 4.5"): "Erecting east half of suspended span - Town Creek."; Image #152 (2.75" x 4.5"): "3-13-29. Progress in Town Creek - getting nearer!"; Image #151 (2.75" x 4.5"): "3-11-29. West cantilever as seen from below. This photo suggested by C.D. Marshall.";Three 4.5" x 2.75" B/W photos numbered 150, 151, 152
Picturing the Bridge. The story of the Cooper river bridge as told in the special editions of the Charleston newspapers was rendered vivid by the wealth of illustrations in those publications, showing progress of the work on the great structure from the beginning to the moment of opening. These pictures will make interesting history and will doubtless be shown in years to come by many of those who participated in the jubilation of yesterday and will be keen to tell of the celebration to the youngsters who will take it all for granted that there is a driveway across the Cooper for their cars. The engineers and builders of the bridge, as, indeed, all of the officers of the corporation which owns and of the contractors who built it, cooperated in every possible way with the newspapers in the making of the special editions complete records of the work and of the occasion celebrated at the opening, and to them The Evening Post expresses its appreciation and thanks. Especially is it under obligations to Mr. E. L. Durkee, engineer of the McClintic-Marshall Company, for putting at its disposal his extensive collection of photographs of the work during the various stages of its progress. The pictures tell the story of the bridge as no verbal description could and there are virtually no significant phases of the work which escaped Mr. Durkee's camera. To have had access to this collection was the good fortune of The Evening Post and of the public to whom it was enabled to present them.;Newspaper clipping (6.5"" x 2"") from the Charleston Evening Post, titled ""Picturing the Bridge.""
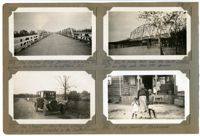
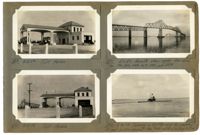
Image #22 (2.75" x 4.5"): "12-13-28. Driving Piles for dock at anchor pier #4."; Image #24 (2.75" x 4.5"): "12-23-28. Charleston Approach completed. Looking east toward Town Creek Span."; Image #25 (4.5" x 2.75"): "1-1-29. Assembling steel falsework bents preparatory to erection of the west anchor arm - Town Creek Span. Pier 2 at right.";Three 4.5" x 2.75" B/W photos numbered 22, 24, 25
Image #429 (2.75" x 4.5"): "6-11-29. Lifting 500 ton capacity hydraulic jack by its 12 1/2" [diameter] plunger to test the section."; Image #430 (2.75" x 4.5"): "6-12-29. Frame for testing hydraulic jacks. Capacity about 50 tons."; Image #431 (2.75" x 4.5"): "6-13-29. Progress. West cantilever (left) complete to U17 L17. Right (east) arm to L16."; Image #432 (2.75" x 4.5"): "6-12-29. Looking east from south of Pier 5.";Four 4.5" x 2.75" B/W photos numbered 429, 430, 431, 432
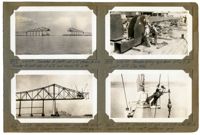
Image #411 (2.75" x 4.5"): "6-18-29. U.S. Engineers' Snag-boat 'Wateree.'"; Image #442 (2.75" x 4.5"): "6-18-29. Four-masted sailing ship passing under Cooper River Span."; Image #443 (2.75" x 4.5"): "6-17-29. Progress."; Image #444 (2.75" x 4.5"): "6-18-29. Looking west from Cooper River. Pier 10 at left. Town Creek Span in background.";Four 4.5" x 2.75" B/W photos numbered 441, 442, 443, 444
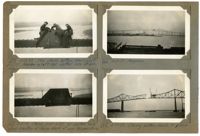
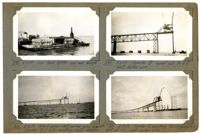
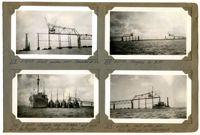
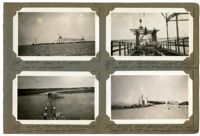
Image #323 (2.75" x 4.5"): "5-17-29. East anchor arm. Traveler at L6."; Image #324 (2.75" x 4.5"): "5-17-29. Progress in A.M."; Image #325 (2.75" x 4.5"): "5-18-29. Supply ship "Dobbin" and five Navy destroyers. West anchor arm beyond."; Image #329 (2.75" x 4.5"): "5-18-29. West anchor arm. Navy destroyer in foreground.";Four 4.5" x 2.75" B/W photos numbered 323, 324, 325, 329
Image #49 (2.75" x 4.5"): "1-18-29. West anchor arm, Town Creek Span. Bottom chord erected to L6."; Image #50 (2.75" x 4.5"): "1-18-29. Erecting top chord U3U5."; Image #51 (4.5" x 2.75"): "1-18-29. Material Tower has erected Anchor Bent on Pier 4 (left), and Bent 1 D of Drum Island Approach (right) with temporary tower bracing b't'n. viaduct traveler trusses, assembled, on lighter at left. (See 57)";Three 4.5" x 2.75" B/W photos numbered 49, 50, 51
Image #108 (4.5" x 2.75"): "2-22-29. Detail of lead sheave at heel of boom on span traveler. Note swivel connection (See also #133)."; Image #110 (4.5" x 2.75"): "2-22-29. Looking west from top of Pier 2, toward anchored bent on Pier 1. Falsework columns still in place, but bracing has been removed."; Image #111. (4.5" x 2.75"): "2-22-29. Looking east from top of Pier 2 toward Pier 3 and Drum Island.";Three 4.5" x 2.75" B/W photos numbered 108, 110, 111
Image #120 (2.75" x 4.5"): "2-24-29. Expansion joint at L0. Plates supported on pipe separators."; Image #128 (2.75" x 4.5"): "3-3-29. Top chord - west cantilever arm."; Image #121 (4.5" x 2.75"): "2-24-29. Rocker shoe under end of viaduct girder, providing expansion between anchor arm and viaduct. Supported on cross girder at top of anchor bent.";Three 4.5" x 2.75" B/W photos numbered 120, 121, 128
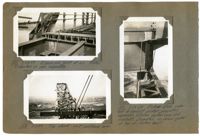
Image #481 (4.5" x 2.75"): "6-22-29. Stairs from L16 to U17, east side only."; Image #482 (2.75" x 4.5"): "6-22-29. Closing chord L19 L21 east with pin driven at L21. Note how chord is arched and still not connected to hanger at L20. (Gap = 6")."; Image #483 (2.75" x 4.5"): "6-24-29. Same as above, after jacking near side down 6 1/8" and far side up 11 13/16", making total vertical movement at pin of 17 15/16". Note hanger being connected - chord is now straight.";Three 4.5" x 2.75" B/W photos numbered 481, 482, 483
Image #477 (2.75" x 4.5"): "6-21-29. U22 L22 = CL [center line] of span. Closing bottom chord, north truss, in place."; Image #478 (2.75" x 4.5"): "6-21-29. Progress."; Image #479 (2.75" x 4.5"): "6-22-29. Driving pin in L21 - East (See 476). This pin was later removed so that no shear could be transferred between the two cantilevers."; Image #480 (2.75" x 4.5"): "6-22-29. Both closing bottom chords in place, and pins driven, but not yet connected to hangers. See 482.";Four 4.5" x 2.75" B/W photos numbered 477, 478, 479, 480
Image #484 (2.75" x 4.5"): "6-25-29. Progress. Last verticals, U21 L21, east, have been erected. (Looking north)."; Image #485 (2.75" x 4.5"): "6-27-29. (Looking south). Showing complete suspended span (note portal bracing b'tn. end posts) cantilevered from ends of cantilever arms (which also have portal bracing between last diagonals L16 U17)."; Image #486 (2.75" x 4.5"): "6-27-29. Progress. All truss members in place.";Three 4.5" x 2.75" B/W photos numbered 484, 485, 486
Image #433 (4.5" x 2.75"): "6-13-29. West cantilever arm, from below, erected to L17. Traveler B at L16."; Image #434 (4.5" x 2.75"): "6-13-29. Looking toward Pier 8 (at 1050' distance) from top of Pier 9. (See 431)."; Image #435 (4.5" x 2.75"): "6-13-29. Joint L17, cantilever arm side, showing opening for 10" [diameter] jacking pin and for jack, to control suspended span while cantilevered. (See 488).";Three 4.5" x 2.75" B/W photos numbered 433, 434, 435
Image #116 (4.5" x 2.75"): "2-23-29. West or Charleston cantilever arm taken from L6 on east anchor arm. Pier 3 in foreground, elev. = 134ft."; Image #118 (4.5" x 2.75"): "2-24-29. Hydraulic hand pump with pressure gauge. Capacity, 8000# per sq. in."; Image #119 (4.5" x 2.75"): "2-24-29. rear tie-down of Span Traveler on Town Creek Span. Note bearing block under rear column for shimming up when using rear boom.";Three 4.5" x 2.75" B/W photos numbered 116, 118, 119
Image #71 (4.5" x 2.75"): "1-30-29. Looking west across Town Creek from west end of Drum Island Viaduct. Just before erection of Span Traveler B. Trusses 24 ft. c. to c."; Image #74 (4.5" x 2.75"): "1-30-29. Driving a batter pile for falsework footings with a No. 2 Vulcan steam hammer hung from a derrick boom."; Image #75 (4.5" x 2.75"): "1-30-29. Pier 12, Cooper River. Elev. top = 50.1 ft. above mean low water. Carries the 270 ft. deck truss spans.";Three 4.5" x 2.75" B/W photos numbered 71, 74, 75
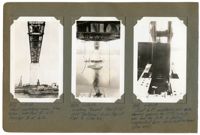
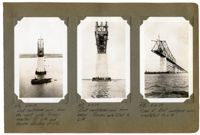
Image #184 (4.5" x 2.75"): "3-22-29. Ready to lower the first 150 HP gasoline hoisting engine from the bridge deck to a lighter in the stream below."; Image #185 (2.75" x 4.5"): "3-22-29. Same as #184 - front view."; Image #186 (2.75" x 4.5"): "3-22-29. Starting down.";Three 4.5" x 2.75" B/W photos numbered 184, 185, 186
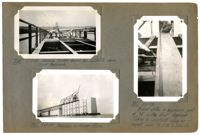
Image #190 (2.75" x 4.5"): "3-26-29. Timber forms erected for curbing, on West Approach. Concrete plant at right."; Image #191 (2.75" x 4.5"): "3-26-29. Timber forms for pouring concrete deck on West Approach."; Image #192 (2.75" x 4.5"): "3-26-29. Pouring concrete deck. West Approach."; Image #193 (2.75" x 4.5"): "3-26-29. Method of supporting timber forms.";Four 4.5" x 2.75" B/W photos numbered 190, 191, 192, 193
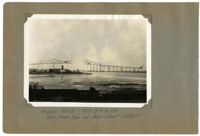
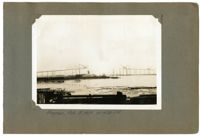
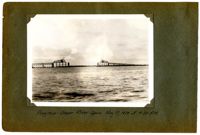
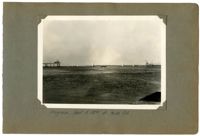
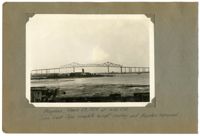
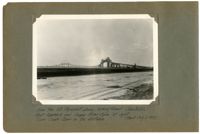
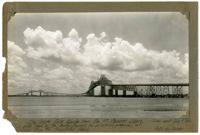
Unnumbered Image (5" x 7"): "Progress, March 29, 1929 at 4:30 P.M. Town Creek Span complete except riveting and travelers removed.";One 5" x 7" B/W photo
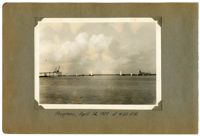
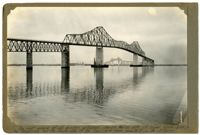
Unnumbered Image (5" x 7"): "Progress in Cooper River, April 26, 1929 at 4:30 P.M. material tower at Pier 13 (right) is erecting viaduct traveler 'C' to complete the east Approach.";One 5" x 7" B/W photo
Image #569 (2.75" x 4.5"): "8-12-29. Toll House."; Image #570 (2.75" x 4.5"): "8-12-29. Toll House."; Image #571 (2.75" x 4.5"): "E.L.D.'s favorite view again. See also Nos. 174, 364, 444, 467, 494, and 554."; Image #572 (2.75" x 4.5"): "8-16-29. Turning a lighter over by sinking it and pulling against the tide with a rolling hitch.";Four 4.5" x 2.75" B/W photos numbered 569, 570, 571, 572
Image #573 (2.75" x 4.5"): "8-16-29. Bottom side of lighter, showing barnacles and other marine growths."; Image #574 (2.75" x 4.5"): "8-20-29. Pile-pulling derrick lighter sunk in 12 to 15 ft. of water at high tide."; Image #575 (2.75" x 4.5"): "8-20-29. Sunken derrick lighter. Photo at low tide."; Image #576 (2.75" x 4.5"): "Same as above.";Four 4.5" x 2.75" B/W photos numbered 573, 574, 575, 576
Image #577 (2.75" x 4.5"): "8-29-29. Fallen stair tower - ready to be towed in."; Image #578 (4.5" x 2.75"): "8-29-29. The last stair tower, at Pier 7, being removed by tipping it over."; Image #579 (2.75" x 4.5"): "8-29-29. Falsework steel burned into scrap lengths 20" x 5'-0". See 523.";Three 4.5" x 2.75" B/W photos numbered 577, 578, 579
Image #565 (2.75" x 4.5"): "8-9-29. Floats parade - second day of the opening celebration."; Image #566 (2.75" x 4.5"): "8-9-29. P.U.C. float."; Image #567 (2.75" x 4.5"): "8-9-29. Floats parade."; Image #568 (2.75" x 4.5"): "8-9-29. Floats parade - looking east from the toll house.";Four 4.5" x 2.75" B/W photos numbered 565, 566, 567, 568
Image #405 (2.75" x 4.5"): "6-7-29. Erecting stringers - east cantilever."; Image #406 (2.75" x 4.5"): "6-8-29. Crane 19. 40 Ton capacity. Working weight about 100 tons."; Image #407 (2.75" x 4.5"): "6-8-29. Dummies made up to throw off of top of span as practice drill for life savers."; Image #409 (2.75" x 4.5"): "6-8-29. Town Creek Span with advertising sign 13' x 30' in place at center.";Four 4.5" x 2.75" B/W photos numbered 405, 406, 407, 409
Image #397 (4.5" x 2.75"): "6-6-29. Main boom - span Traveler. 100 ft. long c. to c. pins. Taken from near heel looking up towards tip at U12."; Image #403 (2.75" x 4.5"): "6-6-29. Setting reinforcing steel - east approach."; Image #404 (2.75" x 4.5"): "6-6-29. 4 Ton Gas. Locomotive & dump cars for pouring concrete deck, east approach & causeway.";Three 4.5" x 2.75" B/W photos numbered 397, 403, 404
Image #395 (2.75" x 4.5"): "6-6-29. Heel of main boom - upper deck of Span Traveler."; Image #398 (4.5" x 2.75"): "6-6-29. West cantilever arm, from Pier 9. U12 L12 at right."; Image #401 (2.75" x 4.5"): "6-6-29. Looking west from end of the east causeway. Town Creek Span (left) is nearly 1 3/4 miles away.";Three 4.5" x 2.75" B/W photos numbered 395, 398, 401
Image #414 (2.75" x 4.5"): "6-10-29. Balance beam with special bent hitch plates used for short hitch on high lifts wher [sic] drift is small."; Image #415 (4.5" x 2.75"): "6-11-29. Front view of double-deck span traveler A at L12 on east cantilever arm.";Two 4.5" x 2.75" B/W photos numbered 414, 415
Image #416 (4.5" x 2.75"): "6-11-29. East cantilever arm, from the west side. Trusses erected to L14 and traveler standing at L12."; Image #417 (4.5" x 2.75"): "6-11-29. East cantilever arm from below. Trusses are erected to L14."; Image #418 (4.5" x 2.75"): "6-11-29. View of East cantilever arm, completed to L14.";Three 4.5" x 2.75" B/W photos numbered 416, 417, 418
Image #247 (2.75" x 4.5"): "4-24-29. Spans 10, 11, and 12. Span 10 under erection."; Image #252 (2.75" x 4.5"): "4-24-29. From Span 1E, looking east. Hydraulic fill causeway in distance."; Image #251 (2.75" x 4.5"): "4-24-29. re-erecting viaduct traveler on Span 1E, at Pier 13, to complete East Approach."; Image #253 (2.75" x 4.5"): "4-24-29. East abutment - looking west. Spans 21E to 13E have been erected by C.E. Hillyer.";Four 4.5" x 2.75" B/W photos numbered 247, 251, 252, 253
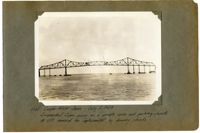
Unnumbered Image (5" x 7"): "From the Mt. Pleasant shore, looking toward Charleston, East Approach and Cooper River Span at right. Town Creek Span in the distance. (About July 2, 1929).";One 5" x 7" B/W photo
Unnumbered Image (5" x 7"): "1050' Cooper River Span - July 2, 1929. Suspended span swung as a simple span and jacking chords at U17 removed for replacement by dummy chords.";One 5" x 7" B/W photo
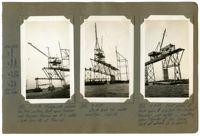
Image #381 (4.5" x 2.75"): "5-31-29. Top chord of east anchor arm, as seen from U1. Peak strut at U10 (top) is highest point of span - elev. 280 ft."; Image #385 (2.75" x 4.5"): "6-1-29. West side - erecting cantilever arm."; Image #386 (2.75" x 4.5"): "6-1-29. Erecting cantilever arm - east side.";Three 4.5" x 2.75" B/W photos numbered 381, 385, 386
Image #387 (2.75" x 4.5"): "Progress 6-1-29"; Image #388 (2.75" x 4.5"): "6-3-29. E.L.D. at U10, watching erection of top chord U10 U12, east side. (See 390 & 391)."; Image #389 (4.5" x 2.75"): "6-2-29. Starting erection of east cantilever arm.";Three 4.5" x 2.75" B/W photos numbered 387, 388, 389
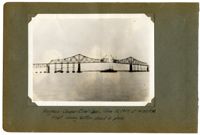
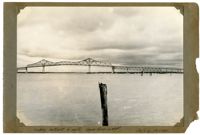
Unnumbered Image (5" x 7"): "The Cooper River Bridge from the Mt. Pleasant Shore. This photo taken by the Bridge Company for advertising purposes, and published thru the Associated Press. (Taken about July 7, '29.) Photo by Jacobs.";One 5" x 7" B/W photo
Unnumbered Image (5" x 7"): "The most unique of all bridge pictures, showing North side of Cooper River Span, in the foreground, and the South side of the Town Creek Span, beneath it, in the distance.";One 5" x 7" B/W photo
Image #377 (2.75" x 4.5"): "5-29-29. West side. First truss members erected in cantilever arm."; Image #378 (2.75" x 4.5"): "5-29-29. East anchor arm complete. Traveler at L9."; Image #379 (2.75" x 4.5"): "5-31-29. Traveler at L9 erecting peak strut at U10. Then moves back 15 ft. to allow boom to "duck" under strut and move forward.. Not drift."; Image #380 (2.75" x 4.5"): "5-31-29. Peak strut at U10 east side, as shown in 379.";Four 4.5" x 2.75" B/W photos numbered 377, 378, 379, 380
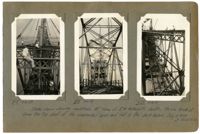
Image #153 (2.75" x 4.5"): "3-13-29. One more panel to be erected."; Image #154 (2.75" x 4.5"): "3-13-29. Ready to erect the first closing bottom chord."; Image #155 (2.75" x 4.5"): "3-13-29. Erecting the closing bottom chord - south truss - Town Creek Span."; Image #158 (2.75" x 4.5"): "3-13-29. Erecting the closing bottom chord - north truss - Town Creek Span.";Three 4.5" x 2.75" B/W photos numbered 153, 154, 155, 158
Image #52 (4.5" x 2.75"): "1-20-29. From L6, west anchor arm, looking east. Erecting viaduct traveler showing over Pier 3."; Image #53 (4.5" x 2.75"): "1-20-29. Traveler A on the Town Creek Span - rear view."; Image #57 (4.5" x 2.75"): "1-20-29. Erecting viaduct traveler on span 1D.";Three 4.5" x 2.75" B/W photos numbered 52, 53, 57