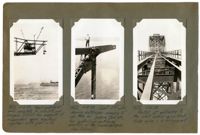
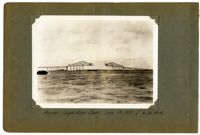
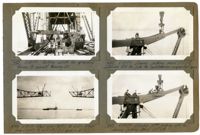
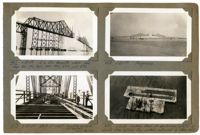
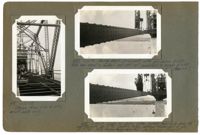
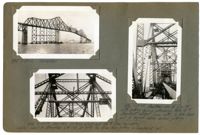
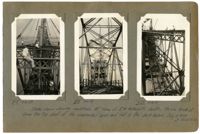
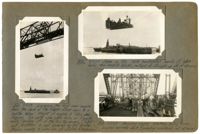
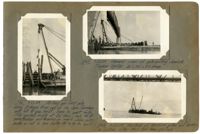
Image #426 (4.5" x 2.75"): "6-12-29. West cantilever arm complete to L16 U17 and hangers U17 L17 for support of suspended span erected, together with joint L17."; Image #427 (4.5" x 2.75"): "6-12-29. Joint U17 with dummy extension carrying 10" pin hole for jacking pin, etc., for controlling cantilever erection of the suspended span. (Geo. Schnell)."; Image #428 (4.5" x 2.75"): "6-12-29. Portal at entrance to the west anchor arm. Deck truss span 6 in foreground.";Three 4.5" x 2.75" B/W photos numbered 426, 427, 428
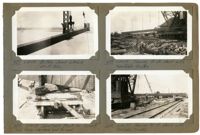
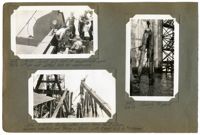
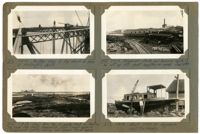
Image #429 (2.75" x 4.5"): "6-11-29. Lifting 500 ton capacity hydraulic jack by its 12 1/2" [diameter] plunger to test the section."; Image #430 (2.75" x 4.5"): "6-12-29. Frame for testing hydraulic jacks. Capacity about 50 tons."; Image #431 (2.75" x 4.5"): "6-13-29. Progress. West cantilever (left) complete to U17 L17. Right (east) arm to L16."; Image #432 (2.75" x 4.5"): "6-12-29. Looking east from south of Pier 5.";Four 4.5" x 2.75" B/W photos numbered 429, 430, 431, 432
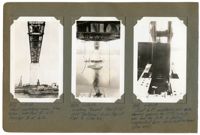
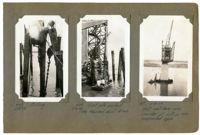
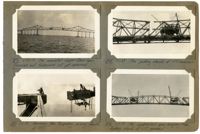
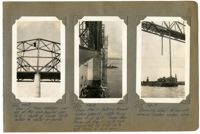
Image #433 (4.5" x 2.75"): "6-13-29. West cantilever arm, from below, erected to L17. Traveler B at L16."; Image #434 (4.5" x 2.75"): "6-13-29. Looking toward Pier 8 (at 1050' distance) from top of Pier 9. (See 431)."; Image #435 (4.5" x 2.75"): "6-13-29. Joint L17, cantilever arm side, showing opening for 10" [diameter] jacking pin and for jack, to control suspended span while cantilevered. (See 488).";Three 4.5" x 2.75" B/W photos numbered 433, 434, 435
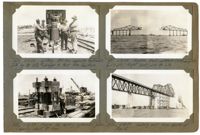
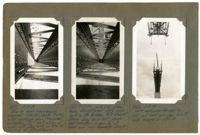
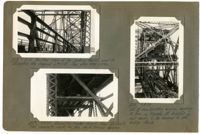
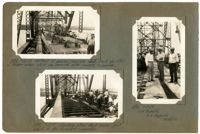
Image #437 (2.75" x 4.5"): "6-13-29. Bottom chord L14 L16. Wt. 17 tons."; Image #438 (2.75" x 4.5"): "6-14-29. Turntable truck for turning long truss members end for end."; Image #439 (2.75" x 4.5"): "6-14-29. Turning 90 ft. chord with turntable trucks."; Image #440 (2.75" x 4.5"): "6-14-29. Turning 90 ft. chord with turntable trucks.";Four 4.5" x 2.75" B/W photos numbered 437, 438, 439, 440
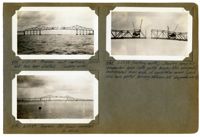
Image #411 (2.75" x 4.5"): "6-18-29. U.S. Engineers' Snag-boat 'Wateree.'"; Image #442 (2.75" x 4.5"): "6-18-29. Four-masted sailing ship passing under Cooper River Span."; Image #443 (2.75" x 4.5"): "6-17-29. Progress."; Image #444 (2.75" x 4.5"): "6-18-29. Looking west from Cooper River. Pier 10 at left. Town Creek Span in background.";Four 4.5" x 2.75" B/W photos numbered 441, 442, 443, 444
Image #445 (2.75" x 4.5"): "6-18-29. Joint L17 - end of suspended span. Note 3" [diameter] pin and slotted hole for expansion."; Image #446 (2.75" x 4.5"): "6-18-29. Pulling piles using Union No. 2 steam hammer, inverted, and taking a strain with 3-part falls by "Wateree"."; Image #447 (4.5" x 2.75"): "6-18-29. Ready to pull.";Three 4.5" x 2.75" B/W photos numbered 445, 446, 447
Image #448 (4.5" x 2.75"): "6-18-29. Pulling."; Image #449 (4.5" x 2.75"): "6-18-29. First pile pulled. Time required, about 15 min."; Image #450 (4.5" x 2.75"): "6-18-29. West cantilever arm. Traveler at L19 on the suspended span.";Three 4.5" x 2.75" B/W photos numbered 448, 449, 450
Image #451 (4.5" x 2.75"): "6-18-29. Bow in main compression diagonal L14 U15, south truss, east cantilever arm. Measured deflection 1 9/16". Note string at lower left. See 495 and 496 for method of straightening."; Image #553 (4.5" x 2.75"): "7-27-29. L14 U15 after being straightened while under load in the bridge. Note straight string along lower left flange. Max variation is now 7/16" at lower end only. Remainder straight."; Image #452 (4.5" x 2.75"): "6-19-29. West cantilever (far side) to L21 and east arm (top) to L17 with hangers at U18 L18.";Three 4.5" x 2.75" B/W photos numbered 451, 453, 553
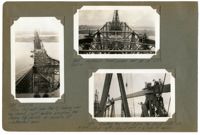
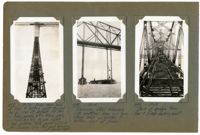
Image #453 (2.75" x 4.5"): "6-20-29. Jacking stick for spreading trusses to connect bracing, etc."; Image #454 (2.75" x 4.5"): "6-19-29. West arm (left) to L21. East arm (right) to L17 U18. (CL [center line] of span is at 22)."; Image #455 (2.75" x 4.5"): "6-19-29. Dummy jacking chord U17 U18 containing 500 ton jack for cantilevering suspended span."; Image #456 (2.75" x 4.5"): "6-19-29. Driving 10" [diameter] jacking pin in dummy jacking chord U17 U18.";Four 4.5" x 2.75" B/W photos numbered 453, 454, 455, 456
Image #457 (4.5" x 2.75"): "6-19-29. Eye-bar hangers U17 L17 at end of cantilever arm, supporting the suspended span."; Image #458 (4.5" x 2.75"): "6-19-29. Jacking diaphragm for 500 ton hydraulic jack in dummy chord U17 U18. Pin carryin [sic] eye-bar hangers is just beyond."; Image #459 (4.5" x 2.75"): "6-19-29. 500-Ton hydraulic jack in place and connected with pump. Saddle casting (foreground) bears on 10" [diameter] jacking pin shown in 456. Drake - Varga.";Three 4.5" x 2.75" B/W photos numbered 457, 458, 459
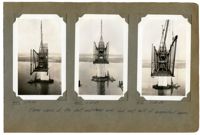
Image #460 (4.5" x 2.75"): "6-19-29."; Image #461 (4.5" x 2.75"): "6-20-29."; Image #462 (4.5" x 2.75"): "6-20-29."; "Three views of the west cantilever arm and west half of suspended span.";Three 4.5" x 2.75" B/W photos numbered 460, 461, 462
Image #463 (2.75" x 4.5"): "6-19-29. Progress."; Image #464 (2.75" x 4.5"): "6-19-29. Cantilevering the suspended span from each side."; Image #465 (2.75" x 4.5"): "6-19-29. Navy oil tanker passing under the Cooper River Span."; Image #466 (2.75" x 4.5"): "6-20-29. Looking east from north side of bridge. Anchor Pier 7 at right.";Four 4.5" x 2.75" B/W photos numbered 463, 464, 465, 466
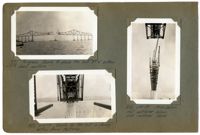
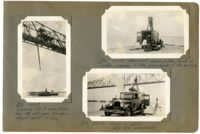
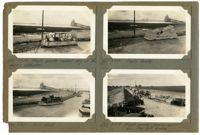
Image #467 (2.75" x 4.5"): "6-20-29. E.L.D.'s favorite view. See also Nos. 174, 364, 444, 494, 554, and 571."; Image #468 (2.75" x 4.5"): "6-20-29. Progress."; Image #469 (2.75" x 4.5"): "6-20-29. Deck of west cantilever arm. G.R. Bullard, H.J. Stetina."; Image #470 (2.75" x 4.5"): "6-21-29. Looking down on anchorage lighter for mooring other lighters. Four anchors controlled by steam hoist.";Four 4.5" x 2.75" B/W photos numbered 467, 468, 469, 470
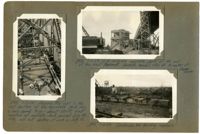
Image #471 (2.75" x 4.5"): "Progress. Ready to place the last 87 1/6" bottom chord section."; Image #472 (2.75" x 4.5"): "6-21-29. Ready for the last or closing bottom chord sections."; Image #473 (4.5" x 2.75"): "6-21-29. From below. West cantilever, below. East cantilever, above.";Three 4.5" x 2.75" B/W photos numbered 471, 472, 473
Image #474 (4.5" x 2.75"): "6-21-29. Erecting the last bottom chord section L19' L21', north truss, east half of suspended span."; Image #475 (2.75" x 4.5"): "6-21-29. Connecting the closing bottom chord at L21'."; Image #476 (2.75" x 4.5"): "6-21-29. Closing B.C. joint L21'. Note 6" [diameter] pin and slotted hole with 7" movement for adjustment, temperature, etc.";Three 4.5" x 2.75" B/W photos numbered 474, 475, 476
Image #477 (2.75" x 4.5"): "6-21-29. U22 L22 = CL [center line] of span. Closing bottom chord, north truss, in place."; Image #478 (2.75" x 4.5"): "6-21-29. Progress."; Image #479 (2.75" x 4.5"): "6-22-29. Driving pin in L21 - East (See 476). This pin was later removed so that no shear could be transferred between the two cantilevers."; Image #480 (2.75" x 4.5"): "6-22-29. Both closing bottom chords in place, and pins driven, but not yet connected to hangers. See 482.";Four 4.5" x 2.75" B/W photos numbered 477, 478, 479, 480
Image #481 (4.5" x 2.75"): "6-22-29. Stairs from L16 to U17, east side only."; Image #482 (2.75" x 4.5"): "6-22-29. Closing chord L19 L21 east with pin driven at L21. Note how chord is arched and still not connected to hanger at L20. (Gap = 6")."; Image #483 (2.75" x 4.5"): "6-24-29. Same as above, after jacking near side down 6 1/8" and far side up 11 13/16", making total vertical movement at pin of 17 15/16". Note hanger being connected - chord is now straight.";Three 4.5" x 2.75" B/W photos numbered 481, 482, 483
Image #484 (2.75" x 4.5"): "6-25-29. Progress. Last verticals, U21 L21, east, have been erected. (Looking north)."; Image #485 (2.75" x 4.5"): "6-27-29. (Looking south). Showing complete suspended span (note portal bracing b'tn. end posts) cantilevered from ends of cantilever arms (which also have portal bracing between last diagonals L16 U17)."; Image #486 (2.75" x 4.5"): "6-27-29. Progress. All truss members in place.";Three 4.5" x 2.75" B/W photos numbered 484, 485, 486
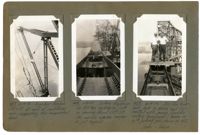
Image #487 (4.5" x 2.75"): "6-27-29. From U10 east (over Pier9) looking over top chord, just before erecting the closing top chords at middle of suspended span."; Image #490 (2.75" x 4.5"): "6-27-29. Hydraulic hand pumps set up at U17."; Image #491 (2.75" x 4.5"): "Erecting the first closing top chord U20' U22. U20 at right. U22, at left, = CL [center line] 1050ft. span.";Three 4.5" x 2.75" B/W photos numbered 487, 490, 491
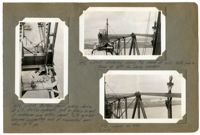
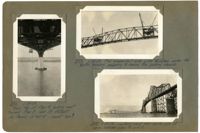
Image #488 (4.5" x 2.75"): "6-27-29. Bottom chord jacking device at L17. 500-Ton hydraulic jack in place in end of cantilever arm bottom chord. Note eye-bar hangers supporting end of suspended span thru 10" [diameter] pin."; Image #492 (2.75" x 4.5"): "6-27-29. Entering closing top chord at U22. Note gap in truss at left for closing member."; Image #493 (2.75" x 4.5"): "6-27-29. Same as 492.";Three 4.5" x 2.75" B/W photos numbered 488, 492, 493
Image #494 (2.75" x 4.5"): "6-28-29. Connected."; Image #495 (2.75" x 4.5"): "6-28-29. See 451. Jacking stick and 1 1/4" [diameter] steel 'hog-rodding' cables used to straighten L14 U15, at left. No strain from jacking on member at right."; Image #496 (4.5" x 2.75"): "6-28-29. Another view of L14 U15 with jacking device attached. Note 1 1/2" [diameter] steamboat ratchet (lower left) to take slack out of hog-rod cables before jacking.";Three 4.5" x 2.75" B/W photos numbered 494, 495, 496
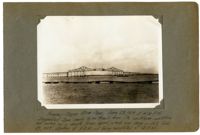
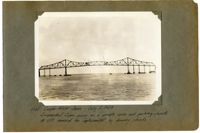
Unnumbered Image (5" x 7"): "Progress - Cooper River Span, June 28, 1929 at 4:30 P.M. Suspended span ready to be freed from its cantilever condition and swung as a simple truss span, which was done on Sat., June 29, 1929, starting at 8 A.M. and being completed at 3: P.M.";One 5" x 7" B/W photo
Image #497 (4.5" x 2.75"): "6-28-29. From near base of Pier 9 looking west toward Pier 8, 1050 ft. distant. Of the 24 truss panels b't'n. these piers, (L10 to L22 to L10), 19 are visible in this picture. Note panel L22 L21 with stringers lying flat and bracing not connected."; Image #498 (4.5" x 2.75"): "6-28-29. Removing steel falsework with snatched lines run from steam hoist on lighter to bottom chord of truss."; Image #499 (4.5" x 2.75"): "6-28-29. Deck of bridge from Pier 8 (L10) - looking east.";Three 4.5" x 2.75" B/W photos numbered 497, 498, 499
Image #500 (2.75" x 4.5"): "6-28-29. The cooper River Cantilever as seen from the Drum Island Viaduct, looking east."; Image #501 (2.75" x 4.5"): "6-29-29. Omohundro (Oak), D.V. Lewis, Stevenson "Rube" Toms, Drake."; Image #502 (2.75" x 4.5"): "6-29-29. Swinging the suspended span. Fitting up bott. chord joints at L21 east."; Image #503 (2.75" x 4.5"): "6-29-29. Swinging the suspended span. Connecting and fitting up closing top chord joints at U22.";Four 4.5" x 2.75" B/W photos numbered 500, 501, 502, 503
Image #506 (4.5" x 2.75"): "6-30-29. From top of Pier 9, looking west toward Pier 8, 1050 ft. distant. 24 Panels at 43'-9" - count 'em!"; Image #507 (2.75" x 4.5"): "6-30-29. The suspended span with travelers under the portal bracing, preparing to remove the jacking chords."; Image #508 (2.75" x 4.5"): "6-30-29. Looking west from south side of span, between piers 10 and 11.";Three 4.5" x 2.75" B/W photos numbered 506, 507, 508
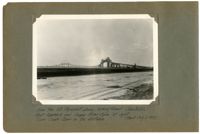
Unnumbered Image (5" x 7"): "1050' Cooper River Span - July 2, 1929. Suspended span swung as a simple span and jacking chords at U17 removed for replacement by dummy chords.";One 5" x 7" B/W photo
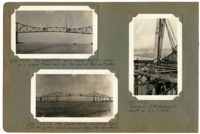
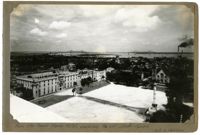
Unnumbered Image (5" x 7"): "From the Mt. Pleasant shore, looking toward Charleston, East Approach and Cooper River Span at right. Town Creek Span in the distance. (About July 2, 1929).";One 5" x 7" B/W photo
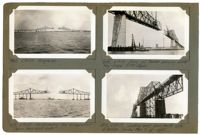
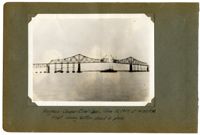
Image #510 (2.75" x 4.5"): "6-30-29. The completed Cooper River Span. Travelers and falsework not yet removed."; Image #511 (2.75" x 4.5"): "7-2-29. Removing the temporary jacking chords at U17."; Image #512 (2.75" x 4.5"): "7-1-29. The jacking chords at U17 removed."; Image #513 (2.75" x 4.5"): "7-2-29. The suspended span hanging free. Jacking chords at U17 removed.";Four 4.5" x 2.75" B/W photos numbered 510, 511, 512, 513
Image #514 (2.75" x 4.5"): "7-2-29. The suspended span hanging free and acting as a simple truss span on the end of the cantilevers."; Image #515 (2.75" x 4.5"): "7-2-29. The Cooper River Cantilever span with the jacking chords removed from the top chord."; Image #517 (4.5" x 2.75"): "7-4-29. Scene of R.H. McKnight's death on July 3, 1929.";Three 4.5" x 2.75" B/W photos numbered 514, 515, 517
Image #518 (4.5" x 2.75"): "7-4-29."; Image #519 (4.5" x 2.75"): "7-4-29."; Image #520 (4.5" x 2.75"): "7-4-29."; "Three views showing conditions at time of R.H. McKnight's death. He was knocked from the top chord of the suspended span and fell to the deck below, July 3, 1929 at 10:45 A.M.";Three 4.5" x 2.75" B/W photos numbered 518, 519, 520
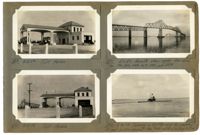
Image #516 (2.75" x 4.5"): "7-4-29. Another view of top chord at time of McKnight's death."; Image #522 (2.75" x 4.5"): "7-8-29. View from top of water tank on Meeting St. near the West Approach. Town Creek span in foreground partly hiding the Cooper River span."; Image #523 (2.75" x 4.5"): "7-9-29. Falsework struts and bracing ready to be cut up into short lengths of scrap. See 579."; Image #524 (2.75" x 4.5"): "7-9-29. Boat U1010 in drydock. Cap't. T.W. Murphy.";Four 4.5" x 2.75" B/W photos numbered 516, 522, 523, 524
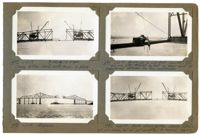
Image #525 (4.5" x 2.75"): "7-9-29. View of truss members over one of the main bearing piers, No. 8 - depth of truss 130 ft. center to center of chords."; Image #526 (4.5" x 2.75"): "7-9-29. From Pier 11 looking toward anchor pier 10 - deck truss span 10 at left. Timber stair tower at Pier 10, 110 ft. high, unsupported for 70 ft. up to bott. chord of deck span."; Image #527 (4.5" x 2.75"): "7-8-29. Removing steel falsework columns under anchor arm.";Three 4.5" x 2.75" B/W photos numbered 525, 526, 527
Image #528 (2.75" x 4.5"): "7-9-29. Another view of the jacking device used to straighten the diagonal L14 U15. See also 495 & 496."; Image #529 (2.75" x 4.5"): "7-9-29. Removing timber forms from beneath the concrete deck on the deck truss spans."; Image #530 (4.5" x 2.75"): "7-8-29. 150 FP [foot pounds] Gas. hoisting engine, weighing 31 tons, on Traveler B, hoisted up and ready to be lowered to the bridge deck.";Three 4.5" x 2.75" B/W photos numbered 528, 529, 530
Image #531 (4.5" x 2.75'): "7-9-29. Lowering the first main engine from the deck of the Cooper River Span to a lighter below. Weight of engine 31 tons, plus rigging. Two sets wire cable falls of 5 parts each, leading off of the two top drums. Clutch out, frictions in, and lowered by foot brakes. Engine running to allow use of clutch if necessary."; Image #532 (2.75" x 4.5"): "7-9-29. Same as 531. Note horizontal leads of cable falls, thru snatch blocks, instead of straight up off of drums."; Image #533 (2.75" x 4.5"): "7-11-29. Removing rigging, riveting, laying forms, pouring concrete deck, & painting overhead - all at once!";Three 4.5" x 2.75" B/W photos numbered 531, 532, 533
Image #534 (2.75" x 4.5"): "7-13-29. Method of pouring concrete deck. Track elevated on timber horses which are removed after concrete is poured."; Image #535 (2.75" x 4.5"): "7-13-29. Riveting steel deck beams - just ahead of the formwork carpenters."; Image #536 (4.5" x 2.75"): "7-13-29. J.H. Reynolds. W.E. Reynolds. Winston.";Three 4.5" x 2.75" B/W photos numbered 534, 535, 536
Image #539 (4.5" x 2.75"): "7-15-29. Lowering 100 ft. main boom from the last span traveler. Weight about 11 tons."; Image #540 (2.75" x 4.5"): "7-16-29. Paramount sound-picture truck on a lighter, preparing to take sound-movies of the bridge."; Image #541 (2.75" x 4.5"): "7-16-29. Same as above. Note the microphone.";Three 4.5" x 2.75" B/W photos numbered 539, 540, 541
Image #542 (4.5" x 2.75"): "7-17-29. Pouring the next to the last section of the concrete deck. Only 3 more panels to go - about 131 ft. Last section of concrete deck poured July 20, 1929, and last section of curb on July21."; Image #543 (2.75" x 4.5"): "7-21-29. C.E. Hillyers' concrete plant at the end of the West Approach. Concrete hauled 6700 ft. to center of Cooper River."; Image #544 (2.75" x 4.5"): "7-21-29. Reinforcing bar bending machine.";Three 4.5" x 2.75" B/W photos numbered 542, 543, 544
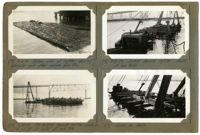
Image #546 (4.5" x 2.75"): "7-22-29. Pulling our first pile using A-frame from one of the Span Travelers, and 150 FP [foot pounds] gas. hoist. Nine (9) part falls. Pile pulled easily at 35 tons - only 20 ft. penetration and bearing on marl. Some piles broke or cut in two under 85 to 90 ton pull."; Image #547 (2.75" x 4.5"): "7-22-29. General view of pile-pulling derrick. Timber lighter 30' x 110' x 8' +/- deep."; Image #548 (2.75" x 4.5"): "7-23-29. Method of handling piles and loading on lighters after they had been pulled.";Three 4.5" x 2.75" B/W photos numbered 546, 547, 548
Image #549 (2.75" x 4.5"): "7-23-29. 12 x 12 Timber caps and blocking removed from the falsework bents."; Image #550 (4.5" x 2.75"): "7-25-29. Sling used for pulling piles - six parts of 1 1/4" [diameter] wire cable with overhauling ball at lower end. Photo shows sling just placed around pile, before taking any strain."; Image #522 (2.75" x 4.5"): "7-25-29. Office force and timekeepers. E. Neufer, E.L.D., W.R. Drake, Roberts, Bacot, D.W. Graham, Frank.";Three 4.5" x 2.75" B/W photos numbered 549, 550, 552
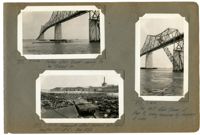
Image #551 (4.5" x 2.75"): "7-25-29. Sling after starting to take a strain on it. Overhauling ball prevents the end from pulling out of the half hitch. This sling will cut a cypress pile in two under 80 to 90 tons pull."; Image #554 (2.75" x 4.5"): "8-1-29. One of the most unique of bridge pictures."; Image #560 (2.75" x 4.5"): "Another view as above, further back.";Three 4.5" x 2.75" B/W photos numbered 551, 554, 560
Image #557 (2.75" x 4.5"): "8-1-29. Entrance to Cooper River Span."; Image #558 (2.75" x 4.5"): "8-1-29. At the center of the Cooper River Span."; Image #559 (4.5" x 2.75"): "8-2-29. W.E. Omohundro ("Oaks") Superintendent on the Cooper River Bridge.";Three 4.5" x 2.75" B/W photos numbered 557, 558, 559
Image #561 (2.75" x 4.5"): "8-8-29. Four-masted Belgian Training ship lying at P.U.C. Dock. Masts 185 ft. high."; Image #562 (2.75" x 4.5"): "8-8-29. The opening day. First cars going east, coming from Charleston."; Image #562 (2.75" x 4.5"): "8-8-29. Free traffic till 4:00 P.M.! Cars now traveling in both directions."; Image #564 (2.75" x 4.5"): "8-9-29. Camera man ready to take movies of the floats parade - 2nd day of bridge opening.";Four 4.5" x 2.75" B/W photos numbered 561, 562, 562, 564
Image #565 (2.75" x 4.5"): "8-9-29. Floats parade - second day of the opening celebration."; Image #566 (2.75" x 4.5"): "8-9-29. P.U.C. float."; Image #567 (2.75" x 4.5"): "8-9-29. Floats parade."; Image #568 (2.75" x 4.5"): "8-9-29. Floats parade - looking east from the toll house.";Four 4.5" x 2.75" B/W photos numbered 565, 566, 567, 568
Image #569 (2.75" x 4.5"): "8-12-29. Toll House."; Image #570 (2.75" x 4.5"): "8-12-29. Toll House."; Image #571 (2.75" x 4.5"): "E.L.D.'s favorite view again. See also Nos. 174, 364, 444, 467, 494, and 554."; Image #572 (2.75" x 4.5"): "8-16-29. Turning a lighter over by sinking it and pulling against the tide with a rolling hitch.";Four 4.5" x 2.75" B/W photos numbered 569, 570, 571, 572
Image #573 (2.75" x 4.5"): "8-16-29. Bottom side of lighter, showing barnacles and other marine growths."; Image #574 (2.75" x 4.5"): "8-20-29. Pile-pulling derrick lighter sunk in 12 to 15 ft. of water at high tide."; Image #575 (2.75" x 4.5"): "8-20-29. Sunken derrick lighter. Photo at low tide."; Image #576 (2.75" x 4.5"): "Same as above.";Four 4.5" x 2.75" B/W photos numbered 573, 574, 575, 576
Image #577 (2.75" x 4.5"): "8-29-29. Fallen stair tower - ready to be towed in."; Image #578 (4.5" x 2.75"): "8-29-29. The last stair tower, at Pier 7, being removed by tipping it over."; Image #579 (2.75" x 4.5"): "8-29-29. Falsework steel burned into scrap lengths 20" x 5'-0". See 523.";Three 4.5" x 2.75" B/W photos numbered 577, 578, 579