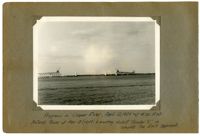
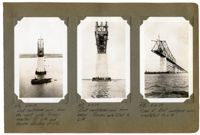
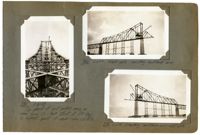
Unnumbered Image (5" x 7"): "Progress in Cooper River, April 26, 1929 at 4:30 P.M. material tower at Pier 13 (right) is erecting viaduct traveler 'C' to complete the east Approach.";One 5" x 7" B/W photo
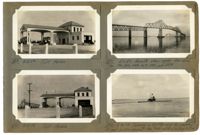
Image #569 (2.75" x 4.5"): "8-12-29. Toll House."; Image #570 (2.75" x 4.5"): "8-12-29. Toll House."; Image #571 (2.75" x 4.5"): "E.L.D.'s favorite view again. See also Nos. 174, 364, 444, 467, 494, and 554."; Image #572 (2.75" x 4.5"): "8-16-29. Turning a lighter over by sinking it and pulling against the tide with a rolling hitch.";Four 4.5" x 2.75" B/W photos numbered 569, 570, 571, 572
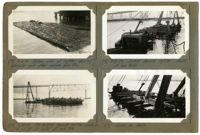
Image #573 (2.75" x 4.5"): "8-16-29. Bottom side of lighter, showing barnacles and other marine growths."; Image #574 (2.75" x 4.5"): "8-20-29. Pile-pulling derrick lighter sunk in 12 to 15 ft. of water at high tide."; Image #575 (2.75" x 4.5"): "8-20-29. Sunken derrick lighter. Photo at low tide."; Image #576 (2.75" x 4.5"): "Same as above.";Four 4.5" x 2.75" B/W photos numbered 573, 574, 575, 576
Image #577 (2.75" x 4.5"): "8-29-29. Fallen stair tower - ready to be towed in."; Image #578 (4.5" x 2.75"): "8-29-29. The last stair tower, at Pier 7, being removed by tipping it over."; Image #579 (2.75" x 4.5"): "8-29-29. Falsework steel burned into scrap lengths 20" x 5'-0". See 523.";Three 4.5" x 2.75" B/W photos numbered 577, 578, 579
Image #565 (2.75" x 4.5"): "8-9-29. Floats parade - second day of the opening celebration."; Image #566 (2.75" x 4.5"): "8-9-29. P.U.C. float."; Image #567 (2.75" x 4.5"): "8-9-29. Floats parade."; Image #568 (2.75" x 4.5"): "8-9-29. Floats parade - looking east from the toll house.";Four 4.5" x 2.75" B/W photos numbered 565, 566, 567, 568
Image #405 (2.75" x 4.5"): "6-7-29. Erecting stringers - east cantilever."; Image #406 (2.75" x 4.5"): "6-8-29. Crane 19. 40 Ton capacity. Working weight about 100 tons."; Image #407 (2.75" x 4.5"): "6-8-29. Dummies made up to throw off of top of span as practice drill for life savers."; Image #409 (2.75" x 4.5"): "6-8-29. Town Creek Span with advertising sign 13' x 30' in place at center.";Four 4.5" x 2.75" B/W photos numbered 405, 406, 407, 409
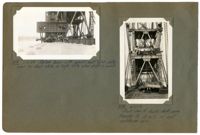
Image #397 (4.5" x 2.75"): "6-6-29. Main boom - span Traveler. 100 ft. long c. to c. pins. Taken from near heel looking up towards tip at U12."; Image #403 (2.75" x 4.5"): "6-6-29. Setting reinforcing steel - east approach."; Image #404 (2.75" x 4.5"): "6-6-29. 4 Ton Gas. Locomotive & dump cars for pouring concrete deck, east approach & causeway.";Three 4.5" x 2.75" B/W photos numbered 397, 403, 404
Image #395 (2.75" x 4.5"): "6-6-29. Heel of main boom - upper deck of Span Traveler."; Image #398 (4.5" x 2.75"): "6-6-29. West cantilever arm, from Pier 9. U12 L12 at right."; Image #401 (2.75" x 4.5"): "6-6-29. Looking west from end of the east causeway. Town Creek Span (left) is nearly 1 3/4 miles away.";Three 4.5" x 2.75" B/W photos numbered 395, 398, 401
Image #414 (2.75" x 4.5"): "6-10-29. Balance beam with special bent hitch plates used for short hitch on high lifts wher [sic] drift is small."; Image #415 (4.5" x 2.75"): "6-11-29. Front view of double-deck span traveler A at L12 on east cantilever arm.";Two 4.5" x 2.75" B/W photos numbered 414, 415
Image #416 (4.5" x 2.75"): "6-11-29. East cantilever arm, from the west side. Trusses erected to L14 and traveler standing at L12."; Image #417 (4.5" x 2.75"): "6-11-29. East cantilever arm from below. Trusses are erected to L14."; Image #418 (4.5" x 2.75"): "6-11-29. View of East cantilever arm, completed to L14.";Three 4.5" x 2.75" B/W photos numbered 416, 417, 418
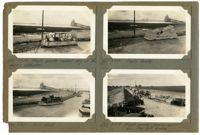
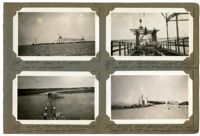
Image #247 (2.75" x 4.5"): "4-24-29. Spans 10, 11, and 12. Span 10 under erection."; Image #252 (2.75" x 4.5"): "4-24-29. From Span 1E, looking east. Hydraulic fill causeway in distance."; Image #251 (2.75" x 4.5"): "4-24-29. re-erecting viaduct traveler on Span 1E, at Pier 13, to complete East Approach."; Image #253 (2.75" x 4.5"): "4-24-29. East abutment - looking west. Spans 21E to 13E have been erected by C.E. Hillyer.";Four 4.5" x 2.75" B/W photos numbered 247, 251, 252, 253
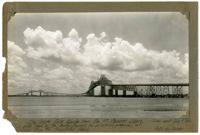
Unnumbered Image (5" x 7"): "From the Mt. Pleasant shore, looking toward Charleston, East Approach and Cooper River Span at right. Town Creek Span in the distance. (About July 2, 1929).";One 5" x 7" B/W photo
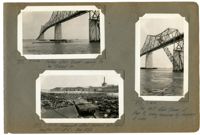
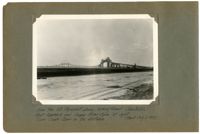
Unnumbered Image (5" x 7"): "1050' Cooper River Span - July 2, 1929. Suspended span swung as a simple span and jacking chords at U17 removed for replacement by dummy chords.";One 5" x 7" B/W photo
Image #381 (4.5" x 2.75"): "5-31-29. Top chord of east anchor arm, as seen from U1. Peak strut at U10 (top) is highest point of span - elev. 280 ft."; Image #385 (2.75" x 4.5"): "6-1-29. West side - erecting cantilever arm."; Image #386 (2.75" x 4.5"): "6-1-29. Erecting cantilever arm - east side.";Three 4.5" x 2.75" B/W photos numbered 381, 385, 386
Image #387 (2.75" x 4.5"): "Progress 6-1-29"; Image #388 (2.75" x 4.5"): "6-3-29. E.L.D. at U10, watching erection of top chord U10 U12, east side. (See 390 & 391)."; Image #389 (4.5" x 2.75"): "6-2-29. Starting erection of east cantilever arm.";Three 4.5" x 2.75" B/W photos numbered 387, 388, 389
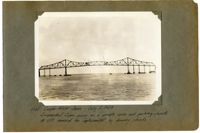
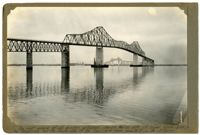
Unnumbered Image (5" x 7"): "The Cooper River Bridge from the Mt. Pleasant Shore. This photo taken by the Bridge Company for advertising purposes, and published thru the Associated Press. (Taken about July 7, '29.) Photo by Jacobs.";One 5" x 7" B/W photo
Unnumbered Image (5" x 7"): "The most unique of all bridge pictures, showing North side of Cooper River Span, in the foreground, and the South side of the Town Creek Span, beneath it, in the distance.";One 5" x 7" B/W photo
Image #377 (2.75" x 4.5"): "5-29-29. West side. First truss members erected in cantilever arm."; Image #378 (2.75" x 4.5"): "5-29-29. East anchor arm complete. Traveler at L9."; Image #379 (2.75" x 4.5"): "5-31-29. Traveler at L9 erecting peak strut at U10. Then moves back 15 ft. to allow boom to "duck" under strut and move forward.. Not drift."; Image #380 (2.75" x 4.5"): "5-31-29. Peak strut at U10 east side, as shown in 379.";Four 4.5" x 2.75" B/W photos numbered 377, 378, 379, 380
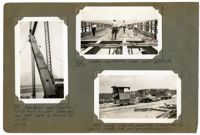
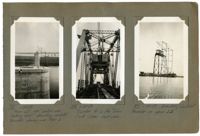
Image #153 (2.75" x 4.5"): "3-13-29. One more panel to be erected."; Image #154 (2.75" x 4.5"): "3-13-29. Ready to erect the first closing bottom chord."; Image #155 (2.75" x 4.5"): "3-13-29. Erecting the closing bottom chord - south truss - Town Creek Span."; Image #158 (2.75" x 4.5"): "3-13-29. Erecting the closing bottom chord - north truss - Town Creek Span.";Three 4.5" x 2.75" B/W photos numbered 153, 154, 155, 158
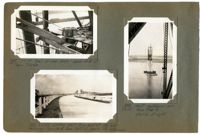
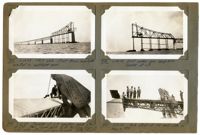
Image #52 (4.5" x 2.75"): "1-20-29. From L6, west anchor arm, looking east. Erecting viaduct traveler showing over Pier 3."; Image #53 (4.5" x 2.75"): "1-20-29. Traveler A on the Town Creek Span - rear view."; Image #57 (4.5" x 2.75"): "1-20-29. Erecting viaduct traveler on span 1D.";Three 4.5" x 2.75" B/W photos numbered 52, 53, 57