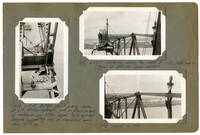
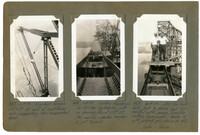
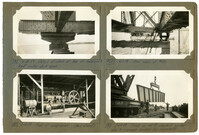
Image #488 (4.5" x 2.75"): "6-27-29. Bottom chord jacking device at L17. 500-Ton hydraulic jack in place in end of cantilever arm bottom chord. Note eye-bar hangers supporting end of suspended span thru 10" [diameter] pin."; Image #492 (2.75" x 4.5"): "6-27-29. Entering closing top chord at U22. Note gap in truss at left for closing member."; Image #493 (2.75" x 4.5"): "6-27-29. Same as 492.";Three 4.5" x 2.75" B/W photos numbered 488, 492, 493
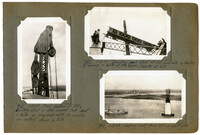
Image #382 (2.75" x 4.5"): "5-31-29. Erecting peak strut at U10 west side, by hauling it around in the back of the boom. Traveler at L10."; Image #383 (4.5" x 2.75"): "5-31-29. Final position of 382. Erecting strut in this manner took about 2 hours as compared with 10 minutes for method shown in 379."; Image #384 (2.75" x 4.5"): "5-31-29. Looking west from U10 on east side.";Three 4.5" x 2.75" B/W photos numbered 382, 383, 384
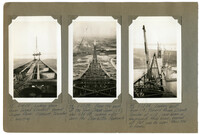
Image #95 (2.75" x 4.5"): "2-15-29. Looking down Drum Island Viaduct toward Cooper River. Viaduct Traveler C erecting."; Image #98 (2.75" x 4.5"): "2-22-29. From the peak of the Town Creek Span (U8), elev. 235 ft. looking west down the Charleston Approach."; Image #99 (2.75" x 4.5"): "2-22-29. Looking east from U8, toward Drum Island Traveler at L13, rear boom in foreground. Main boom, boomed out flat, can be seen thru the A-frame.";Three 4.5" x 2.75" B/W photos numbered 95, 98, 99
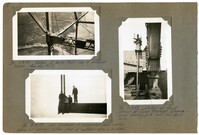
Image #86 (2.75" x 4.5"): "Detail at boom heel - top of material tower. (See also #67)."; Image #93 (2.75" x 4.5"): "2-14-29. End floorbeam of suspended span erected before last (dummy) bottom chord of cantilever arm is in place."; Image #94 (2.75" x 4.5"): "2-14-29. Detail at front corner of Span Traveler, showing screw bearing jack and tie-down-rods.";Three 4.5" x 2.75" B/W photos numbered 96, 93, 94
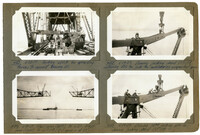
Image #457 (4.5" x 2.75"): "6-19-29. Eye-bar hangers U17 L17 at end of cantilever arm, supporting the suspended span."; Image #458 (4.5" x 2.75"): "6-19-29. Jacking diaphragm for 500 ton hydraulic jack in dummy chord U17 U18. Pin carryin [sic] eye-bar hangers is just beyond."; Image #459 (4.5" x 2.75"): "6-19-29. 500-Ton hydraulic jack in place and connected with pump. Saddle casting (foreground) bears on 10" [diameter] jacking pin shown in 456. Drake - Varga.";Three 4.5" x 2.75" B/W photos numbered 457, 458, 459
Image #453 (2.75" x 4.5"): "6-20-29. Jacking stick for spreading trusses to connect bracing, etc."; Image #454 (2.75" x 4.5"): "6-19-29. West arm (left) to L21. East arm (right) to L17 U18. (CL [center line] of span is at 22)."; Image #455 (2.75" x 4.5"): "6-19-29. Dummy jacking chord U17 U18 containing 500 ton jack for cantilevering suspended span."; Image #456 (2.75" x 4.5"): "6-19-29. Driving 10" [diameter] jacking pin in dummy jacking chord U17 U18.";Four 4.5" x 2.75" B/W photos numbered 453, 454, 455, 456
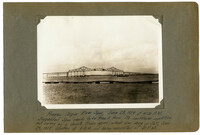
Unnumbered Image (5" x 7"): "Progress - Cooper River Span, June 28, 1929 at 4:30 P.M. Suspended span ready to be freed from its cantilever condition and swung as a simple truss span, which was done on Sat., June 29, 1929, starting at 8 A.M. and being completed at 3: P.M.";One 5" x 7" B/W photo
Image #181 (2.75" x 4.5"): "3-20-29. Detail of shoe at top of falsework bent under deck span."; Image #182 (2.75" x 4.5"): "3-17-29. Fuel oil compressor - (semi-diesel)."; Image #201 (2.75" x 4.5"): "4-1-29. End View of #181."; Image #183 (2.75" x 4.5"): "3-20-29. Twist in 40 ft. viaduct girder due to improper loading for shipment.";Four 4.5" x 2.75" B/W photos numbered 181, 182, 183, 201
Image #4 (4.5" x 2.75"): "11-15-28. High Boom! Minimum reach with main falls is about 5 ft. Note the slack backstays. Weight of traveler complete = 122 tons, including 31 ton; 150 HP gas. engine on the upper deck and 60 HP aux. gas hoist on platform below."; Unnumbered Image (5" x 7"): "Span traveler A erecting on the Charleston or West Approach. Rear boom of traveler not yet erected.";One 4.5" x 2.75" B/W photo and one 5" x 7" B/W photo. Smaller photo numbered 4.
Limit your search
Photographic Record of the Cooper River Bridge✖[remove]202