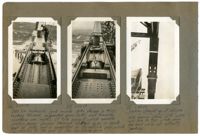
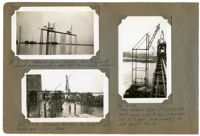
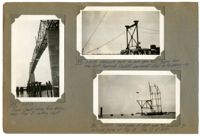
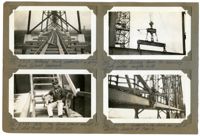
Image #106 (4.5" x 2.75"): "2-22-29"; Image #107 (4.5" x 2.75"): "2-22-29"; Caption under images 106 & 107: "350 Ton hydraulic jack inside links shown in #105. Looking towards suspended span (left) and towards cantilever arm (right). 10 " [diameter] Pin against which saddle casting bears passes through slotted holes in inside pair of links and its supported by the outside pair, which is riveted to the end of the cantilever arm. Note bearing shims with notch and hole in top, which carry the load while not actually jacking"; Image #117 (4.5" x 2.75"): "2-24-29. Looking straight up at U13 U14.";Three 4.5" x 2.75" B/W photos numbered 106, 107, 117
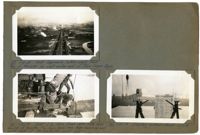
Image #44 (4.5" x 2.75"): "1-13-29. Span Traveler A entering the west anchor arm, Town Creek Span. Blocking up to change from gauge of 19' 6", as used on viaduct, to 18' 0", the gauge of truss span stringers. Trusses 24' 0" c. to c."; Image #45 (4.5" x 2.75"): "1-13-29. Front view of #44."; Image #46 (4.5" x 2.75"): "1-13-29. Looking east across Town Creek at Piers 2 & 3. Material tower 130 ft. high is opposite Pier 4. Piers 5, 6, 7 and 8, in Cooper River, in the distance.";Three 4.5" x 2.75" B/W photos numbered 44, 45, 46
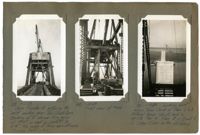
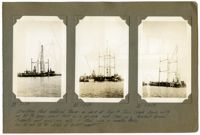
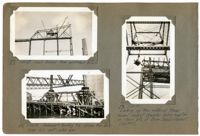
Image #90 (4.5" x 2.75"): "2-13-29. Erecting assembly shown in #89, completing end of cantilever arm except for dummy bottom chords L12 L13."; Image #91 (2.75" x 4.5"): "2-13-29. West side - Town Creek Span. Removing steel falsework bent #1 under anchor arm."; Image #92 (2.75" x 4.5"): "2-14-29. Joint and floorbeam at L13 ( = Lo joint of suspended span. See #93).";Three 4.5" x 2.75" B/W photos numbered 90, 91, 92
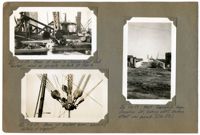
Image #38 (4.5" x 2.75"): "1-10-29."; Image #42 (4.5" x 2.75"): "1-13-29"; Caption under photos 38 & 42: "Timber Stair Tower, 12' x 16' in plan, and 110 ft. high. Eleven flights of stairs, each 10 ft. rise, of 12 steps each. Set up at bent 3W and braced to same at the 3rd points."; Image #43 (4.5" x 2.75"): "1-13-29"; Looking east toward Town Creek from Stair Tower. Material tower at Pier 4, on west bank of Drum Island, in the distance.";Three 4.5" x 2.75" B/W photos numbered 38, 42, 43
Image #83 (2.75" x 4.5"): "2-7-29. Material Tower erecting Span Traveler B. Viaduct traveler erecting Span 5D - Drum Island Viaduct."; Image #84 (2.75" x 4.5"): "2-7-29. Falsework footings Nos. 4 and 5, east anchor arm - Town Creek."; Image #85 (4.5" x 2.75"): "2-7-29. Steel material Tower F067 & F0187. 40 ft. square x 130 ft. high to boom heels. Two 70 ft. boom (30 ton capacity). On dock opposite Pier 4";Three 4.5" x 2.75" B/W photos numbered 83, 84, 85
Image #37 (2.75" x 4.5"): "1-10-29. West Approach, looking west. From top of traveler on west anchor arm of Town Creek Span."; Image #41 (2.75" x 4.5"): "1-10-29. Joint L2, Town Creek Span. Note front bearing of traveler. Tie down rods have been removed and cable used at this particular point only."; Image #40 (2.75" x 4.5"): "1-10-29. Erecting bottom chord L2L4.";Three 4.5" x 2.75" B/W photos numbered 37, 40, 41
Image #29 (4.5" x 2.75"): "1-1-29."; Image #30 (4.5" x 2.75"): "1-3-29." ; Image #31 (4.5" x 2.75"): "1-3-29." Caption under all pictures: "Erecting steel material tower on deck at Pier 4, Town Creek Span, with an 80 ft. boom used first as a gin pole and then as a 'basket boom.' See 32 and 33 for detail of basket support.";Three 4.5" x 2.75" B/W photos numbered 29, 30, 31
Image #32 (2.75" x 4.5"): "1-1-29. Base of boom in Chicago heel and 'basket', used as gin pole on dock at Pier 4."; Image #33 (2.75" x 4.5"): "1-3-29. Base of "basket boom', showing details of support."; Image #36 (4.5" x 2.75"): "1-6-29. West Approach from America St. looking east, before street was paved. (See 271.)";Three 4.5" x 2.75" B/W photos numbered 32, 33, 36
Unnumbered Image (5" x 7"): "Same view as on preceding page, but further back, showing part of East Approach. Photos by Melcher.";One 5" x 7" B/W photo
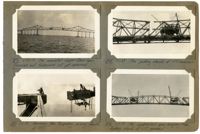
Image #167 (4.5" x 2.75"): "3-15-29. Unloading material from lighters to dock at Pier 4 with stiffleg derrick, for the Drum Island viaduct. (See #143.)"; Image #172 (2.75" x 4.5"): "3-17-29. Erecting first bent of false work for deck span 12. (70 ft. boom has been erected, on left, by 50 ft. boom on right and which has been taken down)."; Image #173 (2.75" x 4.5"): "3-17-29. Progress - from Cooper River. Traveler A removed. Drum Island Viaduct at bottom of grade.";Three 4.5" x 2.75" B/W photos numbered 167, 172, 173
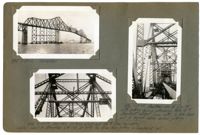
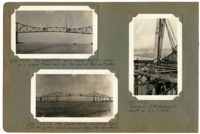
Image #166 (4.5" x 2.75"): "3-15-29. Hydraulic hand pump on top chord at U13, Town Creek Span. Capacity 8000 lbs. Per sq. in. 'Swede' Nelson and V.I. Varga."; Image #168 (2.75" x 4.5"): "3-15-29. Town Creek Span and Drum Island Viaduct from Cooper River. Viaduct is nearly at bottom of grade."; Image #169 (2.75" x 4.5"): "3-15-29. Material tower on dock at Pier 13. One boom erected and rigged. (50 ft. boom, on right).";Three 4.5" x 2.75" B/W photos numbered 166, 168, 169
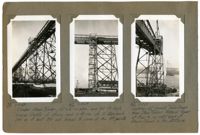
Image #178 (4.5" x 2.75"): "3-17-29. Town Creek Span, from below, near Pier 3 - looking west."; Image #179 (2.75" x 4.5"): "3-17-29. Falsework bent for deck span #12, taken from the East Approach Viaduct permanent steel for temporary use."; Image #180 (2.75" x 4.5"): "3-20-29. First panel of deck span #12 erected by material tower at Pier 13. Pier 12 at left.";Three 4.5" x 2.75" B/W photos numbered 178, 179, 180
Image #54 (2.75" x 4.5"): "1-20-29. West anchor Arm completed to L6."; Image #55 (2.75" x 4.5"): "1-20-29. Falsework footing #3 driven thru dock. Under L6, west anchor arm."; Image #58 (4.5" x 2.75"): "1-20-29. Looking up thru material tower toward viaduct traveler being erected on Span 1D, of Drum Island Viaduct. (see #57).";Three 4.5" x 2.75" B/W photos numbered 54, 55, 58
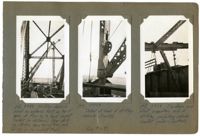
Image #494 (2.75" x 4.5"): "6-28-29. Connected."; Image #495 (2.75" x 4.5"): "6-28-29. See 451. Jacking stick and 1 1/4" [diameter] steel 'hog-rodding' cables used to straighten L14 U15, at left. No strain from jacking on member at right."; Image #496 (4.5" x 2.75"): "6-28-29. Another view of L14 U15 with jacking device attached. Note 1 1/2" [diameter] steamboat ratchet (lower left) to take slack out of hog-rod cables before jacking.";Three 4.5" x 2.75" B/W photos numbered 494, 495, 496
Image #143 (4.5" x 2.75"): "3-7-29. Stiffleg derrick used as material hoist on top of span at Pier 4, to feed viaduct traveler (in distance). Near stiffleg sticks thru truss (#146) and far leg is on viaduct (#145)."; Image #144 (4.5" x 2.75"): #3-7-29. Detail at heel of stiffleg derrick SO4383 (See #167)."; Image #145 (4.5" x 2.75"): "3-7-29. Tie-down and strut supporting end of stiffleg projecting outside viaduct girder (See #143).";Three 4.5" x 2.75" B/W photos numbered 143, 144, 145
Image #140 (2.75" x 4.5"): "3-7-29. Material truck supported on piling. Drum Island Approach."; Image #141 (2.75" x 4.5"): "3-7-29. 'Billy' the Drum Island mascot, at top of stair tower with Buckholt."; Image #142 (2.75" x 4.5"): "3-7-29. Balance beam for handling plate girders. Length 10ft."; Image #146 (2.75" x 4.5"): "3-11-29. Support & tie-down for sill of stiffleg derrick at Pier 4.";Four 4.5" x 2.75" B/W photos numbered 140, 141, 142, 146
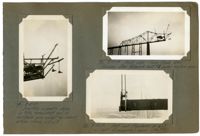
Image #514 (2.75" x 4.5"): "7-2-29. The suspended span hanging free and acting as a simple truss span on the end of the cantilevers."; Image #515 (2.75" x 4.5"): "7-2-29. The Cooper River Cantilever span with the jacking chords removed from the top chord."; Image #517 (4.5" x 2.75"): "7-4-29. Scene of R.H. McKnight's death on July 3, 1929.";Three 4.5" x 2.75" B/W photos numbered 514, 515, 517
Image #510 (2.75" x 4.5"): "6-30-29. The completed Cooper River Span. Travelers and falsework not yet removed."; Image #511 (2.75" x 4.5"): "7-2-29. Removing the temporary jacking chords at U17."; Image #512 (2.75" x 4.5"): "7-1-29. The jacking chords at U17 removed."; Image #513 (2.75" x 4.5"): "7-2-29. The suspended span hanging free. Jacking chords at U17 removed.";Four 4.5" x 2.75" B/W photos numbered 510, 511, 512, 513
Limit your search
Photographic Record of the Cooper River Bridge✖[remove]202