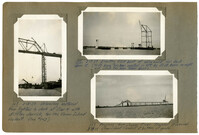
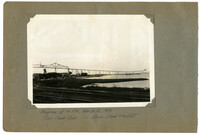
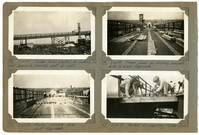
Image #167 (4.5" x 2.75"): "3-15-29. Unloading material from lighters to dock at Pier 4 with stiffleg derrick, for the Drum Island viaduct. (See #143.)"; Image #172 (2.75" x 4.5"): "3-17-29. Erecting first bent of false work for deck span 12. (70 ft. boom has been erected, on left, by 50 ft. boom on right and which has been taken down)."; Image #173 (2.75" x 4.5"): "3-17-29. Progress - from Cooper River. Traveler A removed. Drum Island Viaduct at bottom of grade.";Three 4.5" x 2.75" B/W photos numbered 167, 172, 173
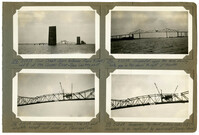
Image #174 (2.75" x 4.5"): "3-17-29. Town Creek Span between Piers 9 (left) and 8 of the Cooper River Span. Looking west."; Image #175 (2.75" x 4.5"): "3-12-29. Suspended Span swung (3-16-29) and complete except last panel of floor system."; Image #176 (2.75" x 4.5"): 3-20-29. Suspended span has been swung. Note gap in top chord to right of traveler."; Image #177 (2.75" x 4.5"): 3-20-29. Temporary top chord jacking links U13 U14 removed to be replaced by permanent 'dummy' chords.";Four 4.5" x 2.75" B/W photos numbered 174, 175, 176, 177
Image #178 (4.5" x 2.75"): "3-17-29. Town Creek Span, from below, near Pier 3 - looking west."; Image #179 (2.75" x 4.5"): "3-17-29. Falsework bent for deck span #12, taken from the East Approach Viaduct permanent steel for temporary use."; Image #180 (2.75" x 4.5"): "3-20-29. First panel of deck span #12 erected by material tower at Pier 13. Pier 12 at left.";Three 4.5" x 2.75" B/W photos numbered 178, 179, 180
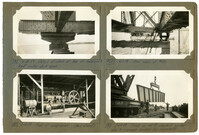
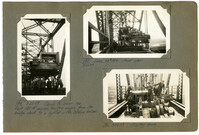
Image #181 (2.75" x 4.5"): "3-20-29. Detail of shoe at top of falsework bent under deck span."; Image #182 (2.75" x 4.5"): "3-17-29. Fuel oil compressor - (semi-diesel)."; Image #201 (2.75" x 4.5"): "4-1-29. End View of #181."; Image #183 (2.75" x 4.5"): "3-20-29. Twist in 40 ft. viaduct girder due to improper loading for shipment.";Four 4.5" x 2.75" B/W photos numbered 181, 182, 183, 201
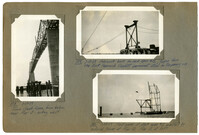
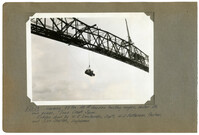
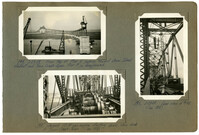
Image #184 (4.5" x 2.75"): "3-22-29. Ready to lower the first 150 HP gasoline hoisting engine from the bridge deck to a lighter in the stream below."; Image #185 (2.75" x 4.5"): "3-22-29. Same as #184 - front view."; Image #186 (2.75" x 4.5"): "3-22-29. Starting down.";Three 4.5" x 2.75" B/W photos numbered 184, 185, 186
Unnumbered Image (5" x 7"): "Lowering 33 ton, 150 HP Gasoline hoisting engine, under its own power. Town Creek Span. Ridden down by W.E. Omohundro, Sup't., W.S. Patterson, Pusher, and John Shelton, Engineman.";One 5" x 7" B/W photo
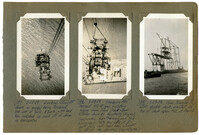
Image #187 (4.5" x 2.75"): "3-22-29. Looking straight down on engine being lowered. One set of falls, 8 parts, with lead line snatched so lead off of drum is horizontal."; Image #188 (4.5" x 2.75"): " 3-28-29. Lowering the second 150 HP gas. hoisting engine from Town Creek Span. ridden down by Dougherty (Eng'm'n.), Omohundro, Leatherman, and two bridgemen. Note two sets of 5-part falls and lead lines straight up off of the drums. (See 195 & 196)"; Image #189 (4.5" x 2.75"): "3-27-29. Span Traveler A, with double deck, erected on top of deck span #12, at Pier 13.";Three 4.5" x 2.75" B/W photos numbered 187, 188, 189
Image #190 (2.75" x 4.5"): "3-26-29. Timber forms erected for curbing, on West Approach. Concrete plant at right."; Image #191 (2.75" x 4.5"): "3-26-29. Timber forms for pouring concrete deck on West Approach."; Image #192 (2.75" x 4.5"): "3-26-29. Pouring concrete deck. West Approach."; Image #193 (2.75" x 4.5"): "3-26-29. Method of supporting timber forms.";Four 4.5" x 2.75" B/W photos numbered 190, 191, 192, 193
Image #194 (2.75" x 4.5"): "3-27-29. From top of Pier 6, looking toward Drum Island viaduct and Town Creek Span. Pier 5 in foreground."; Image #195 (2.75" x 4.5"): "Second 150 HO gas. Engine starting down thru deck of Town Creek Span. (See 188)"; Image #196 (4.5" x 2.75"): "3-28-29. rear view of #195. (See 188)";Three 4.5" x 2.75" B/W photos numbered 194, 195, 196
Limit your search
Photographic Record of the Cooper River Bridge✖[remove]202