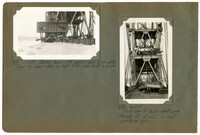
Image #573 (2.75" x 4.5"): "8-16-29. Bottom side of lighter, showing barnacles and other marine growths."; Image #574 (2.75" x 4.5"): "8-20-29. Pile-pulling derrick lighter sunk in 12 to 15 ft. of water at high tide."; Image #575 (2.75" x 4.5"): "8-20-29. Sunken derrick lighter. Photo at low tide."; Image #576 (2.75" x 4.5"): "Same as above.";Four 4.5" x 2.75" B/W photos numbered 573, 574, 575, 576
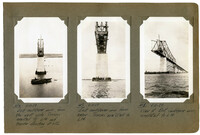
Image #577 (2.75" x 4.5"): "8-29-29. Fallen stair tower - ready to be towed in."; Image #578 (4.5" x 2.75"): "8-29-29. The last stair tower, at Pier 7, being removed by tipping it over."; Image #579 (2.75" x 4.5"): "8-29-29. Falsework steel burned into scrap lengths 20" x 5'-0". See 523.";Three 4.5" x 2.75" B/W photos numbered 577, 578, 579
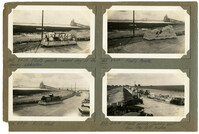
Image #565 (2.75" x 4.5"): "8-9-29. Floats parade - second day of the opening celebration."; Image #566 (2.75" x 4.5"): "8-9-29. P.U.C. float."; Image #567 (2.75" x 4.5"): "8-9-29. Floats parade."; Image #568 (2.75" x 4.5"): "8-9-29. Floats parade - looking east from the toll house.";Four 4.5" x 2.75" B/W photos numbered 565, 566, 567, 568
Image #405 (2.75" x 4.5"): "6-7-29. Erecting stringers - east cantilever."; Image #406 (2.75" x 4.5"): "6-8-29. Crane 19. 40 Ton capacity. Working weight about 100 tons."; Image #407 (2.75" x 4.5"): "6-8-29. Dummies made up to throw off of top of span as practice drill for life savers."; Image #409 (2.75" x 4.5"): "6-8-29. Town Creek Span with advertising sign 13' x 30' in place at center.";Four 4.5" x 2.75" B/W photos numbered 405, 406, 407, 409
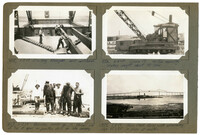
Image #397 (4.5" x 2.75"): "6-6-29. Main boom - span Traveler. 100 ft. long c. to c. pins. Taken from near heel looking up towards tip at U12."; Image #403 (2.75" x 4.5"): "6-6-29. Setting reinforcing steel - east approach."; Image #404 (2.75" x 4.5"): "6-6-29. 4 Ton Gas. Locomotive & dump cars for pouring concrete deck, east approach & causeway.";Three 4.5" x 2.75" B/W photos numbered 397, 403, 404
Image #395 (2.75" x 4.5"): "6-6-29. Heel of main boom - upper deck of Span Traveler."; Image #398 (4.5" x 2.75"): "6-6-29. West cantilever arm, from Pier 9. U12 L12 at right."; Image #401 (2.75" x 4.5"): "6-6-29. Looking west from end of the east causeway. Town Creek Span (left) is nearly 1 3/4 miles away.";Three 4.5" x 2.75" B/W photos numbered 395, 398, 401
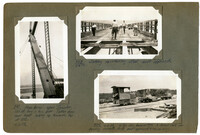
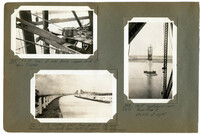
Image #414 (2.75" x 4.5"): "6-10-29. Balance beam with special bent hitch plates used for short hitch on high lifts wher [sic] drift is small."; Image #415 (4.5" x 2.75"): "6-11-29. Front view of double-deck span traveler A at L12 on east cantilever arm.";Two 4.5" x 2.75" B/W photos numbered 414, 415
Image #416 (4.5" x 2.75"): "6-11-29. East cantilever arm, from the west side. Trusses erected to L14 and traveler standing at L12."; Image #417 (4.5" x 2.75"): "6-11-29. East cantilever arm from below. Trusses are erected to L14."; Image #418 (4.5" x 2.75"): "6-11-29. View of East cantilever arm, completed to L14.";Three 4.5" x 2.75" B/W photos numbered 416, 417, 418
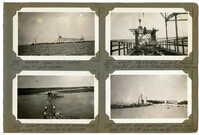
Image #247 (2.75" x 4.5"): "4-24-29. Spans 10, 11, and 12. Span 10 under erection."; Image #252 (2.75" x 4.5"): "4-24-29. From Span 1E, looking east. Hydraulic fill causeway in distance."; Image #251 (2.75" x 4.5"): "4-24-29. re-erecting viaduct traveler on Span 1E, at Pier 13, to complete East Approach."; Image #253 (2.75" x 4.5"): "4-24-29. East abutment - looking west. Spans 21E to 13E have been erected by C.E. Hillyer.";Four 4.5" x 2.75" B/W photos numbered 247, 251, 252, 253
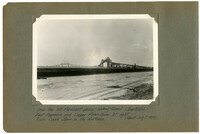
Unnumbered Image (5" x 7"): "From the Mt. Pleasant shore, looking toward Charleston, East Approach and Cooper River Span at right. Town Creek Span in the distance. (About July 2, 1929).";One 5" x 7" B/W photo
Limit your search
Photographic Record of the Cooper River Bridge✖[remove]202