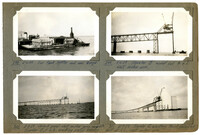
Image #298 (2.75" x 4.5"): "5-6-29. Our tank lighter and coal barge."; Image #299 (2.75" x 4.5"): "5-6-29. Traveler "B" moved out to L2. West anchor arm."; Image #300 (2.75" x 4.5"): "5-8-29. Second panel--west anchor arm complete. Traveler Bat L3, erecting portal bracing."; Image #301 (2.75" x 4.5"): "5-9-29. Traveler B erecting third falsework bent at L6, west anchor arm.";Four 4.5" x 2.75" B/W photos numbered 298, 299, 300, 301
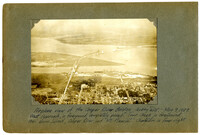
Unnumbered Image (5" x 7"): "Airplane view of the Cooper River Bridge - looking east. May 9, 1929. West approach, in foreground, completely paved. Town Creek in foreground, then Drum Island, Cooper River, and Mt. Pleasant. Charleston in lower right.";One 5" x 7" B/W photo
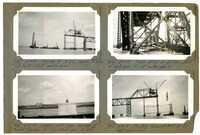
Image #308 (2.75" x 4.5"): "5-9-29. Progress at noon."; Image #309 (2.75" x 4.5"): "5-9-29. Falsework bent #29, L6 - west anchor arm. Low tide, 25 ft. of water. 16 plumb piles & 8 batter piles under each column. Max. load = 20 1/2 tons per pile."; Image #310 (2.75" x 4.5"): "5-10-29. Traveler A, east side, at L4."; Image #311 (2.75" x 4.5"): " 5-10-29. Looking west from traveler on Cooper River Span, west anchor arm.";Four 4.5" x 2.75" B/W photos numbered 308, 309, 310, 311
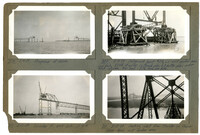
Image #302 (2.75" x 4.5"): "5-9-29. Traveler B at L2, ready to move out to L3. East anchor arm."; Image #304 (2.75" x 4.5"): "5-9-29. Field office on bottom chord of deck span 10 - at anchor pier 10."; Image #305 (2.75" x 4.5"): "5-9-29. Looking west from traveler B toward traveler A. Town Creek span at left."; Image # 307 (2.75" x 4.5"): " 5-9-29. Erecting falsework bent at L6 - west anchor arm.";Four 4.5" x 2.75" B/W photos numbered 302, 304, 305, 307
Limit your search
Photographic Record of the Cooper River Bridge✖[remove]4