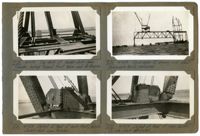
Image #230 (2.75" x 4.5"): "4-7-29. Top deck of double-deck Span Traveler, looking toward front boom and A-frame."; Image #231 (2.75" x 4.5"): "4-7-29. Detail at heel of main (front) boom. Double-deck span traveler."; Image #234 (2.75" x 4.5"): "4-7-29. Deckspan 12 swung and steel falsework bents removed."; Image #233 (2.75" x 4.5"): "4-7-29. Detail at heel of rear boom. Double-deck traveler.";Four 4.5" x 2.75" B/W photos numbered 230, 231, 233, 234
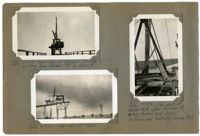
Image #236 (2.75" x 4.5"): "4-7-29. Rear view of Viaduct Traveler 'C' erecting Span Traveler 'A' on Span 5."; Image #237 (2.75" x 4.5"): "4-7-29. Side view of #236."; Image #232 (4.5" x 2.75"): "4-7-29. Top deck of double-deck Span Traveler A, looking toward rear boom, A-frame and backstay connection.";Three 4.5" x 2.75" B/W photos numbered 232, 236, 237
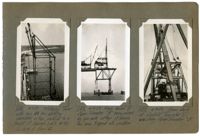
Image #235 (4.5" x 2.75"): "4-7-29. Material Tower with two 50 ton stiffleg derricks on top, erected to a height of 3 panels (ab't 95 ft.) On dock at Pier 13."; Image #238 (4.5" x 2.75"): "4-9-29. Main boom of Span Traveler 'B' being raised by gin pole after A-frame has been tripped into position."; Image #239 (4.5" x 2.75"): "4-9-29. From deck of Viaduct Traveler 'C', erecting Span Traveler 'B'.";Three 4.5" x 2.75" B/W photos numbered 235, 238, 239
Limit your search
Photographic Record of the Cooper River Bridge✖[remove]3