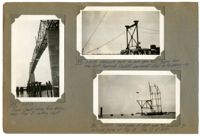
Image #167 (4.5" x 2.75"): "3-15-29. Unloading material from lighters to dock at Pier 4 with stiffleg derrick, for the Drum Island viaduct. (See #143.)"; Image #172 (2.75" x 4.5"): "3-17-29. Erecting first bent of false work for deck span 12. (70 ft. boom has been erected, on left, by 50 ft. boom on right and which has been taken down)."; Image #173 (2.75" x 4.5"): "3-17-29. Progress - from Cooper River. Traveler A removed. Drum Island Viaduct at bottom of grade.";Three 4.5" x 2.75" B/W photos numbered 167, 172, 173
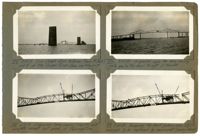
Image #178 (4.5" x 2.75"): "3-17-29. Town Creek Span, from below, near Pier 3 - looking west."; Image #179 (2.75" x 4.5"): "3-17-29. Falsework bent for deck span #12, taken from the East Approach Viaduct permanent steel for temporary use."; Image #180 (2.75" x 4.5"): "3-20-29. First panel of deck span #12 erected by material tower at Pier 13. Pier 12 at left.";Three 4.5" x 2.75" B/W photos numbered 178, 179, 180
Image #174 (2.75" x 4.5"): "3-17-29. Town Creek Span between Piers 9 (left) and 8 of the Cooper River Span. Looking west."; Image #175 (2.75" x 4.5"): "3-12-29. Suspended Span swung (3-16-29) and complete except last panel of floor system."; Image #176 (2.75" x 4.5"): 3-20-29. Suspended span has been swung. Note gap in top chord to right of traveler."; Image #177 (2.75" x 4.5"): 3-20-29. Temporary top chord jacking links U13 U14 removed to be replaced by permanent 'dummy' chords.";Four 4.5" x 2.75" B/W photos numbered 174, 175, 176, 177
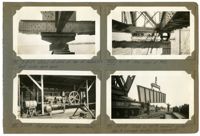
Image #181 (2.75" x 4.5"): "3-20-29. Detail of shoe at top of falsework bent under deck span."; Image #182 (2.75" x 4.5"): "3-17-29. Fuel oil compressor - (semi-diesel)."; Image #201 (2.75" x 4.5"): "4-1-29. End View of #181."; Image #183 (2.75" x 4.5"): "3-20-29. Twist in 40 ft. viaduct girder due to improper loading for shipment.";Four 4.5" x 2.75" B/W photos numbered 181, 182, 183, 201
Limit your search
Photographic Record of the Cooper River Bridge✖[remove]4