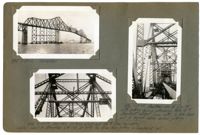
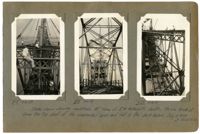
Image #494 (2.75" x 4.5"): "6-28-29. Connected."; Image #495 (2.75" x 4.5"): "6-28-29. See 451. Jacking stick and 1 1/4" [diameter] steel 'hog-rodding' cables used to straighten L14 U15, at left. No strain from jacking on member at right."; Image #496 (4.5" x 2.75"): "6-28-29. Another view of L14 U15 with jacking device attached. Note 1 1/2" [diameter] steamboat ratchet (lower left) to take slack out of hog-rod cables before jacking.";Three 4.5" x 2.75" B/W photos numbered 494, 495, 496
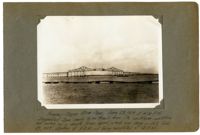
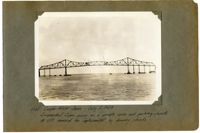
Unnumbered Image (5" x 7"): "Progress - Cooper River Span, June 28, 1929 at 4:30 P.M. Suspended span ready to be freed from its cantilever condition and swung as a simple truss span, which was done on Sat., June 29, 1929, starting at 8 A.M. and being completed at 3: P.M.";One 5" x 7" B/W photo
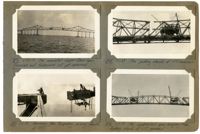
Image #497 (4.5" x 2.75"): "6-28-29. From near base of Pier 9 looking west toward Pier 8, 1050 ft. distant. Of the 24 truss panels b't'n. these piers, (L10 to L22 to L10), 19 are visible in this picture. Note panel L22 L21 with stringers lying flat and bracing not connected."; Image #498 (4.5" x 2.75"): "6-28-29. Removing steel falsework with snatched lines run from steam hoist on lighter to bottom chord of truss."; Image #499 (4.5" x 2.75"): "6-28-29. Deck of bridge from Pier 8 (L10) - looking east.";Three 4.5" x 2.75" B/W photos numbered 497, 498, 499
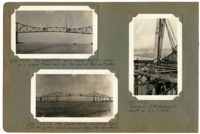
Image #500 (2.75" x 4.5"): "6-28-29. The cooper River Cantilever as seen from the Drum Island Viaduct, looking east."; Image #501 (2.75" x 4.5"): "6-29-29. Omohundro (Oak), D.V. Lewis, Stevenson "Rube" Toms, Drake."; Image #502 (2.75" x 4.5"): "6-29-29. Swinging the suspended span. Fitting up bott. chord joints at L21 east."; Image #503 (2.75" x 4.5"): "6-29-29. Swinging the suspended span. Connecting and fitting up closing top chord joints at U22.";Four 4.5" x 2.75" B/W photos numbered 500, 501, 502, 503
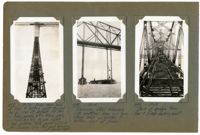
Image #506 (4.5" x 2.75"): "6-30-29. From top of Pier 9, looking west toward Pier 8, 1050 ft. distant. 24 Panels at 43'-9" - count 'em!"; Image #507 (2.75" x 4.5"): "6-30-29. The suspended span with travelers under the portal bracing, preparing to remove the jacking chords."; Image #508 (2.75" x 4.5"): "6-30-29. Looking west from south side of span, between piers 10 and 11.";Three 4.5" x 2.75" B/W photos numbered 506, 507, 508
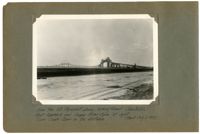
Unnumbered Image (5" x 7"): "1050' Cooper River Span - July 2, 1929. Suspended span swung as a simple span and jacking chords at U17 removed for replacement by dummy chords.";One 5" x 7" B/W photo
Unnumbered Image (5" x 7"): "From the Mt. Pleasant shore, looking toward Charleston, East Approach and Cooper River Span at right. Town Creek Span in the distance. (About July 2, 1929).";One 5" x 7" B/W photo
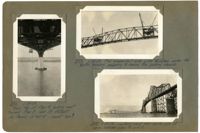
Image #510 (2.75" x 4.5"): "6-30-29. The completed Cooper River Span. Travelers and falsework not yet removed."; Image #511 (2.75" x 4.5"): "7-2-29. Removing the temporary jacking chords at U17."; Image #512 (2.75" x 4.5"): "7-1-29. The jacking chords at U17 removed."; Image #513 (2.75" x 4.5"): "7-2-29. The suspended span hanging free. Jacking chords at U17 removed.";Four 4.5" x 2.75" B/W photos numbered 510, 511, 512, 513
Image #514 (2.75" x 4.5"): "7-2-29. The suspended span hanging free and acting as a simple truss span on the end of the cantilevers."; Image #515 (2.75" x 4.5"): "7-2-29. The Cooper River Cantilever span with the jacking chords removed from the top chord."; Image #517 (4.5" x 2.75"): "7-4-29. Scene of R.H. McKnight's death on July 3, 1929.";Three 4.5" x 2.75" B/W photos numbered 514, 515, 517
Image #518 (4.5" x 2.75"): "7-4-29."; Image #519 (4.5" x 2.75"): "7-4-29."; Image #520 (4.5" x 2.75"): "7-4-29."; "Three views showing conditions at time of R.H. McKnight's death. He was knocked from the top chord of the suspended span and fell to the deck below, July 3, 1929 at 10:45 A.M.";Three 4.5" x 2.75" B/W photos numbered 518, 519, 520