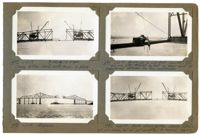
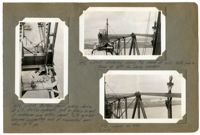
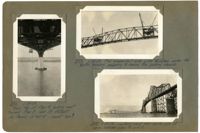
Image #477 (2.75" x 4.5"): "6-21-29. U22 L22 = CL [center line] of span. Closing bottom chord, north truss, in place."; Image #478 (2.75" x 4.5"): "6-21-29. Progress."; Image #479 (2.75" x 4.5"): "6-22-29. Driving pin in L21 - East (See 476). This pin was later removed so that no shear could be transferred between the two cantilevers."; Image #480 (2.75" x 4.5"): "6-22-29. Both closing bottom chords in place, and pins driven, but not yet connected to hangers. See 482.";Four 4.5" x 2.75" B/W photos numbered 477, 478, 479, 480
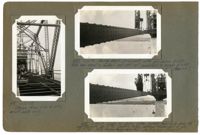
Image #481 (4.5" x 2.75"): "6-22-29. Stairs from L16 to U17, east side only."; Image #482 (2.75" x 4.5"): "6-22-29. Closing chord L19 L21 east with pin driven at L21. Note how chord is arched and still not connected to hanger at L20. (Gap = 6")."; Image #483 (2.75" x 4.5"): "6-24-29. Same as above, after jacking near side down 6 1/8" and far side up 11 13/16", making total vertical movement at pin of 17 15/16". Note hanger being connected - chord is now straight.";Three 4.5" x 2.75" B/W photos numbered 481, 482, 483
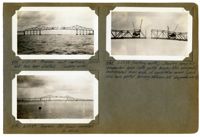
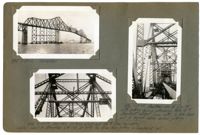
Image #484 (2.75" x 4.5"): "6-25-29. Progress. Last verticals, U21 L21, east, have been erected. (Looking north)."; Image #485 (2.75" x 4.5"): "6-27-29. (Looking south). Showing complete suspended span (note portal bracing b'tn. end posts) cantilevered from ends of cantilever arms (which also have portal bracing between last diagonals L16 U17)."; Image #486 (2.75" x 4.5"): "6-27-29. Progress. All truss members in place.";Three 4.5" x 2.75" B/W photos numbered 484, 485, 486
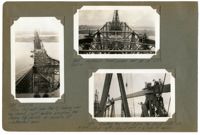
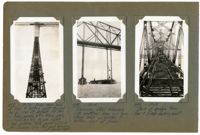
Image #487 (4.5" x 2.75"): "6-27-29. From U10 east (over Pier9) looking over top chord, just before erecting the closing top chords at middle of suspended span."; Image #490 (2.75" x 4.5"): "6-27-29. Hydraulic hand pumps set up at U17."; Image #491 (2.75" x 4.5"): "Erecting the first closing top chord U20' U22. U20 at right. U22, at left, = CL [center line] 1050ft. span.";Three 4.5" x 2.75" B/W photos numbered 487, 490, 491
Image #488 (4.5" x 2.75"): "6-27-29. Bottom chord jacking device at L17. 500-Ton hydraulic jack in place in end of cantilever arm bottom chord. Note eye-bar hangers supporting end of suspended span thru 10" [diameter] pin."; Image #492 (2.75" x 4.5"): "6-27-29. Entering closing top chord at U22. Note gap in truss at left for closing member."; Image #493 (2.75" x 4.5"): "6-27-29. Same as 492.";Three 4.5" x 2.75" B/W photos numbered 488, 492, 493
Image #494 (2.75" x 4.5"): "6-28-29. Connected."; Image #495 (2.75" x 4.5"): "6-28-29. See 451. Jacking stick and 1 1/4" [diameter] steel 'hog-rodding' cables used to straighten L14 U15, at left. No strain from jacking on member at right."; Image #496 (4.5" x 2.75"): "6-28-29. Another view of L14 U15 with jacking device attached. Note 1 1/2" [diameter] steamboat ratchet (lower left) to take slack out of hog-rod cables before jacking.";Three 4.5" x 2.75" B/W photos numbered 494, 495, 496
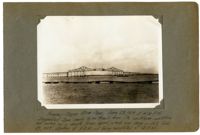
Unnumbered Image (5" x 7"): "Progress - Cooper River Span, June 28, 1929 at 4:30 P.M. Suspended span ready to be freed from its cantilever condition and swung as a simple truss span, which was done on Sat., June 29, 1929, starting at 8 A.M. and being completed at 3: P.M.";One 5" x 7" B/W photo
Image #497 (4.5" x 2.75"): "6-28-29. From near base of Pier 9 looking west toward Pier 8, 1050 ft. distant. Of the 24 truss panels b't'n. these piers, (L10 to L22 to L10), 19 are visible in this picture. Note panel L22 L21 with stringers lying flat and bracing not connected."; Image #498 (4.5" x 2.75"): "6-28-29. Removing steel falsework with snatched lines run from steam hoist on lighter to bottom chord of truss."; Image #499 (4.5" x 2.75"): "6-28-29. Deck of bridge from Pier 8 (L10) - looking east.";Three 4.5" x 2.75" B/W photos numbered 497, 498, 499
Image #500 (2.75" x 4.5"): "6-28-29. The cooper River Cantilever as seen from the Drum Island Viaduct, looking east."; Image #501 (2.75" x 4.5"): "6-29-29. Omohundro (Oak), D.V. Lewis, Stevenson "Rube" Toms, Drake."; Image #502 (2.75" x 4.5"): "6-29-29. Swinging the suspended span. Fitting up bott. chord joints at L21 east."; Image #503 (2.75" x 4.5"): "6-29-29. Swinging the suspended span. Connecting and fitting up closing top chord joints at U22.";Four 4.5" x 2.75" B/W photos numbered 500, 501, 502, 503
Image #506 (4.5" x 2.75"): "6-30-29. From top of Pier 9, looking west toward Pier 8, 1050 ft. distant. 24 Panels at 43'-9" - count 'em!"; Image #507 (2.75" x 4.5"): "6-30-29. The suspended span with travelers under the portal bracing, preparing to remove the jacking chords."; Image #508 (2.75" x 4.5"): "6-30-29. Looking west from south side of span, between piers 10 and 11.";Three 4.5" x 2.75" B/W photos numbered 506, 507, 508