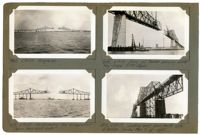
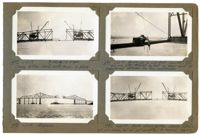
Image #463 (2.75" x 4.5"): "6-19-29. Progress."; Image #464 (2.75" x 4.5"): "6-19-29. Cantilevering the suspended span from each side."; Image #465 (2.75" x 4.5"): "6-19-29. Navy oil tanker passing under the Cooper River Span."; Image #466 (2.75" x 4.5"): "6-20-29. Looking east from north side of bridge. Anchor Pier 7 at right.";Four 4.5" x 2.75" B/W photos numbered 463, 464, 465, 466
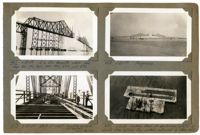
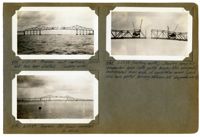
Image #467 (2.75" x 4.5"): "6-20-29. E.L.D.'s favorite view. See also Nos. 174, 364, 444, 494, 554, and 571."; Image #468 (2.75" x 4.5"): "6-20-29. Progress."; Image #469 (2.75" x 4.5"): "6-20-29. Deck of west cantilever arm. G.R. Bullard, H.J. Stetina."; Image #470 (2.75" x 4.5"): "6-21-29. Looking down on anchorage lighter for mooring other lighters. Four anchors controlled by steam hoist.";Four 4.5" x 2.75" B/W photos numbered 467, 468, 469, 470
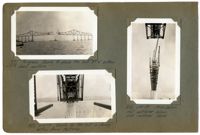
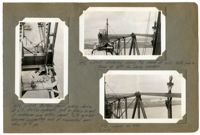
Image #471 (2.75" x 4.5"): "Progress. Ready to place the last 87 1/6" bottom chord section."; Image #472 (2.75" x 4.5"): "6-21-29. Ready for the last or closing bottom chord sections."; Image #473 (4.5" x 2.75"): "6-21-29. From below. West cantilever, below. East cantilever, above.";Three 4.5" x 2.75" B/W photos numbered 471, 472, 473
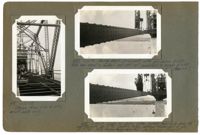
Image #474 (4.5" x 2.75"): "6-21-29. Erecting the last bottom chord section L19' L21', north truss, east half of suspended span."; Image #475 (2.75" x 4.5"): "6-21-29. Connecting the closing bottom chord at L21'."; Image #476 (2.75" x 4.5"): "6-21-29. Closing B.C. joint L21'. Note 6" [diameter] pin and slotted hole with 7" movement for adjustment, temperature, etc.";Three 4.5" x 2.75" B/W photos numbered 474, 475, 476
Image #477 (2.75" x 4.5"): "6-21-29. U22 L22 = CL [center line] of span. Closing bottom chord, north truss, in place."; Image #478 (2.75" x 4.5"): "6-21-29. Progress."; Image #479 (2.75" x 4.5"): "6-22-29. Driving pin in L21 - East (See 476). This pin was later removed so that no shear could be transferred between the two cantilevers."; Image #480 (2.75" x 4.5"): "6-22-29. Both closing bottom chords in place, and pins driven, but not yet connected to hangers. See 482.";Four 4.5" x 2.75" B/W photos numbered 477, 478, 479, 480
Image #481 (4.5" x 2.75"): "6-22-29. Stairs from L16 to U17, east side only."; Image #482 (2.75" x 4.5"): "6-22-29. Closing chord L19 L21 east with pin driven at L21. Note how chord is arched and still not connected to hanger at L20. (Gap = 6")."; Image #483 (2.75" x 4.5"): "6-24-29. Same as above, after jacking near side down 6 1/8" and far side up 11 13/16", making total vertical movement at pin of 17 15/16". Note hanger being connected - chord is now straight.";Three 4.5" x 2.75" B/W photos numbered 481, 482, 483
Image #484 (2.75" x 4.5"): "6-25-29. Progress. Last verticals, U21 L21, east, have been erected. (Looking north)."; Image #485 (2.75" x 4.5"): "6-27-29. (Looking south). Showing complete suspended span (note portal bracing b'tn. end posts) cantilevered from ends of cantilever arms (which also have portal bracing between last diagonals L16 U17)."; Image #486 (2.75" x 4.5"): "6-27-29. Progress. All truss members in place.";Three 4.5" x 2.75" B/W photos numbered 484, 485, 486
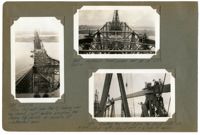
Image #487 (4.5" x 2.75"): "6-27-29. From U10 east (over Pier9) looking over top chord, just before erecting the closing top chords at middle of suspended span."; Image #490 (2.75" x 4.5"): "6-27-29. Hydraulic hand pumps set up at U17."; Image #491 (2.75" x 4.5"): "Erecting the first closing top chord U20' U22. U20 at right. U22, at left, = CL [center line] 1050ft. span.";Three 4.5" x 2.75" B/W photos numbered 487, 490, 491
Image #488 (4.5" x 2.75"): "6-27-29. Bottom chord jacking device at L17. 500-Ton hydraulic jack in place in end of cantilever arm bottom chord. Note eye-bar hangers supporting end of suspended span thru 10" [diameter] pin."; Image #492 (2.75" x 4.5"): "6-27-29. Entering closing top chord at U22. Note gap in truss at left for closing member."; Image #493 (2.75" x 4.5"): "6-27-29. Same as 492.";Three 4.5" x 2.75" B/W photos numbered 488, 492, 493