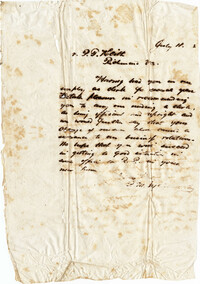
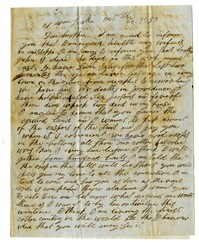
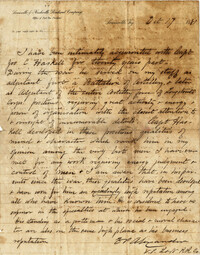
A letter to Woodward Manning from his brother Ira L. Manning discussing the death of their brother John, a "rage" of yellow fever that has killed 125 people, acquiring land, crops, construction on a railroad in Alabama, and purchasing enslaved persons.
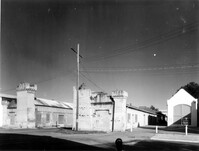
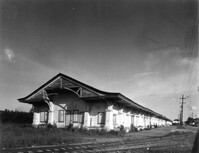
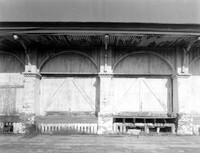
Camden Depot of the S.C.R.R., ca. 1845; South side of Ann Street between Meeting and King Streets. Attributed to E.B. White, architect. View of entry with NW pier detail from the NE. 4" x 5" B/W photo.
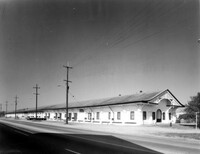
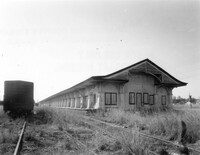
Camden Depot of the S.C.R.R., ca. 1845; South side of Ann Street between Meeting and King Streets. Attributed to E.B. White, architect. View of entry from the NE. 4" x 5" B/W photo.
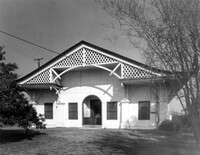
Camden Depot of the S.C.R.R., ca. 1845; South side of Ann Street between Meeting and King Streets. Attributed to E.B. White, architect. View of entry from the NW. 4" x 5" B/W photo.
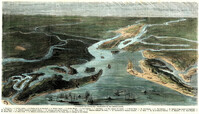
[Color image.] Caption (in French): 'Evenements des Etats-Unis: Charleston et ses fortifications. [Events of the United States: Charleston and its fortifications.] 1--Charleston. 2--Riviere Ashley [Ashley River]. 3--Chemin de fer de Savannah [Savannah Railway]. 4--Riviere Cooper [Cooper River]. 5--Riviere Wando [Wando River]. 6--Fort Pinkney [Castle Pinckney]. 7--Fort Ripley. 8--Fort Johnson (ile James) [James Island]. 9--Riviere Stone [Stono River]. 10--Fort Sumter. 11--Fort Moultrie. 12--Batterie Gregg (pointe de Gumming) [Battery Gregg (Cummings Point)]. 13--Fort Wagner. 14--Batteries rasantes du general Gilmore [grazed batteries of General Gilmore]. 15--Ouvrages pris par les federaux. [Works undertaken by the Federals]. 16--Phare Inlet [Lighthouse inlet]. 17--Batteries federales (ile Folly) [Federal Batteries (Folly Island)]. 18--Canonnieres et vaisseaux cuirasses [gunboats and ironclads]. 19--Hotel. 20--Ile et batteries Sullivan [Sullivan Island and Batteries]. 21--Moultrie. 22--Mont Pleasant [Mount Pleasant]. 23--Breach Inlet. 24--Shem Creek. 25--Batteries construite par les confederes sur l'ile James, dans le voisinage du fort Johnson [Batteries built by the Confederates on James Island, in the vicinity of Fort Johnson].
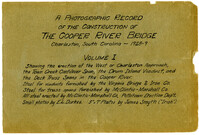
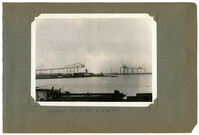
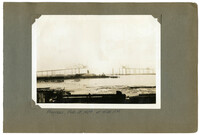
A Photographic Record of the Construction of the Cooper River Bridge; Charleston, South Carolina - 1928-29; Volume I; Showing the erection of the West or Charleston approach, the Town Creek Cantilever Span, the Drum Island Viaduct, and the Deck Truss Spans in the Cooper River. Steel for viaducts furnished by the Virginia Bridge & Iron Co. Steel for truss spans furnished by McClintic-Marshall Co. All steel erected by McClintic-Marshall Co., Pottstown Erection Dep't. Small photos by E.L. Durkee. 5" x 7" Photos by James Smyth ("Irish").;Title Page, 6.75" x 10.125"
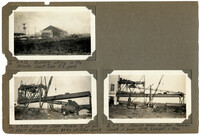
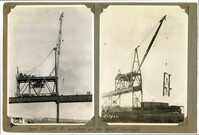
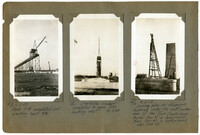
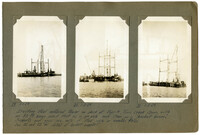
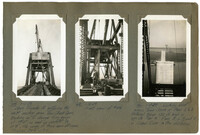
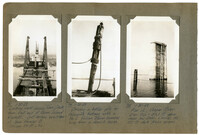
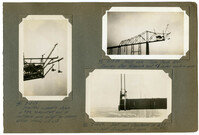
Image #1 (2.75" x 4.5"): "11-9-28. Building office in the Atlantic Coast Line R.R. Yard."; Image #2 (2.75" x 4.5"): "11-9-28. Erecting Span Traveler 'A' at and of West Approach, using 30 ton stiffleg derrick."; Image #3 (2.75" x 4.5"): "11-9-28. Raising boom for Span Traveler. Length of boom 100ft., & weight, 11 tons.";Three 4.5" x 2.75" B/W photos numbered 1, 2, 3
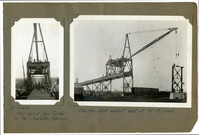
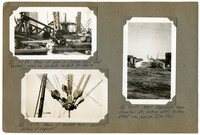
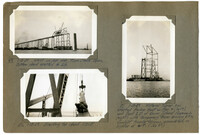
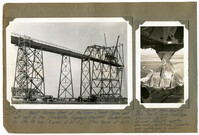
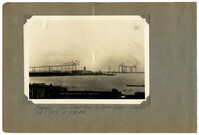
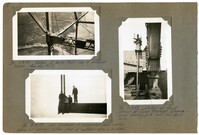
Image #4 (4.5" x 2.75"): "11-15-28. High Boom! Minimum reach with main falls is about 5 ft. Note the slack backstays. Weight of traveler complete = 122 tons, including 31 ton; 150 HP gas. engine on the upper deck and 60 HP aux. gas hoist on platform below."; Unnumbered Image (5" x 7"): "Span traveler A erecting on the Charleston or West Approach. Rear boom of traveler not yet erected.";One 4.5" x 2.75" B/W photo and one 5" x 7" B/W photo. Smaller photo numbered 4.
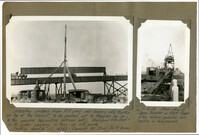
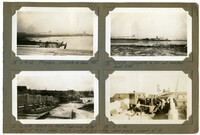
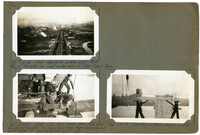
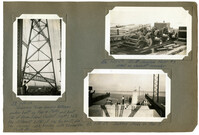
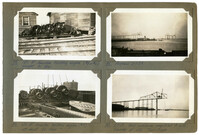
Image #5 (4.5" x 2.75"): "11-15-28. Front view of Span Traveler on the Charleston Approach."; Unnumbered Image (5" x 7"): "Erecting steel viaduct bent at 97 ft. reach.";One 4.5" x 2.75" B/W photo and one 5" x 7" B/W photo. Smaller photo numbered 5
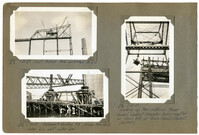
Unnumbered Image (5" x 7"): "Unloading girders from R.R. cars and loading onto trucks on top of viaduct, to be pushed out to traveler by an 8 ton gasoline locomotive (extreme left.) Max-load handled = 97 ft. girder weighing 16 tons up 6% grade. Stiffleg derrick S.O. H383 - Capacity 30 tons. 70 ft. boom."; Image #6 (4.5" x 2.75"): "11-15-28. Rear view of Span Traveler on West Appr. 8 ton Vulcan gasoline locomotive in foreground.";One 4.5" x 2.75" B/W photo and one 5" x 7" B/W photo. Smaller photo numbered 6.
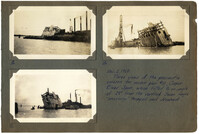
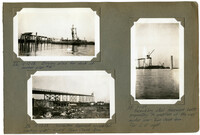
Images #8, 10, 12 (2.75" x 4.5"): Caption under all photos: Dec. 2, 1928. Three views of pneumatic caisson for anchor pier #10, Cooper River Span, which tilted to an angle 29 [degrees] from the vertical. Seven negro 'sand-hogs' trapped and drowned.";Three 4.5" x 2.75" B/W photos numbered 8, 10, 12
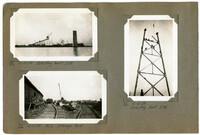
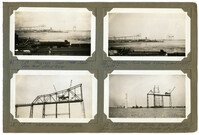
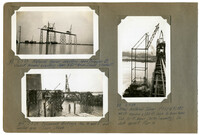
Image #13 (4.5" x 2.75"): "12-3-28. Span 10 W completed and erecting bent 8 W."; Image #15 (4.5" x 2.75"): "Charleston Viaduct completed to span 10 W. Looking west. 12-3-28."; Image #16 (4.5" x 2.75"): "12-3-28 Driving piles for false work footings under the west anchor arm of the Town Creek Span. Anchor Pier #1 in foreground. Main Pier #2 in background, elev. 134 ft.";Three 4.5" x 2.75" B/W photos numbered 13, 15, 16
Image #14 (2.75" x 4.5"): "12-4-28. Progress. Complete to span 9W."; Image #19 (2.75" x 4.5"): "12-13-29. Complete to 5W and erecting bent 3W."; Images #17, 18 (2.75" x 4.5"): "12-8-28. Wreck on West Approach after runaway of 14 ton girder which pushed locomotive down grade ahead of it.";Four 4.5" x 2.75" B/W photos numbered 14, 17, 18, 19
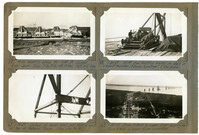
Image #22 (2.75" x 4.5"): "12-13-28. Driving Piles for dock at anchor pier #4."; Image #24 (2.75" x 4.5"): "12-23-28. Charleston Approach completed. Looking east toward Town Creek Span."; Image #25 (4.5" x 2.75"): "1-1-29. Assembling steel falsework bents preparatory to erection of the west anchor arm - Town Creek Span. Pier 2 at right.";Three 4.5" x 2.75" B/W photos numbered 22, 24, 25
Image #26 (2.75" x 4.5"): " 1-3-29. Erecting first bottom chord section, L0L2, west anchor arm."; Image #27 (4.5" x 2.75"): "1-3-29. Steel falsework bent under L2, west anchor arm. connecting first bottom chord."; Image # 28 (2.75" x 4.5"): "1-2-29. Faslework footing #2 under panel point L4 - west anchor arm.;Three 4.5" x 2.75" B/W photos numbered 26, 27, 28
Image #29 (4.5" x 2.75"): "1-1-29."; Image #30 (4.5" x 2.75"): "1-3-29." ; Image #31 (4.5" x 2.75"): "1-3-29." Caption under all pictures: "Erecting steel material tower on deck at Pier 4, Town Creek Span, with an 80 ft. boom used first as a gin pole and then as a 'basket boom.' See 32 and 33 for detail of basket support.";Three 4.5" x 2.75" B/W photos numbered 29, 30, 31
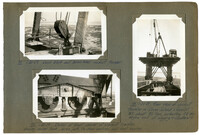
Image #32 (2.75" x 4.5"): "1-1-29. Base of boom in Chicago heel and 'basket', used as gin pole on dock at Pier 4."; Image #33 (2.75" x 4.5"): "1-3-29. Base of "basket boom', showing details of support."; Image #36 (4.5" x 2.75"): "1-6-29. West Approach from America St. looking east, before street was paved. (See 271.)";Three 4.5" x 2.75" B/W photos numbered 32, 33, 36
Image #37 (2.75" x 4.5"): "1-10-29. West Approach, looking west. From top of traveler on west anchor arm of Town Creek Span."; Image #41 (2.75" x 4.5"): "1-10-29. Joint L2, Town Creek Span. Note front bearing of traveler. Tie down rods have been removed and cable used at this particular point only."; Image #40 (2.75" x 4.5"): "1-10-29. Erecting bottom chord L2L4.";Three 4.5" x 2.75" B/W photos numbered 37, 40, 41
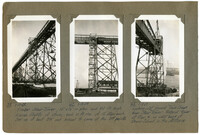
Image #38 (4.5" x 2.75"): "1-10-29."; Image #42 (4.5" x 2.75"): "1-13-29"; Caption under photos 38 & 42: "Timber Stair Tower, 12' x 16' in plan, and 110 ft. high. Eleven flights of stairs, each 10 ft. rise, of 12 steps each. Set up at bent 3W and braced to same at the 3rd points."; Image #43 (4.5" x 2.75"): "1-13-29"; Looking east toward Town Creek from Stair Tower. Material tower at Pier 4, on west bank of Drum Island, in the distance.";Three 4.5" x 2.75" B/W photos numbered 38, 42, 43
Image #44 (4.5" x 2.75"): "1-13-29. Span Traveler A entering the west anchor arm, Town Creek Span. Blocking up to change from gauge of 19' 6", as used on viaduct, to 18' 0", the gauge of truss span stringers. Trusses 24' 0" c. to c."; Image #45 (4.5" x 2.75"): "1-13-29. Front view of #44."; Image #46 (4.5" x 2.75"): "1-13-29. Looking east across Town Creek at Piers 2 & 3. Material tower 130 ft. high is opposite Pier 4. Piers 5, 6, 7 and 8, in Cooper River, in the distance.";Three 4.5" x 2.75" B/W photos numbered 44, 45, 46
Image #49 (2.75" x 4.5"): "1-18-29. West anchor arm, Town Creek Span. Bottom chord erected to L6."; Image #50 (2.75" x 4.5"): "1-18-29. Erecting top chord U3U5."; Image #51 (4.5" x 2.75"): "1-18-29. Material Tower has erected Anchor Bent on Pier 4 (left), and Bent 1 D of Drum Island Approach (right) with temporary tower bracing b't'n. viaduct traveler trusses, assembled, on lighter at left. (See 57)";Three 4.5" x 2.75" B/W photos numbered 49, 50, 51
Image #52 (4.5" x 2.75"): "1-20-29. From L6, west anchor arm, looking east. Erecting viaduct traveler showing over Pier 3."; Image #53 (4.5" x 2.75"): "1-20-29. Traveler A on the Town Creek Span - rear view."; Image #57 (4.5" x 2.75"): "1-20-29. Erecting viaduct traveler on span 1D.";Three 4.5" x 2.75" B/W photos numbered 52, 53, 57
Image #54 (2.75" x 4.5"): "1-20-29. West anchor Arm completed to L6."; Image #55 (2.75" x 4.5"): "1-20-29. Falsework footing #3 driven thru dock. Under L6, west anchor arm."; Image #58 (4.5" x 2.75"): "1-20-29. Looking up thru material tower toward viaduct traveler being erected on Span 1D, of Drum Island Viaduct. (see #57).";Three 4.5" x 2.75" B/W photos numbered 54, 55, 58
Image #59 (4.5" x 2.75"): "1-20-29. Temporary tower bracing between anchor bent on Pier 4 (left) and bent 1D of Drum Island Viaduct (right). Note the different batter of the two bents, also the diagonal cable bracing, with turnbuckles (Frank Stengel)."; Image #56 (2.75" x 4.5"): "1-20-29. 100 HP Gasoline Hoist #7. Used on viaduct traveler."; Image #60 (2.75" x 4.5"): "1-20-29. Setting shoes on Pier 2.";Three 4.5" x 2.75" B/W photos numbered 56, 59, 60
Unnumbered Image (5" x 7"): "1-28-29. West Anchor arm of the Town Creek Span and east end of the Charleston Approach Viaduct. Anchor arm is 256 ft. long (8 panels at 32 ft.). Stair tower at left."; Image #66 (4.5" x 2.75"): "1-30-29. Main bearing shoe, Pier 2, Town Creek Span. 5' 0" x 5' 9" = 28.75 [square feet]. Des. Load = 1,813,000# = 438 # [per square inch]. Erec. Load = 1,089,000# max. (suspended span cantilevered to center). Lower shoe 3' 4" high.";One 4.5" x 2.75" B/W photo and one 5" x 7" B/W photo. Smaller photo numbered 66.
Image #61 (2.75" x 4.5"): "1-23-29. Progress - Town Creek Span. Taken from office tower."; Image #62 (2.75" x 4.5"): "Progress - Town Creek & Drum Island (right). 1-26-29."; Image #63 (2.75" x 4.5"):"1-28-29. West anchor arm complete."; Image #64 (2.75" x 4.5"): "1-28-29. Viaduct traveler starting erection of Drum Island Viaduct. span traveler not yet erected.";Four 4.5" x 2.75" B/W photos numbered 61, 62, 63, 64
Image #65 (2.75" x 4.5"): Main bearing shoes for 1050 ft. Cooper River Span. Base 7' 3" x 8' 6". Wt. 10 tons. Ab't. 4' 6" high."; Image #68 (2.75" x 4.5"): "1-30-29. 100 HP Gas. Hoisting engine on deck of viaduct traveler. 3 Drums & swinger. (Tom Kane)"; Image #67 (2.75" x 4.5"): "1-30-29. Detail of boom heel and foot of mast at top of Material Tower. (See also No. 86)"; Image #69 (2.75" x 4.5"): 1-30-29. Drum Island & Cooper River - looking east. Piers 5 to 13 in Cooper River completed.";Four 4.5" x 2.75" B/W photos numbered 65, 67, 68, 69
Image #70 (2.75" x 4.5"): " 1-30-29. Lead block and boom heel - viaduct traveler."; Image #72 (2.75" x 4.5"): "1-30-29. Detail at front corner of viaduct traveler, showing swivel truck, 40 ton jack, tie-down anchors, and front bearing."; Image #73 (4.5" x 2.5"): "1-30-29. rear view of viaduct traveler on Drum Island Viaduct. Wt. about 80 tons, including 25 ton engine and all rigging & counterw't.";Three 4.5" x 2.75" B/W photos numbered 70, 72, 73
Image #71 (4.5" x 2.75"): "1-30-29. Looking west across Town Creek from west end of Drum Island Viaduct. Just before erection of Span Traveler B. Trusses 24 ft. c. to c."; Image #74 (4.5" x 2.75"): "1-30-29. Driving a batter pile for falsework footings with a No. 2 Vulcan steam hammer hung from a derrick boom."; Image #75 (4.5" x 2.75"): "1-30-29. Pier 12, Cooper River. Elev. top = 50.1 ft. above mean low water. Carries the 270 ft. deck truss spans.";Three 4.5" x 2.75" B/W photos numbered 71, 74, 75
Image #76 (2.75" x 4.5"): Temporary top chord links between U13 and U14, carrying diaphragms for hydraulic jacks - Town Creek Span."; Image #77 (2.75" x 4.5"): "End view of links shown in #76."; Image #78 (2.75" x 4.5): "End view of top chords U12 U13 at U13. (see #87).";Three 4.5" x 2.75" B/W photos numbered 76, 77, 78
Image #79 (2.75" x 4.5"): "150 HP Gasoline hoisting engine (#5 or #6). Weight 31 tons."; Image #80 (2.75" x 4.5"): "100 HP Gasoline hoisting engine (#7). Weight about 26 tons."; Image #81 (2.75" x 4.5"): "Progress 2-1-29."; Image #82 (2.75" x 4.5"): "2-7-29. West cantilever completed to L12. Traveler at L10. Town Creek.";Four 4.5" x 2.75" B/W photos numbered 79, 80, 81, 82
Image #83 (2.75" x 4.5"): "2-7-29. Material Tower erecting Span Traveler B. Viaduct traveler erecting Span 5D - Drum Island Viaduct."; Image #84 (2.75" x 4.5"): "2-7-29. Falsework footings Nos. 4 and 5, east anchor arm - Town Creek."; Image #85 (4.5" x 2.75"): "2-7-29. Steel material Tower F067 & F0187. 40 ft. square x 130 ft. high to boom heels. Two 70 ft. boom (30 ton capacity). On dock opposite Pier 4";Three 4.5" x 2.75" B/W photos numbered 83, 84, 85
Image #87 (2.75" x 4.5"): "2-7-29. Top chords U12 U13 showing joint at U13 and temporary jacking links. Note eye bar hangers."; Image #88 (2.75" x 4.5"): "2-13-29. Bottom chord joint L13 - Town Creek. End joint of suspended span."; Image #89 (4.5" x 2.75"): "2-13-29. Assembly of top chord U12 U13, hanger, U13 L13 and joint L13 at end of suspended span.";Three 4.5" x 2.75" B/W photos numbered 87, 88, 89
Image #90 (4.5" x 2.75"): "2-13-29. Erecting assembly shown in #89, completing end of cantilever arm except for dummy bottom chords L12 L13."; Image #91 (2.75" x 4.5"): "2-13-29. West side - Town Creek Span. Removing steel falsework bent #1 under anchor arm."; Image #92 (2.75" x 4.5"): "2-14-29. Joint and floorbeam at L13 ( = Lo joint of suspended span. See #93).";Three 4.5" x 2.75" B/W photos numbered 90, 91, 92
Image #86 (2.75" x 4.5"): "Detail at boom heel - top of material tower. (See also #67)."; Image #93 (2.75" x 4.5"): "2-14-29. End floorbeam of suspended span erected before last (dummy) bottom chord of cantilever arm is in place."; Image #94 (2.75" x 4.5"): "2-14-29. Detail at front corner of Span Traveler, showing screw bearing jack and tie-down-rods.";Three 4.5" x 2.75" B/W photos numbered 96, 93, 94
![051. [Illegible] to Paul Trapier Keith -- July 18, year unknown](https://rspace.library.cofc.edu/iiif/image/24761/full/200,/0/default.jpg)