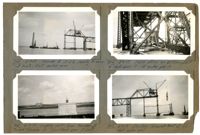
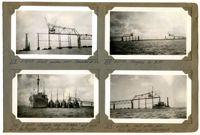
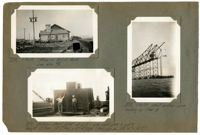
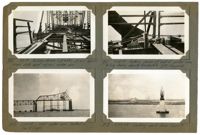
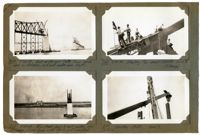
Image #302 (2.75" x 4.5"): "5-9-29. Traveler B at L2, ready to move out to L3. East anchor arm."; Image #304 (2.75" x 4.5"): "5-9-29. Field office on bottom chord of deck span 10 - at anchor pier 10."; Image #305 (2.75" x 4.5"): "5-9-29. Looking west from traveler B toward traveler A. Town Creek span at left."; Image # 307 (2.75" x 4.5"): " 5-9-29. Erecting falsework bent at L6 - west anchor arm.";Four 4.5" x 2.75" B/W photos numbered 302, 304, 305, 307
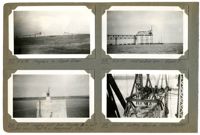
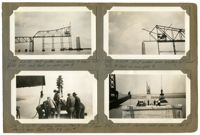
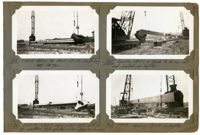
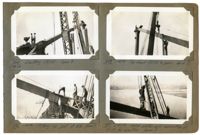
Image #308 (2.75" x 4.5"): "5-9-29. Progress at noon."; Image #309 (2.75" x 4.5"): "5-9-29. Falsework bent #29, L6 - west anchor arm. Low tide, 25 ft. of water. 16 plumb piles & 8 batter piles under each column. Max. load = 20 1/2 tons per pile."; Image #310 (2.75" x 4.5"): "5-10-29. Traveler A, east side, at L4."; Image #311 (2.75" x 4.5"): " 5-10-29. Looking west from traveler on Cooper River Span, west anchor arm.";Four 4.5" x 2.75" B/W photos numbered 308, 309, 310, 311
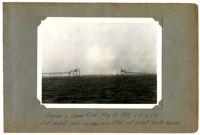
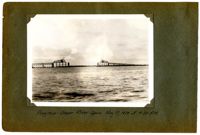
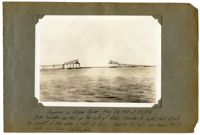
Unnumbered Image (5" x 7"): "Progress in Cooper River, May 10, 1929, at 4:30 P.M. East viaduct (right) has been completed and viaduct traveler removed.";One 5" x 7" B/W photo
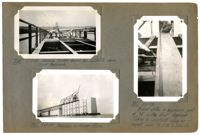
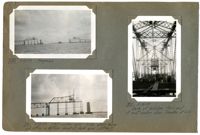
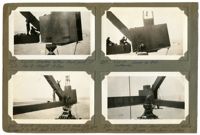
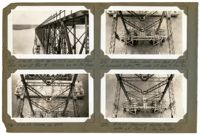
Image #312 (2.75" x 4.5"): "5-16-29. Progress in Cooper River."; Image #313 (2.75" x 4.5"): "5-16-29. West anchor arm - Span 7."; Image #314 (2.75" x 4.5"): "5-16-29. Looking east from traveler B on west anchor arm. Pier B in foreground, Elev. 132.0'."; Image #319 (2.75" x 4.5"): "5-16-29. Looking down on Span Traveler.";Four 4.5" X 2.75" B/W photos numbered 312, 313, 314, 319
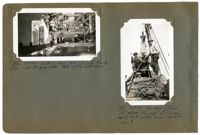
Image #320 (2.75" x 4.5"): "5-17-29. Setting timber forms for concrete deck, East Approach."; Image #321 (4.5" x 2.75"); "5-17-29. Bowed plates in expansion joint at 9E on the East Approach. Taken to illustrate shop error. report made to V.B. & Iron Co."; Image #322 (2.75" x 4.5"): "5-17-29. Progress in Cooper River.";Three 4.5" X 2.75" B/W photos numbered 320, 321, 322
Image #323 (2.75" x 4.5"): "5-17-29. East anchor arm. Traveler at L6."; Image #324 (2.75" x 4.5"): "5-17-29. Progress in A.M."; Image #325 (2.75" x 4.5"): "5-18-29. Supply ship "Dobbin" and five Navy destroyers. West anchor arm beyond."; Image #329 (2.75" x 4.5"): "5-18-29. West anchor arm. Navy destroyer in foreground.";Four 4.5" x 2.75" B/W photos numbered 323, 324, 325, 329
Image #330 (2.75" x 4.5"): "5-18-29. Progress"; Image #331 (2.75" x 4.5"): "5-18-29. West anchor arm. Note stair tower and office on bottom chord of deck span - at Pier 7."; Image #332 (4.5" x 2.75"): "5-18-29. Deck of bridge from end of east anchor arm. Traveler at L6.";Three 4.5" x 2.75" B/W photos numbered 330, 331, 332
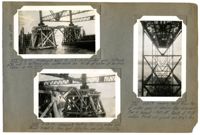
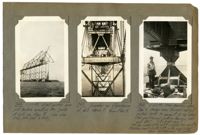
Image #333 (2.75" x 4.5"): "5-18-29. Falsework bent 31- L8 - East anchor arm. 16 Plumb piles and 10 battered piles under each col. 40 ft. of water at low tide. Taken at low tide. See also 355."; Image #334 (2.75" x 4.5"): "5-18-29. Falsework footing 32 - L6, anchor arm. Similar to bent 31. Max. load 20 1/2 tons per pile (D + L + Trav.)."; Image #335 (4.5" x 2.75"): "5-18-29. Looking west from top of anchor pier 10 showing steel falsework. Pier 9 beyond = 450 ft. Bents at 90 ft. centers. Flswk. cols. plumb and 37'-6" c. to c.";Three 4.5" x 2.75" B/W photos numbered 333, 334, 335
Image #336 (2.75" x 4.5"): "5-18-29. Office in A.C.L. Yard. See also #1."; Image #337 (2.75" x 4.5"): "Bottom chord joint at L10 - over main piers 8 and 9. Weight 13 tons. 12'-7" long x 12'-4" high (Main gas. pl. 108" x 1" x 12'-7")."; Image #338 (4.5" x 2.75"): "5-21-29. West anchor arm landing on Pier 8.";Three 4.5" x 2.75" B/W photos numbered 336, 337, 338
Image #339 (2.75" x 4.5"): "5-21-29. West anchor arm ready to erect last panel 8-10, and land on main pier 8."; Image #340 (2.75" x 4.5"): "5-22-29. East anchor arm erecting last panel 8-10, to land on main pier 9."; Image #341 (2.75" x 4.5"): "5-22-29. Setting shoe in Pier 8. wt. of lower shoe = 10 tons. Base 7'-3 x 8'-6 = 61.6 [square feet]"; Image #342 (2.75" x 4.5"): "5-22-29. Setting main shoes on Pier 8.";Four 4.5" x 2.75" B/W photos numbered 339, 340, 341, 342
Image #343 (2.75" x 4.5"): "5-22-29. Erecting bottom chord joint at L10, Pier 8. Weight 13 tons."; Image #344 (2.75" x 4.5"): "5-22-29. Same as 343. (Leatherman)."; Image #345 (2.75" x 4.5"): "5-22-29. Pulling joint L10 back into place to connect to bott. chord L8 L10 and diagonal M9 L10."; Image #348 (2.75" x 4.5"): "5-23-29. Bottom chord joint L10 before erection of stringers. Floorbeam in place.";Four 4.5" x 2.75" B/W photos numbered 343, 344, 345, 348
Image #346 (4.5" x 2.75"): " 5-22-29. East anchor arm just before erecting the joints at L10 on Pier 8. (See also 343, 344, 345, & 348)."; Image #347 (4.5" x 2.75"): "Traveler on floorbeam at L8, Span 7, from Pier 8."; Image #349 (4.5" x 2.75"): "5-23-29. Main bearing shoe, Pier 9. Anchor arm trusses not yet pulled back to connect to top shoe. See pulling and jacking devices, 350 and 351. 7'-3 x 8'-6 = 61.6 [square feet]. Max. Des. Load = 3,916,000 [pounds] = 63,540 [pounds/square feet] = 440 [pounds/square inch]. Max. Erec. Load = 2,658,000 [pounds] with suspended span cantilevered to center.";Three 4.5" x 2.75" B/W photos numbered 346, 347, 349
Image #350 (2.75" x 4.5"): "5-23-29. Pulling device (at left) at L0 - Span 9. Where deck span adjoins anchor arm."; Image #351 (2.75" x 4.5"): "5-23-29. Jacking device at end of anchor arm. Pulling device, showing turnbuckle - just beyond."; Image #352 (2.75" x 4.5"): "5-23-29. West anchor arm landed on Pier 8 (right)."; Image #353 (2.75" x 4.5"): "5-24-29. Looking west from Span 9.";Four 4.5" x 2.75" B/W photos numbered 350, 351, 352, 353
Unnumbered Image (5" x 7"): "Progress in Cooper River, May 24, 1929 at 5: P.M. Both travelers are tied up for lack of steel. Traveler A (right) held at L8 on account of shop error in joint at L10. Traveler B (left) has moved to L9. Note U.S. Navy destroyers.";One 5" x 7" B/W photo
Image #354 (2.75" x 4.5"): "5-26-29. Deck spans 10, 11, and 12 - from stair tower at Pier 10. Trusses are 40 ft. deep."; Image #355 (2.75" x 4.5"): "5-26-29. Looking down from deck of bridge at falsework footing #31, under L8. Span 9. (See 333)."; Image #356 (2.75" x 4.5"): "5-26-29. Same as 355."; Image # 5-26-29. Falsework footing #32, under L6, Span 9. (See also 334).";Four 4.5" x 2.75" B/W photos numbered 354, 355, 356, 357
Image #360 (2.75" x 4.5"): "5-28-29. rolling top chord U8 U10 - 100 ft. long Wt. 36 tons."; Image #361 (2.75" x 4.5"): "5-28-29. U8 U10 being rolled right side up for erection. Note special rolling slings & sheaves."; Image #362 (2.75" x 4.5"): "5-28-29. Loading U8 U10 on truck to be run out and loaded on lighter."; Image #363 (2.75" x 4.5"): "5-28-29. Loading U8 U10 on lighter.";Four 4.5" x 2.75" B/W photos numbered 360, 361, 362, 363
Image #364 (2.75" x 4.5"): "5-28-29. East anchor arm (left) - Town Creek Span in distance and west anchor arm (right)."; Image #365 (2.75" x 4.5"): "5-29-29. Town Creek Span & west anchor arm of Cooper River Span with U8 U10 just erected."; Image #366 (2.75" x 4.5"): "5-29-29. Erecting top chord U8 U10. Span 9. (Patterson)."; Image #367 (2.75" x 4.5"): "5-29-29. Erecting U8 U10. Span 9.";Four 4.5" X 2.75" B/W photos numbered 364, 365, 366, 367
Image #372 (2.75" x 4.5"): "5-29-29. Looking down from U10, over Pier 8. Elev. = 280 ft. above water. Note lighter with steel."; Image #373 (4.5" x 2.75"): "5-29-29. Top chord U8 U10 just entered into joint at U8 and ready to be pulled in and connected. Span 9.";Two 4.5" x 2.75" B/W photos numbered 372, 373