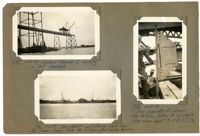
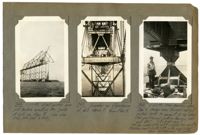
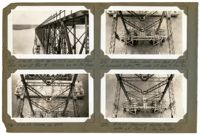
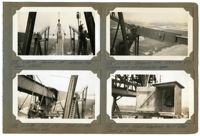
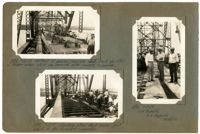
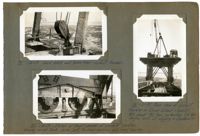
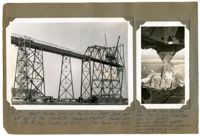
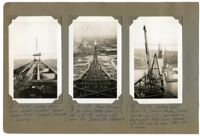
Image #551 (4.5" x 2.75"): "7-25-29. Sling after starting to take a strain on it. Overhauling ball prevents the end from pulling out of the half hitch. This sling will cut a cypress pile in two under 80 to 90 tons pull."; Image #554 (2.75" x 4.5"): "8-1-29. One of the most unique of bridge pictures."; Image #560 (2.75" x 4.5"): "Another view as above, further back.";Three 4.5" x 2.75" B/W photos numbered 551, 554, 560
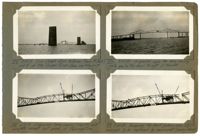
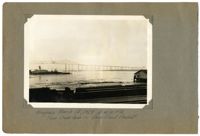
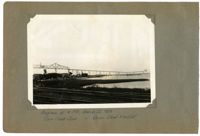
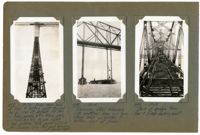
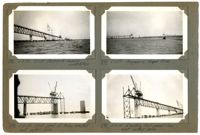
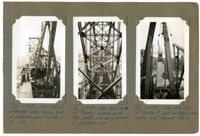
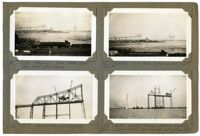
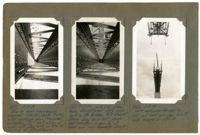
Image #174 (2.75" x 4.5"): "3-17-29. Town Creek Span between Piers 9 (left) and 8 of the Cooper River Span. Looking west."; Image #175 (2.75" x 4.5"): "3-12-29. Suspended Span swung (3-16-29) and complete except last panel of floor system."; Image #176 (2.75" x 4.5"): 3-20-29. Suspended span has been swung. Note gap in top chord to right of traveler."; Image #177 (2.75" x 4.5"): 3-20-29. Temporary top chord jacking links U13 U14 removed to be replaced by permanent 'dummy' chords.";Four 4.5" x 2.75" B/W photos numbered 174, 175, 176, 177
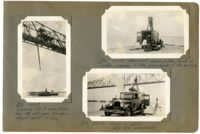
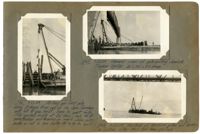
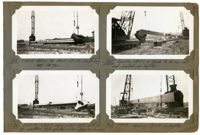
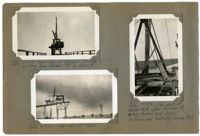
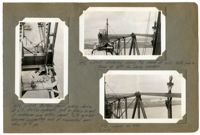
Image #539 (4.5" x 2.75"): "7-15-29. Lowering 100 ft. main boom from the last span traveler. Weight about 11 tons."; Image #540 (2.75" x 4.5"): "7-16-29. Paramount sound-picture truck on a lighter, preparing to take sound-movies of the bridge."; Image #541 (2.75" x 4.5"): "7-16-29. Same as above. Note the microphone.";Three 4.5" x 2.75" B/W photos numbered 539, 540, 541
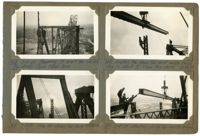
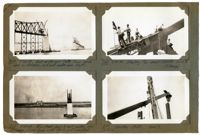
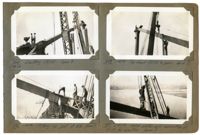
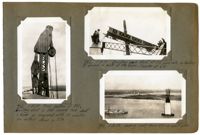
Image #163 (2.75" x 4.5"): "3-15-29. Preparing to erect the closing top chords - Town Creek Span."; Image #164 (2.75" x 4.5"): "3-15-29. Gap for closing top chord U16 U18."; Image #165 (2.75" x 4.5"): "Erecting the closing top chord - south truss. Gap is about 2" longer than chord. 3-15-29."; Image #171 (2.75" x 4.5"): "3-15-29. Erecting closing top - north truss.";Four 4.5" x 2.75" B/W photos numbered 163, 164, 165, 171
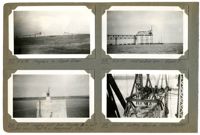
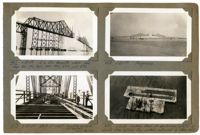
Image #497 (4.5" x 2.75"): "6-28-29. From near base of Pier 9 looking west toward Pier 8, 1050 ft. distant. Of the 24 truss panels b't'n. these piers, (L10 to L22 to L10), 19 are visible in this picture. Note panel L22 L21 with stringers lying flat and bracing not connected."; Image #498 (4.5" x 2.75"): "6-28-29. Removing steel falsework with snatched lines run from steam hoist on lighter to bottom chord of truss."; Image #499 (4.5" x 2.75"): "6-28-29. Deck of bridge from Pier 8 (L10) - looking east.";Three 4.5" x 2.75" B/W photos numbered 497, 498, 499
Picturing the Bridge. The story of the Cooper river bridge as told in the special editions of the Charleston newspapers was rendered vivid by the wealth of illustrations in those publications, showing progress of the work on the great structure from the beginning to the moment of opening. These pictures will make interesting history and will doubtless be shown in years to come by many of those who participated in the jubilation of yesterday and will be keen to tell of the celebration to the youngsters who will take it all for granted that there is a driveway across the Cooper for their cars. The engineers and builders of the bridge, as, indeed, all of the officers of the corporation which owns and of the contractors who built it, cooperated in every possible way with the newspapers in the making of the special editions complete records of the work and of the occasion celebrated at the opening, and to them The Evening Post expresses its appreciation and thanks. Especially is it under obligations to Mr. E. L. Durkee, engineer of the McClintic-Marshall Company, for putting at its disposal his extensive collection of photographs of the work during the various stages of its progress. The pictures tell the story of the bridge as no verbal description could and there are virtually no significant phases of the work which escaped Mr. Durkee's camera. To have had access to this collection was the good fortune of The Evening Post and of the public to whom it was enabled to present them.;Newspaper clipping (6.5" x 2") from the Charleston Evening Post, titled "Picturing the Bridge."
Image #308 (2.75" x 4.5"): "5-9-29. Progress at noon."; Image #309 (2.75" x 4.5"): "5-9-29. Falsework bent #29, L6 - west anchor arm. Low tide, 25 ft. of water. 16 plumb piles & 8 batter piles under each column. Max. load = 20 1/2 tons per pile."; Image #310 (2.75" x 4.5"): "5-10-29. Traveler A, east side, at L4."; Image #311 (2.75" x 4.5"): " 5-10-29. Looking west from traveler on Cooper River Span, west anchor arm.";Four 4.5" x 2.75" B/W photos numbered 308, 309, 310, 311
Image #302 (2.75" x 4.5"): "5-9-29. Traveler B at L2, ready to move out to L3. East anchor arm."; Image #304 (2.75" x 4.5"): "5-9-29. Field office on bottom chord of deck span 10 - at anchor pier 10."; Image #305 (2.75" x 4.5"): "5-9-29. Looking west from traveler B toward traveler A. Town Creek span at left."; Image # 307 (2.75" x 4.5"): " 5-9-29. Erecting falsework bent at L6 - west anchor arm.";Four 4.5" x 2.75" B/W photos numbered 302, 304, 305, 307
Image #500 (2.75" x 4.5"): "6-28-29. The cooper River Cantilever as seen from the Drum Island Viaduct, looking east."; Image #501 (2.75" x 4.5"): "6-29-29. Omohundro (Oak), D.V. Lewis, Stevenson "Rube" Toms, Drake."; Image #502 (2.75" x 4.5"): "6-29-29. Swinging the suspended span. Fitting up bott. chord joints at L21 east."; Image #503 (2.75" x 4.5"): "6-29-29. Swinging the suspended span. Connecting and fitting up closing top chord joints at U22.";Four 4.5" x 2.75" B/W photos numbered 500, 501, 502, 503
Image #506 (4.5" x 2.75"): "6-30-29. From top of Pier 9, looking west toward Pier 8, 1050 ft. distant. 24 Panels at 43'-9" - count 'em!"; Image #507 (2.75" x 4.5"): "6-30-29. The suspended span with travelers under the portal bracing, preparing to remove the jacking chords."; Image #508 (2.75" x 4.5"): "6-30-29. Looking west from south side of span, between piers 10 and 11.";Three 4.5" x 2.75" B/W photos numbered 506, 507, 508
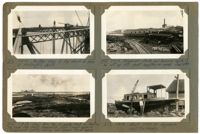
Image #240 (2.75" x 4.5"): "4-9-29. Compressor plant under Span 35D, near Pier 5, and ramp leading to it from Pier 37D which is in deep water."; Image #242 (2.75" x 4.5"): "4-18-29. Falsework under Span 5. Falsework bents have battered columns."; Image #241 (2.75" x 4.5"): "4-18-29. Rocker bearing and roller expansion shoe under 270 ft. deck truss span - Pier 6."; Image #243 (2.75" x 4.5"): "4-15-29. Span 5 erected to U5L6.";Four 4.5" x 2.75" B/W photos numbered 240, 241, 242, 243
Image #285 (2.75" x 4.5"): "4-30-29. Viaduct Traveler C working on East Approach."; Image #286 (2.75" x 4.5"): "5-1-29. Our wharf and storage yard from the Cooper River. Note the 3-locomotive crane booms."; Image #283 (4.5" x 2.75"): "4-30-29. Poor assembly of column-cap details. Taken to illustrate shop error report to V.B.& I. Co.";Three 4.5" x 2.75" B/W photos numbered 283, 285, 286
Image #531 (4.5" x 2.75'): "7-9-29. Lowering the first main engine from the deck of the Cooper River Span to a lighter below. Weight of engine 31 tons, plus rigging. Two sets wire cable falls of 5 parts each, leading off of the two top drums. Clutch out, frictions in, and lowered by foot brakes. Engine running to allow use of clutch if necessary."; Image #532 (2.75" x 4.5"): "7-9-29. Same as 531. Note horizontal leads of cable falls, thru snatch blocks, instead of straight up off of drums."; Image #533 (2.75" x 4.5"): "7-11-29. Removing rigging, riveting, laying forms, pouring concrete deck, & painting overhead - all at once!";Three 4.5" x 2.75" B/W photos numbered 531, 532, 533
Image #516 (2.75" x 4.5"): "7-4-29. Another view of top chord at time of McKnight's death."; Image #522 (2.75" x 4.5"): "7-8-29. View from top of water tank on Meeting St. near the West Approach. Town Creek span in foreground partly hiding the Cooper River span."; Image #523 (2.75" x 4.5"): "7-9-29. Falsework struts and bracing ready to be cut up into short lengths of scrap. See 579."; Image #524 (2.75" x 4.5"): "7-9-29. Boat U1010 in drydock. Cap't. T.W. Murphy.";Four 4.5" x 2.75" B/W photos numbered 516, 522, 523, 524
Image #254 (2.75" x 4.5"): "4-24-29. East Approach - end of causeway and start of steel girder spans."; Image #256 (2.75" x 4.5"): "4-24-29. Typical timber pile falsework footing before being braced. Piles are unusually well lined up."; Image #255 (2.75" x 4.5"): "4-23-29. Falsework footings 28 and 29 & Pier 8 beyond - looking east from top of anchor pier 7."; Image #257 (2.75" x 4.5"): "4-23-29. Framing timber falsework pile bents.";Four 4.5" x 2.75" B/W photos numbered 254, 255, 256, 257
Image #346 (4.5" x 2.75"): " 5-22-29. East anchor arm just before erecting the joints at L10 on Pier 8. (See also 343, 344, 345, & 348)."; Image #347 (4.5" x 2.75"): "Traveler on floorbeam at L8, Span 7, from Pier 8."; Image #349 (4.5" x 2.75"): "5-23-29. Main bearing shoe, Pier 9. Anchor arm trusses not yet pulled back to connect to top shoe. See pulling and jacking devices, 350 and 351. 7'-3 x 8'-6 = 61.6 [square feet]. Max. Des. Load = 3,916,000 [pounds] = 63,540 [pounds/square feet] = 440 [pounds/square inch]. Max. Erec. Load = 2,658,000 [pounds] with suspended span cantilevered to center.";Three 4.5" x 2.75" B/W photos numbered 346, 347, 349
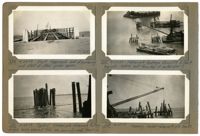
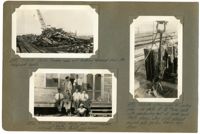
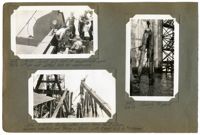
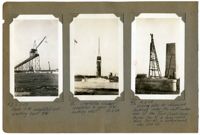
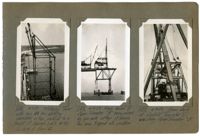
Image #546 (4.5" x 2.75"): "7-22-29. Pulling our first pile using A-frame from one of the Span Travelers, and 150 FP [foot pounds] gas. hoist. Nine (9) part falls. Pile pulled easily at 35 tons - only 20 ft. penetration and bearing on marl. Some piles broke or cut in two under 85 to 90 ton pull."; Image #547 (2.75" x 4.5"): "7-22-29. General view of pile-pulling derrick. Timber lighter 30' x 110' x 8' +/- deep."; Image #548 (2.75" x 4.5"): "7-23-29. Method of handling piles and loading on lighters after they had been pulled.";Three 4.5" x 2.75" B/W photos numbered 546, 547, 548
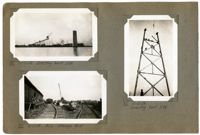
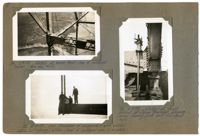
Image #549 (2.75" x 4.5"): "7-23-29. 12 x 12 Timber caps and blocking removed from the falsework bents."; Image #550 (4.5" x 2.75"): "7-25-29. Sling used for pulling piles - six parts of 1 1/4" [diameter] wire cable with overhauling ball at lower end. Photo shows sling just placed around pile, before taking any strain."; Image #522 (2.75" x 4.5"): "7-25-29. Office force and timekeepers. E. Neufer, E.L.D., W.R. Drake, Roberts, Bacot, D.W. Graham, Frank.";Three 4.5" x 2.75" B/W photos numbered 549, 550, 552
Image #291 (4.5" x 2.75"): "5-3-29. East Approach nearing completion."; Image #294 (4.5" x 2.75"): "5-5-29. First panel of truss erected - west anchor arm."; Image #295 (4.5" x 2.75"): "5-6-29. Erecting first panel of floor - east anchor arm."; Image #297 (4.5" x 2.75"): "5-6-29. Progress in Cooper River.";Four 4.5" x 2.75" B/W photos numbered 291, 294, 295, 297
Image #354 (2.75" x 4.5"): "5-26-29. Deck spans 10, 11, and 12 - from stair tower at Pier 10. Trusses are 40 ft. deep."; Image #355 (2.75" x 4.5"): "5-26-29. Looking down from deck of bridge at falsework footing #31, under L8. Span 9. (See 333)."; Image #356 (2.75" x 4.5"): "5-26-29. Same as 355."; Image # 5-26-29. Falsework footing #32, under L6, Span 9. (See also 334).";Four 4.5" x 2.75" B/W photos numbered 354, 355, 356, 357
Image #360 (2.75" x 4.5"): "5-28-29. rolling top chord U8 U10 - 100 ft. long Wt. 36 tons."; Image #361 (2.75" x 4.5"): "5-28-29. U8 U10 being rolled right side up for erection. Note special rolling slings & sheaves."; Image #362 (2.75" x 4.5"): "5-28-29. Loading U8 U10 on truck to be run out and loaded on lighter."; Image #363 (2.75" x 4.5"): "5-28-29. Loading U8 U10 on lighter.";Four 4.5" x 2.75" B/W photos numbered 360, 361, 362, 363
Image #364 (2.75" x 4.5"): "5-28-29. East anchor arm (left) - Town Creek Span in distance and west anchor arm (right)."; Image #365 (2.75" x 4.5"): "5-29-29. Town Creek Span & west anchor arm of Cooper River Span with U8 U10 just erected."; Image #366 (2.75" x 4.5"): "5-29-29. Erecting top chord U8 U10. Span 9. (Patterson)."; Image #367 (2.75" x 4.5"): "5-29-29. Erecting U8 U10. Span 9.";Four 4.5" X 2.75" B/W photos numbered 364, 365, 366, 367
Image #312 (2.75" x 4.5"): "5-16-29. Progress in Cooper River."; Image #313 (2.75" x 4.5"): "5-16-29. West anchor arm - Span 7."; Image #314 (2.75" x 4.5"): "5-16-29. Looking east from traveler B on west anchor arm. Pier B in foreground, Elev. 132.0'."; Image #319 (2.75" x 4.5"): "5-16-29. Looking down on Span Traveler.";Four 4.5" X 2.75" B/W photos numbered 312, 313, 314, 319
Image #103 (2.75" x 4.5"): "2-22-29. Boomed out, between top chords U14 U16."; Image #104 (2.75" x 4.5"): "2-22-29. Joint U13 - End of the cantilever arm."; Image #105 (2.75" x 4.5"): "2-22-29. Temporary links U13 to U14, b't'n. cantilever arm and suspended span."; Image #112 (2.75" x 4.5"): "2-23-29. Field telephone - top of stair tower at Pier 4.";Four 4.5" x 2.75" B/W photos numbered 103, 104, 105, 112
Image #100 (4.5" x 2.75"): "2-22-29. From U15, on suspended span, looking back at cantilever arm. Traveler is at L13."; Image #101 (4.5" x 2.75"): "2-22-29. View from deck of traveler looking back thru portal and sway bracing of cantilever arm."; Image #102 (4.5" x 2.75"): "2-22-29. View from roof of Traveler A, west cantilever arm, looking east toward Pier 3.";Three 4.5" x 2.75" B/W photos numbered 100, 101, 102
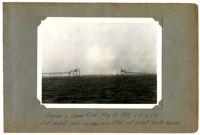
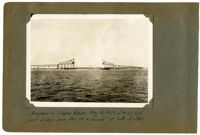
Unnumbered Image (5" x 7"): "Progress in Cooper River, May 10, 1929, at 4:30 P.M. East viaduct (right) has been completed and viaduct traveler removed.";One 5" x 7" B/W photo
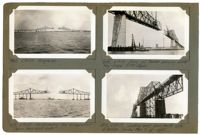
Image #467 (2.75" x 4.5"): "6-20-29. E.L.D.'s favorite view. See also Nos. 174, 364, 444, 494, 554, and 571."; Image #468 (2.75" x 4.5"): "6-20-29. Progress."; Image #469 (2.75" x 4.5"): "6-20-29. Deck of west cantilever arm. G.R. Bullard, H.J. Stetina."; Image #470 (2.75" x 4.5"): "6-21-29. Looking down on anchorage lighter for mooring other lighters. Four anchors controlled by steam hoist.";Four 4.5" x 2.75" B/W photos numbered 467, 468, 469, 470
Image #445 (2.75" x 4.5"): "6-18-29. Joint L17 - end of suspended span. Note 3" [diameter] pin and slotted hole for expansion."; Image #446 (2.75" x 4.5"): "6-18-29. Pulling piles using Union No. 2 steam hammer, inverted, and taking a strain with 3-part falls by "Wateree"."; Image #447 (4.5" x 2.75"): "6-18-29. Ready to pull.";Three 4.5" x 2.75" B/W photos numbered 445, 446, 447
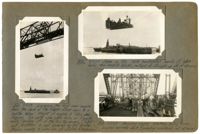
Image #463 (2.75" x 4.5"): "6-19-29. Progress."; Image #464 (2.75" x 4.5"): "6-19-29. Cantilevering the suspended span from each side."; Image #465 (2.75" x 4.5"): "6-19-29. Navy oil tanker passing under the Cooper River Span."; Image #466 (2.75" x 4.5"): "6-20-29. Looking east from north side of bridge. Anchor Pier 7 at right.";Four 4.5" x 2.75" B/W photos numbered 463, 464, 465, 466
Unnumbered Image (5" x 7"): "Progress in Cooper River, May 3, 1929 at 4:30 P.M. East Approach (right) complete except two spans.";One 5" x 7" B/W photo
Image #13 (4.5" x 2.75"): "12-3-28. Span 10 W completed and erecting bent 8 W."; Image #15 (4.5" x 2.75"): "Charleston Viaduct completed to span 10 W. Looking west. 12-3-28."; Image #16 (4.5" x 2.75"): "12-3-28 Driving piles for false work footings under the west anchor arm of the Town Creek Span. Anchor Pier #1 in foreground. Main Pier #2 in background, elev. 134 ft.";Three 4.5" x 2.75" B/W photos numbered 13, 15, 16
Image #534 (2.75" x 4.5"): "7-13-29. Method of pouring concrete deck. Track elevated on timber horses which are removed after concrete is poured."; Image #535 (2.75" x 4.5"): "7-13-29. Riveting steel deck beams - just ahead of the formwork carpenters."; Image #536 (4.5" x 2.75"): "7-13-29. J.H. Reynolds. W.E. Reynolds. Winston.";Three 4.5" x 2.75" B/W photos numbered 534, 535, 536
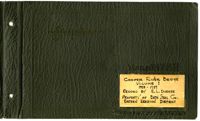
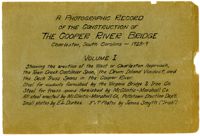
A Photographic Record of the Construction of the Cooper River Bridge; Charleston, South Carolina - 1928-29; Volume I; Showing the erection of the West or Charleston approach, the Town Creek Cantilever Span, the Drum Island Viaduct, and the Deck Truss Spans in the Cooper River. Steel for viaducts furnished by the Virginia Bridge & Iron Co. Steel for truss spans furnished by McClintic-Marshall Co. All steel erected by McClintic-Marshall Co., Pottstown Erection Dep't. Small photos by E.L. Durkee. 5" x 7" Photos by James Smyth ("Irish").;Title Page, 6.75" x 10.125"
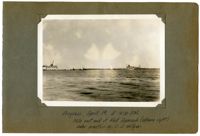
Unnumbered Image (5" x 7'): "Progress in Cooper River, May 31, 1929 at 4:30 P.M. Lost 3 days since May 24 on account of lack of steel.";One 5" x 7" B/W photo
Image #235 (4.5" x 2.75"): "4-7-29. Material Tower with two 50 ton stiffleg derricks on top, erected to a height of 3 panels (ab't 95 ft.) On dock at Pier 13."; Image #238 (4.5" x 2.75"): "4-9-29. Main boom of Span Traveler 'B' being raised by gin pole after A-frame has been tripped into position."; Image #239 (4.5" x 2.75"): "4-9-29. From deck of Viaduct Traveler 'C', erecting Span Traveler 'B'.";Three 4.5" x 2.75" B/W photos numbered 235, 238, 239
Image #70 (2.75" x 4.5"): " 1-30-29. Lead block and boom heel - viaduct traveler."; Image #72 (2.75" x 4.5"): "1-30-29. Detail at front corner of viaduct traveler, showing swivel truck, 40 ton jack, tie-down anchors, and front bearing."; Image #73 (4.5" x 2.5"): "1-30-29. rear view of viaduct traveler on Drum Island Viaduct. Wt. about 80 tons, including 25 ton engine and all rigging & counterw't.";Three 4.5" x 2.75" B/W photos numbered 70, 72, 73
Image #61 (2.75" x 4.5"): "1-23-29. Progress - Town Creek Span. Taken from office tower."; Image #62 (2.75" x 4.5"): "Progress - Town Creek & Drum Island (right). 1-26-29."; Image #63 (2.75" x 4.5"):"1-28-29. West anchor arm complete."; Image #64 (2.75" x 4.5"): "1-28-29. Viaduct traveler starting erection of Drum Island Viaduct. span traveler not yet erected.";Four 4.5" x 2.75" B/W photos numbered 61, 62, 63, 64
Image #236 (2.75" x 4.5"): "4-7-29. Rear view of Viaduct Traveler 'C' erecting Span Traveler 'A' on Span 5."; Image #237 (2.75" x 4.5"): "4-7-29. Side view of #236."; Image #232 (4.5" x 2.75"): "4-7-29. Top deck of double-deck Span Traveler A, looking toward rear boom, A-frame and backstay connection.";Three 4.5" x 2.75" B/W photos numbered 232, 236, 237
Unnumbered Image (5" x 7"): "Progress, April 19, 1929 at 4:30 P.M. Note east end of East Approach (extreme right) under erection by C.E. Hillyer.";One 5" x 7" B/W photo
Unnumbered Image (5" x 7"): "1-28-29. West Anchor arm of the Town Creek Span and east end of the Charleston Approach Viaduct. Anchor arm is 256 ft. long (8 panels at 32 ft.). Stair tower at left."; Image #66 (4.5" x 2.75"): "1-30-29. Main bearing shoe, Pier 2, Town Creek Span. 5' 0" x 5' 9" = 28.75 [square feet]. Des. Load = 1,813,000# = 438 # [per square inch]. Erec. Load = 1,089,000# max. (suspended span cantilevered to center). Lower shoe 3' 4" high.";One 4.5" x 2.75" B/W photo and one 5" x 7" B/W photo. Smaller photo numbered 66.
Image #451 (4.5" x 2.75"): "6-18-29. Bow in main compression diagonal L14 U15, south truss, east cantilever arm. Measured deflection 1 9/16". Note string at lower left. See 495 and 496 for method of straightening."; Image #553 (4.5" x 2.75"): "7-27-29. L14 U15 after being straightened while under load in the bridge. Note straight string along lower left flange. Max variation is now 7/16" at lower end only. Remainder straight."; Image #452 (4.5" x 2.75"): "6-19-29. West cantilever (far side) to L21 and east arm (top) to L17 with hangers at U18 L18.";Three 4.5" x 2.75" B/W photos numbered 451, 453, 553
Image #488 (4.5" x 2.75"): "6-27-29. Bottom chord jacking device at L17. 500-Ton hydraulic jack in place in end of cantilever arm bottom chord. Note eye-bar hangers supporting end of suspended span thru 10" [diameter] pin."; Image #492 (2.75" x 4.5"): "6-27-29. Entering closing top chord at U22. Note gap in truss at left for closing member."; Image #493 (2.75" x 4.5"): "6-27-29. Same as 492.";Three 4.5" x 2.75" B/W photos numbered 488, 492, 493
Image #382 (2.75" x 4.5"): "5-31-29. Erecting peak strut at U10 west side, by hauling it around in the back of the boom. Traveler at L10."; Image #383 (4.5" x 2.75"): "5-31-29. Final position of 382. Erecting strut in this manner took about 2 hours as compared with 10 minutes for method shown in 379."; Image #384 (2.75" x 4.5"): "5-31-29. Looking west from U10 on east side.";Three 4.5" x 2.75" B/W photos numbered 382, 383, 384
Image #95 (2.75" x 4.5"): "2-15-29. Looking down Drum Island Viaduct toward Cooper River. Viaduct Traveler C erecting."; Image #98 (2.75" x 4.5"): "2-22-29. From the peak of the Town Creek Span (U8), elev. 235 ft. looking west down the Charleston Approach."; Image #99 (2.75" x 4.5"): "2-22-29. Looking east from U8, toward Drum Island Traveler at L13, rear boom in foreground. Main boom, boomed out flat, can be seen thru the A-frame.";Three 4.5" x 2.75" B/W photos numbered 95, 98, 99
Image #86 (2.75" x 4.5"): "Detail at boom heel - top of material tower. (See also #67)."; Image #93 (2.75" x 4.5"): "2-14-29. End floorbeam of suspended span erected before last (dummy) bottom chord of cantilever arm is in place."; Image #94 (2.75" x 4.5"): "2-14-29. Detail at front corner of Span Traveler, showing screw bearing jack and tie-down-rods.";Three 4.5" x 2.75" B/W photos numbered 96, 93, 94