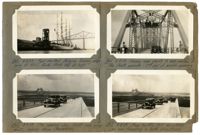
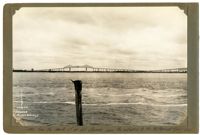
Image #561 (2.75" x 4.5"): "8-8-29. Four-masted Belgian Training ship lying at P.U.C. Dock. Masts 185 ft. high."; Image #562 (2.75" x 4.5"): "8-8-29. The opening day. First cars going east, coming from Charleston."; Image #562 (2.75" x 4.5"): "8-8-29. Free traffic till 4:00 P.M.! Cars now traveling in both directions."; Image #564 (2.75" x 4.5"): "8-9-29. Camera man ready to take movies of the floats parade - 2nd day of bridge opening.";Four 4.5" x 2.75" B/W photos numbered 561, 562, 562, 564
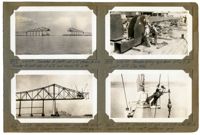
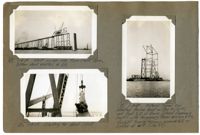
Image #422 (2.75" x 4.5"): "6-11-29. Traveler B (left) at L15 & truss to L16. Traveler A (east side) at L12 and truss to L14."; Image #423 (2.75" x 4.5"): "6-12-29. West cantilever arm complete except floor L16 to L17. Eye-bar hangers U17 L17 being erected."; Image #424 (2.75" x 4.5"): "6-12-29. Assembling eye-bars U17 L17 to joint L17 (See 420)."; Image #425 (2.75" x 4.5"): "6-12-29. Driving 10" pin at U17 with 500lb. overhauling ball - west cantilever arm.";Four 4.5" x 2.75" B/W photos numbered 422, 423, 424, 425
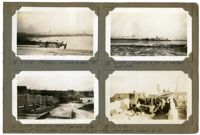
Image #14 (2.75" x 4.5"): "12-4-28. Progress. Complete to span 9W."; Image #19 (2.75" x 4.5"): "12-13-29. Complete to 5W and erecting bent 3W."; Images #17, 18 (2.75" x 4.5"): "12-8-28. Wreck on West Approach after runaway of 14 ton girder which pushed locomotive down grade ahead of it.";Four 4.5" x 2.75" B/W photos numbered 14, 17, 18, 19
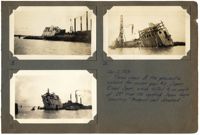
Images #8, 10, 12 (2.75" x 4.5"): Caption under all photos: Dec. 2, 1928. Three views of pneumatic caisson for anchor pier #10, Cooper River Span, which tilted to an angle 29 [degrees] from the vertical. Seven negro 'sand-hogs' trapped and drowned.";Three 4.5" x 2.75" B/W photos numbered 8, 10, 12
Image #49 (2.75" x 4.5"): "1-18-29. West anchor arm, Town Creek Span. Bottom chord erected to L6."; Image #50 (2.75" x 4.5"): "1-18-29. Erecting top chord U3U5."; Image #51 (4.5" x 2.75"): "1-18-29. Material Tower has erected Anchor Bent on Pier 4 (left), and Bent 1 D of Drum Island Approach (right) with temporary tower bracing b't'n. viaduct traveler trusses, assembled, on lighter at left. (See 57)";Three 4.5" x 2.75" B/W photos numbered 49, 50, 51
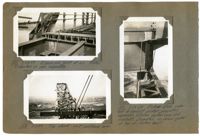
Image #108 (4.5" x 2.75"): "2-22-29. Detail of lead sheave at heel of boom on span traveler. Note swivel connection (See also #133)."; Image #110 (4.5" x 2.75"): "2-22-29. Looking west from top of Pier 2, toward anchored bent on Pier 1. Falsework columns still in place, but bracing has been removed."; Image #111. (4.5" x 2.75"): "2-22-29. Looking east from top of Pier 2 toward Pier 3 and Drum Island.";Three 4.5" x 2.75" B/W photos numbered 108, 110, 111
Image #120 (2.75" x 4.5"): "2-24-29. Expansion joint at L0. Plates supported on pipe separators."; Image #128 (2.75" x 4.5"): "3-3-29. Top chord - west cantilever arm."; Image #121 (4.5" x 2.75"): "2-24-29. Rocker shoe under end of viaduct girder, providing expansion between anchor arm and viaduct. Supported on cross girder at top of anchor bent.";Three 4.5" x 2.75" B/W photos numbered 120, 121, 128