Image #83 (2.75" x 4.5"): "2-7-29. Material Tower erecting Span Traveler B. Viaduct traveler erecting Span 5D - Drum Island Viaduct."; Image #84 (2.75" x 4.5"): "2-7-29. Falsework footings Nos. 4 and 5, east anchor arm - Town Creek."; Image #85 (4.5" x 2.75"): "2-7-29. Steel material Tower F067 & F0187. 40 ft. square x 130 ft. high to boom heels. Two 70 ft. boom (30 ton capacity). On dock opposite Pier 4";Three 4.5" x 2.75" B/W photos numbered 83, 84, 85
Image #37 (2.75" x 4.5"): "1-10-29. West Approach, looking west. From top of traveler on west anchor arm of Town Creek Span."; Image #41 (2.75" x 4.5"): "1-10-29. Joint L2, Town Creek Span. Note front bearing of traveler. Tie down rods have been removed and cable used at this particular point only."; Image #40 (2.75" x 4.5"): "1-10-29. Erecting bottom chord L2L4.";Three 4.5" x 2.75" B/W photos numbered 37, 40, 41
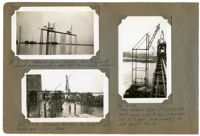
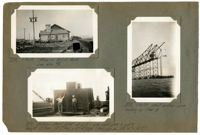
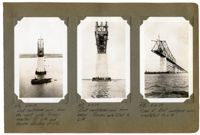
Image #29 (4.5" x 2.75"): "1-1-29."; Image #30 (4.5" x 2.75"): "1-3-29." ; Image #31 (4.5" x 2.75"): "1-3-29." Caption under all pictures: "Erecting steel material tower on deck at Pier 4, Town Creek Span, with an 80 ft. boom used first as a gin pole and then as a 'basket boom.' See 32 and 33 for detail of basket support.";Three 4.5" x 2.75" B/W photos numbered 29, 30, 31
Image #32 (2.75" x 4.5"): "1-1-29. Base of boom in Chicago heel and 'basket', used as gin pole on dock at Pier 4."; Image #33 (2.75" x 4.5"): "1-3-29. Base of "basket boom', showing details of support."; Image #36 (4.5" x 2.75"): "1-6-29. West Approach from America St. looking east, before street was paved. (See 271.)";Three 4.5" x 2.75" B/W photos numbered 32, 33, 36
Image #336 (2.75" x 4.5"): "5-18-29. Office in A.C.L. Yard. See also #1."; Image #337 (2.75" x 4.5"): "Bottom chord joint at L10 - over main piers 8 and 9. Weight 13 tons. 12'-7" long x 12'-4" high (Main gas. pl. 108" x 1" x 12'-7")."; Image #338 (4.5" x 2.75"): "5-21-29. West anchor arm landing on Pier 8.";Three 4.5" x 2.75" B/W photos numbered 336, 337, 338
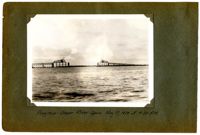
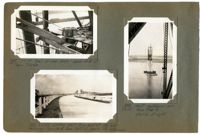
Image #395 (2.75" x 4.5"): "6-6-29. Heel of main boom - upper deck of Span Traveler."; Image #398 (4.5" x 2.75"): "6-6-29. West cantilever arm, from Pier 9. U12 L12 at right."; Image #401 (2.75" x 4.5"): "6-6-29. Looking west from end of the east causeway. Town Creek Span (left) is nearly 1 3/4 miles away.";Three 4.5" x 2.75" B/W photos numbered 395, 398, 401
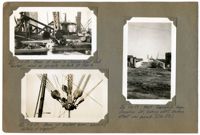
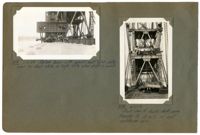
Image #414 (2.75" x 4.5"): "6-10-29. Balance beam with special bent hitch plates used for short hitch on high lifts wher [sic] drift is small."; Image #415 (4.5" x 2.75"): "6-11-29. Front view of double-deck span traveler A at L12 on east cantilever arm.";Two 4.5" x 2.75" B/W photos numbered 414, 415
Image #416 (4.5" x 2.75"): "6-11-29. East cantilever arm, from the west side. Trusses erected to L14 and traveler standing at L12."; Image #417 (4.5" x 2.75"): "6-11-29. East cantilever arm from below. Trusses are erected to L14."; Image #418 (4.5" x 2.75"): "6-11-29. View of East cantilever arm, completed to L14.";Three 4.5" x 2.75" B/W photos numbered 416, 417, 418
Image #153 (2.75" x 4.5"): "3-13-29. One more panel to be erected."; Image #154 (2.75" x 4.5"): "3-13-29. Ready to erect the first closing bottom chord."; Image #155 (2.75" x 4.5"): "3-13-29. Erecting the closing bottom chord - south truss - Town Creek Span."; Image #158 (2.75" x 4.5"): "3-13-29. Erecting the closing bottom chord - north truss - Town Creek Span.";Three 4.5" x 2.75" B/W photos numbered 153, 154, 155, 158
Limit your search
Photographic Record of the Cooper River Bridge✖[remove]202