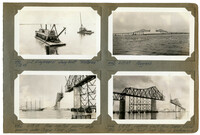
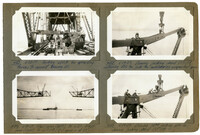
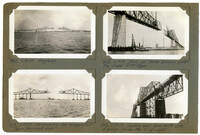
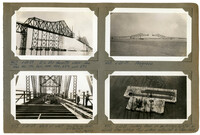
Image #411 (2.75" x 4.5"): "6-18-29. U.S. Engineers' Snag-boat 'Wateree.'"; Image #442 (2.75" x 4.5"): "6-18-29. Four-masted sailing ship passing under Cooper River Span."; Image #443 (2.75" x 4.5"): "6-17-29. Progress."; Image #444 (2.75" x 4.5"): "6-18-29. Looking west from Cooper River. Pier 10 at left. Town Creek Span in background.";Four 4.5" x 2.75" B/W photos numbered 441, 442, 443, 444
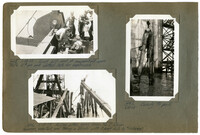
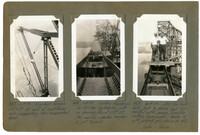
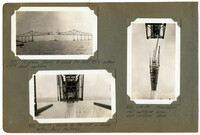
Image #445 (2.75" x 4.5"): "6-18-29. Joint L17 - end of suspended span. Note 3" [diameter] pin and slotted hole for expansion."; Image #446 (2.75" x 4.5"): "6-18-29. Pulling piles using Union No. 2 steam hammer, inverted, and taking a strain with 3-part falls by "Wateree"."; Image #447 (4.5" x 2.75"): "6-18-29. Ready to pull.";Three 4.5" x 2.75" B/W photos numbered 445, 446, 447
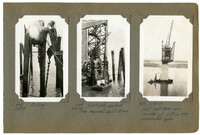
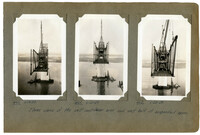
Image #448 (4.5" x 2.75"): "6-18-29. Pulling."; Image #449 (4.5" x 2.75"): "6-18-29. First pile pulled. Time required, about 15 min."; Image #450 (4.5" x 2.75"): "6-18-29. West cantilever arm. Traveler at L19 on the suspended span.";Three 4.5" x 2.75" B/W photos numbered 448, 449, 450
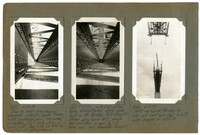
Image #451 (4.5" x 2.75"): "6-18-29. Bow in main compression diagonal L14 U15, south truss, east cantilever arm. Measured deflection 1 9/16". Note string at lower left. See 495 and 496 for method of straightening."; Image #553 (4.5" x 2.75"): "7-27-29. L14 U15 after being straightened while under load in the bridge. Note straight string along lower left flange. Max variation is now 7/16" at lower end only. Remainder straight."; Image #452 (4.5" x 2.75"): "6-19-29. West cantilever (far side) to L21 and east arm (top) to L17 with hangers at U18 L18.";Three 4.5" x 2.75" B/W photos numbered 451, 453, 553
Image #453 (2.75" x 4.5"): "6-20-29. Jacking stick for spreading trusses to connect bracing, etc."; Image #454 (2.75" x 4.5"): "6-19-29. West arm (left) to L21. East arm (right) to L17 U18. (CL [center line] of span is at 22)."; Image #455 (2.75" x 4.5"): "6-19-29. Dummy jacking chord U17 U18 containing 500 ton jack for cantilevering suspended span."; Image #456 (2.75" x 4.5"): "6-19-29. Driving 10" [diameter] jacking pin in dummy jacking chord U17 U18.";Four 4.5" x 2.75" B/W photos numbered 453, 454, 455, 456
Image #457 (4.5" x 2.75"): "6-19-29. Eye-bar hangers U17 L17 at end of cantilever arm, supporting the suspended span."; Image #458 (4.5" x 2.75"): "6-19-29. Jacking diaphragm for 500 ton hydraulic jack in dummy chord U17 U18. Pin carryin [sic] eye-bar hangers is just beyond."; Image #459 (4.5" x 2.75"): "6-19-29. 500-Ton hydraulic jack in place and connected with pump. Saddle casting (foreground) bears on 10" [diameter] jacking pin shown in 456. Drake - Varga.";Three 4.5" x 2.75" B/W photos numbered 457, 458, 459
Image #460 (4.5" x 2.75"): "6-19-29."; Image #461 (4.5" x 2.75"): "6-20-29."; Image #462 (4.5" x 2.75"): "6-20-29."; "Three views of the west cantilever arm and west half of suspended span.";Three 4.5" x 2.75" B/W photos numbered 460, 461, 462
Image #463 (2.75" x 4.5"): "6-19-29. Progress."; Image #464 (2.75" x 4.5"): "6-19-29. Cantilevering the suspended span from each side."; Image #465 (2.75" x 4.5"): "6-19-29. Navy oil tanker passing under the Cooper River Span."; Image #466 (2.75" x 4.5"): "6-20-29. Looking east from north side of bridge. Anchor Pier 7 at right.";Four 4.5" x 2.75" B/W photos numbered 463, 464, 465, 466
Image #467 (2.75" x 4.5"): "6-20-29. E.L.D.'s favorite view. See also Nos. 174, 364, 444, 494, 554, and 571."; Image #468 (2.75" x 4.5"): "6-20-29. Progress."; Image #469 (2.75" x 4.5"): "6-20-29. Deck of west cantilever arm. G.R. Bullard, H.J. Stetina."; Image #470 (2.75" x 4.5"): "6-21-29. Looking down on anchorage lighter for mooring other lighters. Four anchors controlled by steam hoist.";Four 4.5" x 2.75" B/W photos numbered 467, 468, 469, 470
Image #471 (2.75" x 4.5"): "Progress. Ready to place the last 87 1/6" bottom chord section."; Image #472 (2.75" x 4.5"): "6-21-29. Ready for the last or closing bottom chord sections."; Image #473 (4.5" x 2.75"): "6-21-29. From below. West cantilever, below. East cantilever, above.";Three 4.5" x 2.75" B/W photos numbered 471, 472, 473
Limit your search
Photographic Record of the Cooper River Bridge✖[remove]202