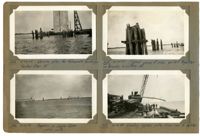
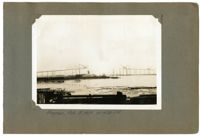
Image #264 (2.75" x 4.5"): "4-24-29. Driving piles for falsework footings. Anchor Pier 10."; Image #266 (2.75" x 4.5"): "Progress in Cooper River. Looking north."; Image #265 (2.75" x 4.5"): "4-24-29. Typical group of piles pulled together for bracing & cutting off."; Image #267 (2.75" x 4.5"): "4-26-29. Loading cypress piles from car to lighter.";Four 4.5" x 2.75" B/W photos numbered 264, 265, 266, 267
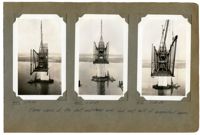
Image #333 (2.75" x 4.5"): "5-18-29. Falsework bent 31- L8 - East anchor arm. 16 Plumb piles and 10 battered piles under each col. 40 ft. of water at low tide. Taken at low tide. See also 355."; Image #334 (2.75" x 4.5"): "5-18-29. Falsework footing 32 - L6, anchor arm. Similar to bent 31. Max. load 20 1/2 tons per pile (D + L + Trav.)."; Image #335 (4.5" x 2.75"): "5-18-29. Looking west from top of anchor pier 10 showing steel falsework. Pier 9 beyond = 450 ft. Bents at 90 ft. centers. Flswk. cols. plumb and 37'-6" c. to c.";Three 4.5" x 2.75" B/W photos numbered 333, 334, 335
Image #518 (4.5" x 2.75"): "7-4-29."; Image #519 (4.5" x 2.75"): "7-4-29."; Image #520 (4.5" x 2.75"): "7-4-29."; "Three views showing conditions at time of R.H. McKnight's death. He was knocked from the top chord of the suspended span and fell to the deck below, July 3, 1929 at 10:45 A.M.";Three 4.5" x 2.75" B/W photos numbered 518, 519, 520
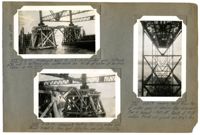
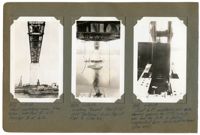
Image #26 (2.75" x 4.5"): " 1-3-29. Erecting first bottom chord section, L0L2, west anchor arm."; Image #27 (4.5" x 2.75"): "1-3-29. Steel falsework bent under L2, west anchor arm. connecting first bottom chord."; Image # 28 (2.75" x 4.5"): "1-2-29. Faslework footing #2 under panel point L4 - west anchor arm.;Three 4.5" x 2.75" B/W photos numbered 26, 27, 28
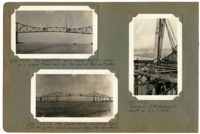
Image #5 (4.5" x 2.75"): "11-15-28. Front view of Span Traveler on the Charleston Approach."; Unnumbered Image (5" x 7"): "Erecting steel viaduct bent at 97 ft. reach.";One 4.5" x 2.75" B/W photo and one 5" x 7" B/W photo. Smaller photo numbered 5
Image #460 (4.5" x 2.75"): "6-19-29."; Image #461 (4.5" x 2.75"): "6-20-29."; Image #462 (4.5" x 2.75"): "6-20-29."; "Three views of the west cantilever arm and west half of suspended span.";Three 4.5" x 2.75" B/W photos numbered 460, 461, 462
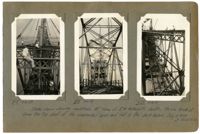
Image #433 (4.5" x 2.75"): "6-13-29. West cantilever arm, from below, erected to L17. Traveler B at L16."; Image #434 (4.5" x 2.75"): "6-13-29. Looking toward Pier 8 (at 1050' distance) from top of Pier 9. (See 431)."; Image #435 (4.5" x 2.75"): "6-13-29. Joint L17, cantilever arm side, showing opening for 10" [diameter] jacking pin and for jack, to control suspended span while cantilevered. (See 488).";Three 4.5" x 2.75" B/W photos numbered 433, 434, 435
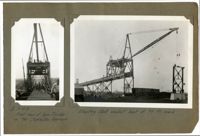
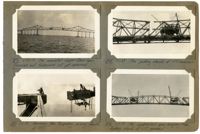
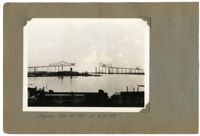
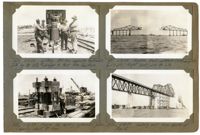
Image #71 (4.5" x 2.75"): "1-30-29. Looking west across Town Creek from west end of Drum Island Viaduct. Just before erection of Span Traveler B. Trusses 24 ft. c. to c."; Image #74 (4.5" x 2.75"): "1-30-29. Driving a batter pile for falsework footings with a No. 2 Vulcan steam hammer hung from a derrick boom."; Image #75 (4.5" x 2.75"): "1-30-29. Pier 12, Cooper River. Elev. top = 50.1 ft. above mean low water. Carries the 270 ft. deck truss spans.";Three 4.5" x 2.75" B/W photos numbered 71, 74, 75
Image #514 (2.75" x 4.5"): "7-2-29. The suspended span hanging free and acting as a simple truss span on the end of the cantilevers."; Image #515 (2.75" x 4.5"): "7-2-29. The Cooper River Cantilever span with the jacking chords removed from the top chord."; Image #517 (4.5" x 2.75"): "7-4-29. Scene of R.H. McKnight's death on July 3, 1929.";Three 4.5" x 2.75" B/W photos numbered 514, 515, 517
Image #510 (2.75" x 4.5"): "6-30-29. The completed Cooper River Span. Travelers and falsework not yet removed."; Image #511 (2.75" x 4.5"): "7-2-29. Removing the temporary jacking chords at U17."; Image #512 (2.75" x 4.5"): "7-1-29. The jacking chords at U17 removed."; Image #513 (2.75" x 4.5"): "7-2-29. The suspended span hanging free. Jacking chords at U17 removed.";Four 4.5" x 2.75" B/W photos numbered 510, 511, 512, 513
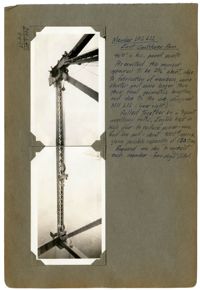
Image #399 (2.75" x 4.5") and Image #400 (2.75" x 4.5"): "Member U12 L12 East Cantilever Arm. 96'-0" c. to c. panel points. As erected this member appeared to be 3 1/2" short, due to fabrication of members, some shorter and some longer than their final geometric lengths, and due to the sub-diagonal M11 L12 (lower right). Pulled together by a 7-part auxiliary falls. Engine kept in high gear to reduce power - max. lead line pull = about 9000 [pounds], approx., giving possible capacity of 130 tons. Required one day to connect each member - two days total.;Two 4.5" x 2.75" B/W photos numbered 399, 400
Unnumbered Image (5" x 7"): "Lowering 33 ton, 150 HP Gasoline hoisting engine, under its own power. Town Creek Span. Ridden down by W.E. Omohundro, Sup't., W.S. Patterson, Pusher, and John Shelton, Engineman.";One 5" x 7" B/W photo
Image #437 (2.75" x 4.5"): "6-13-29. Bottom chord L14 L16. Wt. 17 tons."; Image #438 (2.75" x 4.5"): "6-14-29. Turntable truck for turning long truss members end for end."; Image #439 (2.75" x 4.5"): "6-14-29. Turning 90 ft. chord with turntable trucks."; Image #440 (2.75" x 4.5"): "6-14-29. Turning 90 ft. chord with turntable trucks.";Four 4.5" x 2.75" B/W photos numbered 437, 438, 439, 440
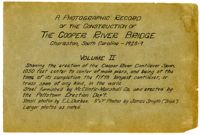
A Photographic Record of the Construction of the Cooper River Bridge; Charleston, South Carolina - 1928-29; Volume II; Showing the erection of the Cooper River Cantilever Span, 1050 feet center to center of main piers, and being at the time of its completion the fifth longest cantilever, or truss span of any kind in the world. Steel furnished by McClintic-Marshall Co. and erected by the Pottstown Erection Dep't. Small photos by E.L. Durkee. 5" x 7" Photos by James Smyth ("Irish"). Larger photos as noted.;Title Page, 6.75" x 10.125"
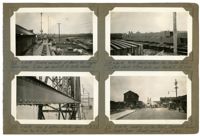
Image #268 (2.75" x 4.5"): "4-26-29. Twelve carloads of chords for Cooper River Span. 3 cars per load of 3 - 90 ft. chords."; Image #270 (2.75" x 4.5"): "4-26-29. Line of bottom chords - Spans 10, 11, & 12. From top of Pier 10, looking east."; Image #269 (2.75" x 4.5"): "4-26-29. 90 ft. Chord sections for Anchor Arm. Lightest chords 15 tons each and heaviest, 36 tons."; Image #271 (2.75" x 4.5"): "4-28-29. Looking up the West Approach toward Town Creek Span. Street paved (see #36).";Four 4.5" x 2.75" B/W photos numbered 268, 269, 270, 271
Image #150 (2.75" x 4.5"): "Erecting east half of suspended span - Town Creek."; Image #152 (2.75" x 4.5"): "3-13-29. Progress in Town Creek - getting nearer!"; Image #151 (2.75" x 4.5"): "3-11-29. West cantilever as seen from below. This photo suggested by C.D. Marshall.";Three 4.5" x 2.75" B/W photos numbered 150, 151, 152
Unnumbered Image (5" x 7"): "Unloading girders from R.R. cars and loading onto trucks on top of viaduct, to be pushed out to traveler by an 8 ton gasoline locomotive (extreme left.) Max-load handled = 97 ft. girder weighing 16 tons up 6% grade. Stiffleg derrick S.O. H383 - Capacity 30 tons. 70 ft. boom."; Image #6 (4.5" x 2.75"): "11-15-28. Rear view of Span Traveler on West Appr. 8 ton Vulcan gasoline locomotive in foreground.";One 4.5" x 2.75" B/W photo and one 5" x 7" B/W photo. Smaller photo numbered 6.
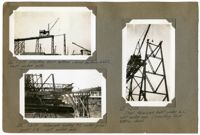
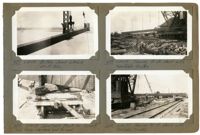
Image #429 (2.75" x 4.5"): "6-11-29. Lifting 500 ton capacity hydraulic jack by its 12 1/2" [diameter] plunger to test the section."; Image #430 (2.75" x 4.5"): "6-12-29. Frame for testing hydraulic jacks. Capacity about 50 tons."; Image #431 (2.75" x 4.5"): "6-13-29. Progress. West cantilever (left) complete to U17 L17. Right (east) arm to L16."; Image #432 (2.75" x 4.5"): "6-12-29. Looking east from south of Pier 5.";Four 4.5" x 2.75" B/W photos numbered 429, 430, 431, 432
Limit your search
Photographic Record of the Cooper River Bridge✖[remove]202