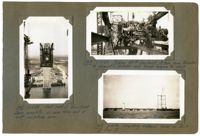
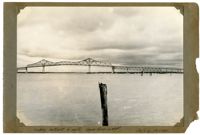
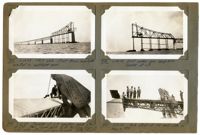
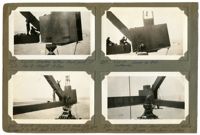
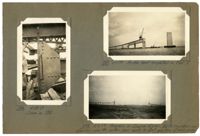
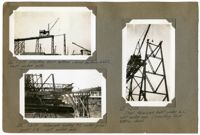
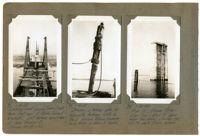
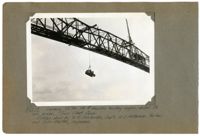
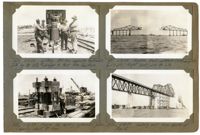
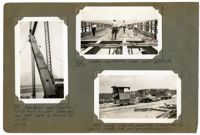
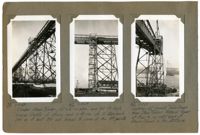
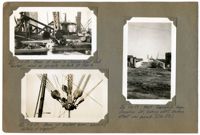
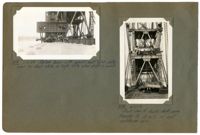
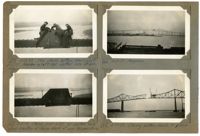
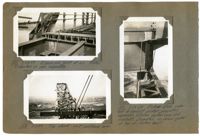
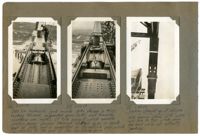
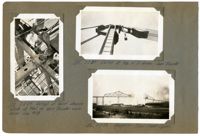
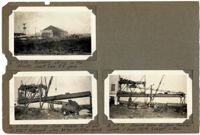
Image #147 (4.5" x 2.75"): "3-11-29. West half of Town Creek Span complete, as seen from end of east cantilever arm."; Image #148 (2.75" x 4.5"): "3-11-29. Picking 150 HP Gas. Hoist, 31 tons, from traveler to dismantle traveler and lower engine to deck."; Image #149 (2.75" x 4.5"): "3-11-29. Erecting material tower on dock at Pier 13.";Three 4.5" x 2.75" B/W photos numbered 147, 148, 149
Image #474 (4.5" x 2.75"): "6-21-29. Erecting the last bottom chord section L19' L21', north truss, east half of suspended span."; Image #475 (2.75" x 4.5"): "6-21-29. Connecting the closing bottom chord at L21'."; Image #476 (2.75" x 4.5"): "6-21-29. Closing B.C. joint L21'. Note 6" [diameter] pin and slotted hole with 7" movement for adjustment, temperature, etc.";Three 4.5" x 2.75" B/W photos numbered 474, 475, 476
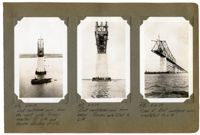
Image #471 (2.75" x 4.5"): "Progress. Ready to place the last 87 1/6" bottom chord section."; Image #472 (2.75" x 4.5"): "6-21-29. Ready for the last or closing bottom chord sections."; Image #473 (4.5" x 2.75"): "6-21-29. From below. West cantilever, below. East cantilever, above.";Three 4.5" x 2.75" B/W photos numbered 471, 472, 473
Image #113 (2.75" x 4.5"): "2-23-29. East anchor arm. Traveler Bat L4 Truss erected to L6."; Image #114 (2.75" x 4.5"): "2-23-29. West side - Town Creek Span. Traveler A at L15."; Image #115 (4.5" x 2.75"): "2-23-29. West side - Town Creek Cantilever.";Three 4.5" x 2.75" B/W photos numbered 113, 114, 115
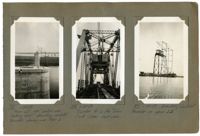
Image #487 (4.5" x 2.75"): "6-27-29. From U10 east (over Pier9) looking over top chord, just before erecting the closing top chords at middle of suspended span."; Image #490 (2.75" x 4.5"): "6-27-29. Hydraulic hand pumps set up at U17."; Image #491 (2.75" x 4.5"): "Erecting the first closing top chord U20' U22. U20 at right. U22, at left, = CL [center line] 1050ft. span.";Three 4.5" x 2.75" B/W photos numbered 487, 490, 491
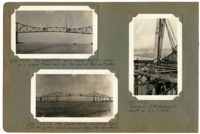
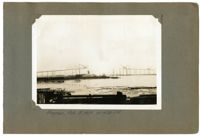
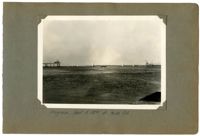
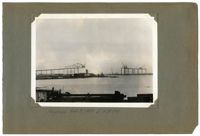
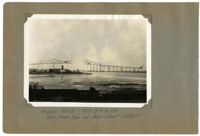
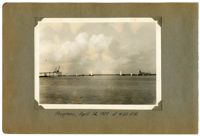
Unnumbered Image (5" x 7"): "Progress in Cooper River, April 26, 1929 at 4:30 P.M. material tower at Pier 13 (right) is erecting viaduct traveler 'C' to complete the east Approach.";One 5" x 7" B/W photo
Image #377 (2.75" x 4.5"): "5-29-29. West side. First truss members erected in cantilever arm."; Image #378 (2.75" x 4.5"): "5-29-29. East anchor arm complete. Traveler at L9."; Image #379 (2.75" x 4.5"): "5-31-29. Traveler at L9 erecting peak strut at U10. Then moves back 15 ft. to allow boom to "duck" under strut and move forward.. Not drift."; Image #380 (2.75" x 4.5"): "5-31-29. Peak strut at U10 east side, as shown in 379.";Four 4.5" x 2.75" B/W photos numbered 377, 378, 379, 380
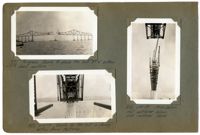
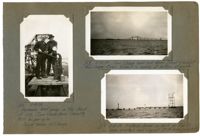
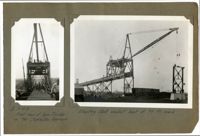
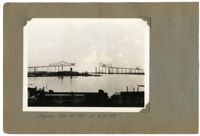
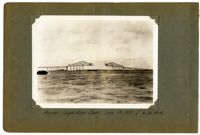
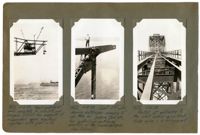
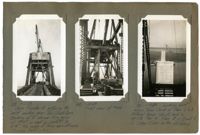
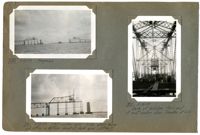
Image #166 (4.5" x 2.75"): "3-15-29. Hydraulic hand pump on top chord at U13, Town Creek Span. Capacity 8000 lbs. Per sq. in. 'Swede' Nelson and V.I. Varga."; Image #168 (2.75" x 4.5"): "3-15-29. Town Creek Span and Drum Island Viaduct from Cooper River. Viaduct is nearly at bottom of grade."; Image #169 (2.75" x 4.5"): "3-15-29. Material tower on dock at Pier 13. One boom erected and rigged. (50 ft. boom, on right).";Three 4.5" x 2.75" B/W photos numbered 166, 168, 169
Image #178 (4.5" x 2.75"): "3-17-29. Town Creek Span, from below, near Pier 3 - looking west."; Image #179 (2.75" x 4.5"): "3-17-29. Falsework bent for deck span #12, taken from the East Approach Viaduct permanent steel for temporary use."; Image #180 (2.75" x 4.5"): "3-20-29. First panel of deck span #12 erected by material tower at Pier 13. Pier 12 at left.";Three 4.5" x 2.75" B/W photos numbered 178, 179, 180
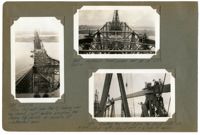
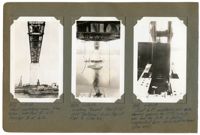
Image #339 (2.75" x 4.5"): "5-21-29. West anchor arm ready to erect last panel 8-10, and land on main pier 8."; Image #340 (2.75" x 4.5"): "5-22-29. East anchor arm erecting last panel 8-10, to land on main pier 9."; Image #341 (2.75" x 4.5"): "5-22-29. Setting shoe in Pier 8. wt. of lower shoe = 10 tons. Base 7'-3 x 8'-6 = 61.6 [square feet]"; Image #342 (2.75" x 4.5"): "5-22-29. Setting main shoes on Pier 8.";Four 4.5" x 2.75" B/W photos numbered 339, 340, 341, 342
Image #343 (2.75" x 4.5"): "5-22-29. Erecting bottom chord joint at L10, Pier 8. Weight 13 tons."; Image #344 (2.75" x 4.5"): "5-22-29. Same as 343. (Leatherman)."; Image #345 (2.75" x 4.5"): "5-22-29. Pulling joint L10 back into place to connect to bott. chord L8 L10 and diagonal M9 L10."; Image #348 (2.75" x 4.5"): "5-23-29. Bottom chord joint L10 before erection of stringers. Floorbeam in place.";Four 4.5" x 2.75" B/W photos numbered 343, 344, 345, 348
Image #350 (2.75" x 4.5"): "5-23-29. Pulling device (at left) at L0 - Span 9. Where deck span adjoins anchor arm."; Image #351 (2.75" x 4.5"): "5-23-29. Jacking device at end of anchor arm. Pulling device, showing turnbuckle - just beyond."; Image #352 (2.75" x 4.5"): "5-23-29. West anchor arm landed on Pier 8 (right)."; Image #353 (2.75" x 4.5"): "5-24-29. Looking west from Span 9.";Four 4.5" x 2.75" B/W photos numbered 350, 351, 352, 353
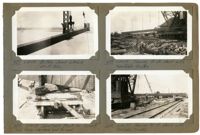
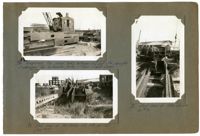
Image #258 (2.75" x 4.5"): "4-23-29. Driving piles and framing."; Image #260 (2.75" x 4.5"): "4-23-29. Falsework footing #16, under deck span #10. Two (2) plumb piles and six (6) battered piles under each col."; Image #259 (2.75" x 4.5"): "4-23-29. Timber falsework footings under Span 10. Av. depth of water = 25' at low tide."; Image #261 (2.75" x 4.5"): "4-24-29. typical detail of steel falsework col. on ton of 2-200 ton wedge jacks. Deck spans.";Four 4.5" x 2.75" B/W photos numbered 258, 259, 260, 261
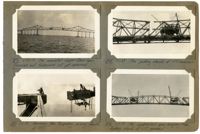
Image #244 (2.75" x 4.5"): "4-18-29. Span 5 completed. Viaduct Traveler at left being removed by stiffleg derrick, which it has set up in front of it."; Image #245 (2.75" x 4.5"): "4-18-29. Spans 11 and 12 completed."; Image #246 (4.5" x 2.75"): "4-23-29. Erecting Span 10. Taken from near Pier 12, looking west toward Pier 11, anchor pier 10 and main piers 9 and 8.";Three 4.5" x 2.75" B/W photos numbered 244, 245, 246
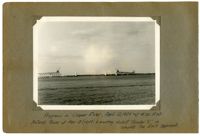
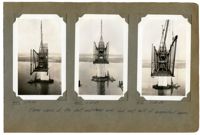
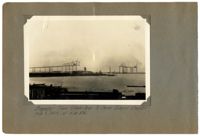
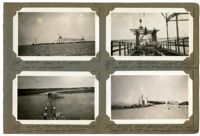
Image #284 (4.5" x 2.75"): "4-30-29. Same as 283."; Image #287 (2.75" x 4.5"): "5-1-29. Anchor bent completed on Pier 7."; Image #288 (2.75" x 4.5"): "5-2-29. Progress in Cooper River. Both travelers are standing over the anchor piers - ready to start erection of main span.";Three 4.5" x 2.75" B/W photos numbered 284, 287, 288
Image #248 (4.5" x 2.75"): "4-23-29. Span 5 completed and working on Span 6."; Image #249 (4.5" x 2.75"): "4-23-29. From top of anchor pier 7, looking west toward Span Traveler B erecting Span 6." Image #250 (4.5" x 2.75"): 4-23-29. From top of viaduct at bent #12E, looking west. Town Creek Span in distance.";Three 4.5" x 2.75" B/W photos numbered 248, 249, 250
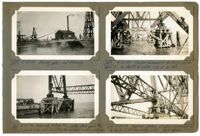
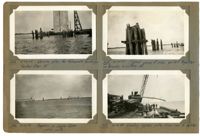
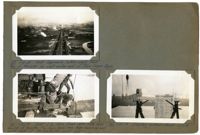
Image #264 (2.75" x 4.5"): "4-24-29. Driving piles for falsework footings. Anchor Pier 10."; Image #266 (2.75" x 4.5"): "Progress in Cooper River. Looking north."; Image #265 (2.75" x 4.5"): "4-24-29. Typical group of piles pulled together for bracing & cutting off."; Image #267 (2.75" x 4.5"): "4-26-29. Loading cypress piles from car to lighter.";Four 4.5" x 2.75" B/W photos numbered 264, 265, 266, 267
Image #333 (2.75" x 4.5"): "5-18-29. Falsework bent 31- L8 - East anchor arm. 16 Plumb piles and 10 battered piles under each col. 40 ft. of water at low tide. Taken at low tide. See also 355."; Image #334 (2.75" x 4.5"): "5-18-29. Falsework footing 32 - L6, anchor arm. Similar to bent 31. Max. load 20 1/2 tons per pile (D + L + Trav.)."; Image #335 (4.5" x 2.75"): "5-18-29. Looking west from top of anchor pier 10 showing steel falsework. Pier 9 beyond = 450 ft. Bents at 90 ft. centers. Flswk. cols. plumb and 37'-6" c. to c.";Three 4.5" x 2.75" B/W photos numbered 333, 334, 335
Image #518 (4.5" x 2.75"): "7-4-29."; Image #519 (4.5" x 2.75"): "7-4-29."; Image #520 (4.5" x 2.75"): "7-4-29."; "Three views showing conditions at time of R.H. McKnight's death. He was knocked from the top chord of the suspended span and fell to the deck below, July 3, 1929 at 10:45 A.M.";Three 4.5" x 2.75" B/W photos numbered 518, 519, 520
Image #26 (2.75" x 4.5"): " 1-3-29. Erecting first bottom chord section, L0L2, west anchor arm."; Image #27 (4.5" x 2.75"): "1-3-29. Steel falsework bent under L2, west anchor arm. connecting first bottom chord."; Image # 28 (2.75" x 4.5"): "1-2-29. Faslework footing #2 under panel point L4 - west anchor arm.;Three 4.5" x 2.75" B/W photos numbered 26, 27, 28
Image #5 (4.5" x 2.75"): "11-15-28. Front view of Span Traveler on the Charleston Approach."; Unnumbered Image (5" x 7"): "Erecting steel viaduct bent at 97 ft. reach.";One 4.5" x 2.75" B/W photo and one 5" x 7" B/W photo. Smaller photo numbered 5
Image #460 (4.5" x 2.75"): "6-19-29."; Image #461 (4.5" x 2.75"): "6-20-29."; Image #462 (4.5" x 2.75"): "6-20-29."; "Three views of the west cantilever arm and west half of suspended span.";Three 4.5" x 2.75" B/W photos numbered 460, 461, 462
Image #433 (4.5" x 2.75"): "6-13-29. West cantilever arm, from below, erected to L17. Traveler B at L16."; Image #434 (4.5" x 2.75"): "6-13-29. Looking toward Pier 8 (at 1050' distance) from top of Pier 9. (See 431)."; Image #435 (4.5" x 2.75"): "6-13-29. Joint L17, cantilever arm side, showing opening for 10" [diameter] jacking pin and for jack, to control suspended span while cantilevered. (See 488).";Three 4.5" x 2.75" B/W photos numbered 433, 434, 435
Image #71 (4.5" x 2.75"): "1-30-29. Looking west across Town Creek from west end of Drum Island Viaduct. Just before erection of Span Traveler B. Trusses 24 ft. c. to c."; Image #74 (4.5" x 2.75"): "1-30-29. Driving a batter pile for falsework footings with a No. 2 Vulcan steam hammer hung from a derrick boom."; Image #75 (4.5" x 2.75"): "1-30-29. Pier 12, Cooper River. Elev. top = 50.1 ft. above mean low water. Carries the 270 ft. deck truss spans.";Three 4.5" x 2.75" B/W photos numbered 71, 74, 75
Image #514 (2.75" x 4.5"): "7-2-29. The suspended span hanging free and acting as a simple truss span on the end of the cantilevers."; Image #515 (2.75" x 4.5"): "7-2-29. The Cooper River Cantilever span with the jacking chords removed from the top chord."; Image #517 (4.5" x 2.75"): "7-4-29. Scene of R.H. McKnight's death on July 3, 1929.";Three 4.5" x 2.75" B/W photos numbered 514, 515, 517
Image #510 (2.75" x 4.5"): "6-30-29. The completed Cooper River Span. Travelers and falsework not yet removed."; Image #511 (2.75" x 4.5"): "7-2-29. Removing the temporary jacking chords at U17."; Image #512 (2.75" x 4.5"): "7-1-29. The jacking chords at U17 removed."; Image #513 (2.75" x 4.5"): "7-2-29. The suspended span hanging free. Jacking chords at U17 removed.";Four 4.5" x 2.75" B/W photos numbered 510, 511, 512, 513
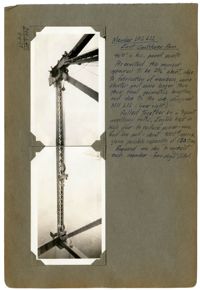
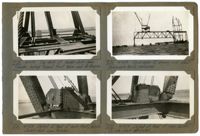
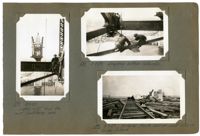
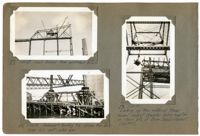
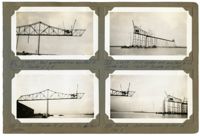
Image #399 (2.75" x 4.5") and Image #400 (2.75" x 4.5"): "Member U12 L12 East Cantilever Arm. 96'-0" c. to c. panel points. As erected this member appeared to be 3 1/2" short, due to fabrication of members, some shorter and some longer than their final geometric lengths, and due to the sub-diagonal M11 L12 (lower right). Pulled together by a 7-part auxiliary falls. Engine kept in high gear to reduce power - max. lead line pull = about 9000 [pounds], approx., giving possible capacity of 130 tons. Required one day to connect each member - two days total.;Two 4.5" x 2.75" B/W photos numbered 399, 400
Unnumbered Image (5" x 7"): "Lowering 33 ton, 150 HP Gasoline hoisting engine, under its own power. Town Creek Span. Ridden down by W.E. Omohundro, Sup't., W.S. Patterson, Pusher, and John Shelton, Engineman.";One 5" x 7" B/W photo
Image #437 (2.75" x 4.5"): "6-13-29. Bottom chord L14 L16. Wt. 17 tons."; Image #438 (2.75" x 4.5"): "6-14-29. Turntable truck for turning long truss members end for end."; Image #439 (2.75" x 4.5"): "6-14-29. Turning 90 ft. chord with turntable trucks."; Image #440 (2.75" x 4.5"): "6-14-29. Turning 90 ft. chord with turntable trucks.";Four 4.5" x 2.75" B/W photos numbered 437, 438, 439, 440
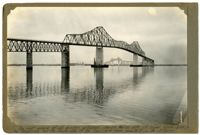
A Photographic Record of the Construction of the Cooper River Bridge; Charleston, South Carolina - 1928-29; Volume II; Showing the erection of the Cooper River Cantilever Span, 1050 feet center to center of main piers, and being at the time of its completion the fifth longest cantilever, or truss span of any kind in the world. Steel furnished by McClintic-Marshall Co. and erected by the Pottstown Erection Dep't. Small photos by E.L. Durkee. 5" x 7" Photos by James Smyth ("Irish"). Larger photos as noted.;Title Page, 6.75" x 10.125"
Image #268 (2.75" x 4.5"): "4-26-29. Twelve carloads of chords for Cooper River Span. 3 cars per load of 3 - 90 ft. chords."; Image #270 (2.75" x 4.5"): "4-26-29. Line of bottom chords - Spans 10, 11, & 12. From top of Pier 10, looking east."; Image #269 (2.75" x 4.5"): "4-26-29. 90 ft. Chord sections for Anchor Arm. Lightest chords 15 tons each and heaviest, 36 tons."; Image #271 (2.75" x 4.5"): "4-28-29. Looking up the West Approach toward Town Creek Span. Street paved (see #36).";Four 4.5" x 2.75" B/W photos numbered 268, 269, 270, 271
Image #150 (2.75" x 4.5"): "Erecting east half of suspended span - Town Creek."; Image #152 (2.75" x 4.5"): "3-13-29. Progress in Town Creek - getting nearer!"; Image #151 (2.75" x 4.5"): "3-11-29. West cantilever as seen from below. This photo suggested by C.D. Marshall.";Three 4.5" x 2.75" B/W photos numbered 150, 151, 152
Unnumbered Image (5" x 7"): "Unloading girders from R.R. cars and loading onto trucks on top of viaduct, to be pushed out to traveler by an 8 ton gasoline locomotive (extreme left.) Max-load handled = 97 ft. girder weighing 16 tons up 6% grade. Stiffleg derrick S.O. H383 - Capacity 30 tons. 70 ft. boom."; Image #6 (4.5" x 2.75"): "11-15-28. Rear view of Span Traveler on West Appr. 8 ton Vulcan gasoline locomotive in foreground.";One 4.5" x 2.75" B/W photo and one 5" x 7" B/W photo. Smaller photo numbered 6.
Image #429 (2.75" x 4.5"): "6-11-29. Lifting 500 ton capacity hydraulic jack by its 12 1/2" [diameter] plunger to test the section."; Image #430 (2.75" x 4.5"): "6-12-29. Frame for testing hydraulic jacks. Capacity about 50 tons."; Image #431 (2.75" x 4.5"): "6-13-29. Progress. West cantilever (left) complete to U17 L17. Right (east) arm to L16."; Image #432 (2.75" x 4.5"): "6-12-29. Looking east from south of Pier 5.";Four 4.5" x 2.75" B/W photos numbered 429, 430, 431, 432
Image #22 (2.75" x 4.5"): "12-13-28. Driving Piles for dock at anchor pier #4."; Image #24 (2.75" x 4.5"): "12-23-28. Charleston Approach completed. Looking east toward Town Creek Span."; Image #25 (4.5" x 2.75"): "1-1-29. Assembling steel falsework bents preparatory to erection of the west anchor arm - Town Creek Span. Pier 2 at right.";Three 4.5" x 2.75" B/W photos numbered 22, 24, 25
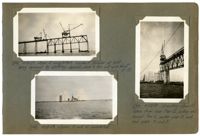
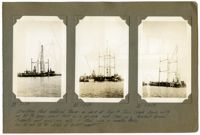
Image #411 (2.75" x 4.5"): "6-18-29. U.S. Engineers' Snag-boat 'Wateree.'"; Image #442 (2.75" x 4.5"): "6-18-29. Four-masted sailing ship passing under Cooper River Span."; Image #443 (2.75" x 4.5"): "6-17-29. Progress."; Image #444 (2.75" x 4.5"): "6-18-29. Looking west from Cooper River. Pier 10 at left. Town Creek Span in background.";Four 4.5" x 2.75" B/W photos numbered 441, 442, 443, 444
Image #323 (2.75" x 4.5"): "5-17-29. East anchor arm. Traveler at L6."; Image #324 (2.75" x 4.5"): "5-17-29. Progress in A.M."; Image #325 (2.75" x 4.5"): "5-18-29. Supply ship "Dobbin" and five Navy destroyers. West anchor arm beyond."; Image #329 (2.75" x 4.5"): "5-18-29. West anchor arm. Navy destroyer in foreground.";Four 4.5" x 2.75" B/W photos numbered 323, 324, 325, 329
Image #405 (2.75" x 4.5"): "6-7-29. Erecting stringers - east cantilever."; Image #406 (2.75" x 4.5"): "6-8-29. Crane 19. 40 Ton capacity. Working weight about 100 tons."; Image #407 (2.75" x 4.5"): "6-8-29. Dummies made up to throw off of top of span as practice drill for life savers."; Image #409 (2.75" x 4.5"): "6-8-29. Town Creek Span with advertising sign 13' x 30' in place at center.";Four 4.5" x 2.75" B/W photos numbered 405, 406, 407, 409
Image #397 (4.5" x 2.75"): "6-6-29. Main boom - span Traveler. 100 ft. long c. to c. pins. Taken from near heel looking up towards tip at U12."; Image #403 (2.75" x 4.5"): "6-6-29. Setting reinforcing steel - east approach."; Image #404 (2.75" x 4.5"): "6-6-29. 4 Ton Gas. Locomotive & dump cars for pouring concrete deck, east approach & causeway.";Three 4.5" x 2.75" B/W photos numbered 397, 403, 404
Image #230 (2.75" x 4.5"): "4-7-29. Top deck of double-deck Span Traveler, looking toward front boom and A-frame."; Image #231 (2.75" x 4.5"): "4-7-29. Detail at heel of main (front) boom. Double-deck span traveler."; Image #234 (2.75" x 4.5"): "4-7-29. Deckspan 12 swung and steel falsework bents removed."; Image #233 (2.75" x 4.5"): "4-7-29. Detail at heel of rear boom. Double-deck traveler.";Four 4.5" x 2.75" B/W photos numbered 230, 231, 233, 234
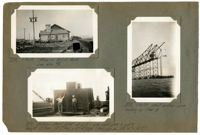
Image #38 (4.5" x 2.75"): "1-10-29."; Image #42 (4.5" x 2.75"): "1-13-29"; Caption under photos 38 & 42: "Timber Stair Tower, 12' x 16' in plan, and 110 ft. high. Eleven flights of stairs, each 10 ft. rise, of 12 steps each. Set up at bent 3W and braced to same at the 3rd points."; Image #43 (4.5" x 2.75"): "1-13-29"; Looking east toward Town Creek from Stair Tower. Material tower at Pier 4, on west bank of Drum Island, in the distance.";Three 4.5" x 2.75" B/W photos numbered 38, 42, 43
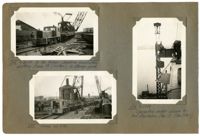
Image #83 (2.75" x 4.5"): "2-7-29. Material Tower erecting Span Traveler B. Viaduct traveler erecting Span 5D - Drum Island Viaduct."; Image #84 (2.75" x 4.5"): "2-7-29. Falsework footings Nos. 4 and 5, east anchor arm - Town Creek."; Image #85 (4.5" x 2.75"): "2-7-29. Steel material Tower F067 & F0187. 40 ft. square x 130 ft. high to boom heels. Two 70 ft. boom (30 ton capacity). On dock opposite Pier 4";Three 4.5" x 2.75" B/W photos numbered 83, 84, 85
Image #37 (2.75" x 4.5"): "1-10-29. West Approach, looking west. From top of traveler on west anchor arm of Town Creek Span."; Image #41 (2.75" x 4.5"): "1-10-29. Joint L2, Town Creek Span. Note front bearing of traveler. Tie down rods have been removed and cable used at this particular point only."; Image #40 (2.75" x 4.5"): "1-10-29. Erecting bottom chord L2L4.";Three 4.5" x 2.75" B/W photos numbered 37, 40, 41
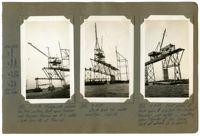
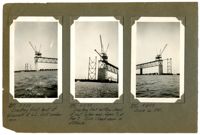
Image #29 (4.5" x 2.75"): "1-1-29."; Image #30 (4.5" x 2.75"): "1-3-29." ; Image #31 (4.5" x 2.75"): "1-3-29." Caption under all pictures: "Erecting steel material tower on deck at Pier 4, Town Creek Span, with an 80 ft. boom used first as a gin pole and then as a 'basket boom.' See 32 and 33 for detail of basket support.";Three 4.5" x 2.75" B/W photos numbered 29, 30, 31
Image #32 (2.75" x 4.5"): "1-1-29. Base of boom in Chicago heel and 'basket', used as gin pole on dock at Pier 4."; Image #33 (2.75" x 4.5"): "1-3-29. Base of "basket boom', showing details of support."; Image #36 (4.5" x 2.75"): "1-6-29. West Approach from America St. looking east, before street was paved. (See 271.)";Three 4.5" x 2.75" B/W photos numbered 32, 33, 36
Image #336 (2.75" x 4.5"): "5-18-29. Office in A.C.L. Yard. See also #1."; Image #337 (2.75" x 4.5"): "Bottom chord joint at L10 - over main piers 8 and 9. Weight 13 tons. 12'-7" long x 12'-4" high (Main gas. pl. 108" x 1" x 12'-7")."; Image #338 (4.5" x 2.75"): "5-21-29. West anchor arm landing on Pier 8.";Three 4.5" x 2.75" B/W photos numbered 336, 337, 338
Image #395 (2.75" x 4.5"): "6-6-29. Heel of main boom - upper deck of Span Traveler."; Image #398 (4.5" x 2.75"): "6-6-29. West cantilever arm, from Pier 9. U12 L12 at right."; Image #401 (2.75" x 4.5"): "6-6-29. Looking west from end of the east causeway. Town Creek Span (left) is nearly 1 3/4 miles away.";Three 4.5" x 2.75" B/W photos numbered 395, 398, 401
Image #414 (2.75" x 4.5"): "6-10-29. Balance beam with special bent hitch plates used for short hitch on high lifts wher [sic] drift is small."; Image #415 (4.5" x 2.75"): "6-11-29. Front view of double-deck span traveler A at L12 on east cantilever arm.";Two 4.5" x 2.75" B/W photos numbered 414, 415
Image #416 (4.5" x 2.75"): "6-11-29. East cantilever arm, from the west side. Trusses erected to L14 and traveler standing at L12."; Image #417 (4.5" x 2.75"): "6-11-29. East cantilever arm from below. Trusses are erected to L14."; Image #418 (4.5" x 2.75"): "6-11-29. View of East cantilever arm, completed to L14.";Three 4.5" x 2.75" B/W photos numbered 416, 417, 418
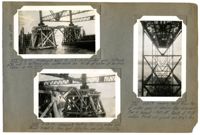
Image #153 (2.75" x 4.5"): "3-13-29. One more panel to be erected."; Image #154 (2.75" x 4.5"): "3-13-29. Ready to erect the first closing bottom chord."; Image #155 (2.75" x 4.5"): "3-13-29. Erecting the closing bottom chord - south truss - Town Creek Span."; Image #158 (2.75" x 4.5"): "3-13-29. Erecting the closing bottom chord - north truss - Town Creek Span.";Three 4.5" x 2.75" B/W photos numbered 153, 154, 155, 158
Image #52 (4.5" x 2.75"): "1-20-29. From L6, west anchor arm, looking east. Erecting viaduct traveler showing over Pier 3."; Image #53 (4.5" x 2.75"): "1-20-29. Traveler A on the Town Creek Span - rear view."; Image #57 (4.5" x 2.75"): "1-20-29. Erecting viaduct traveler on span 1D.";Three 4.5" x 2.75" B/W photos numbered 52, 53, 57
Image #137 (4.5" x 2.75"): "3-7-29. Looking west from the east cantilever arm."; Image #138 (2.75" x 4.5"): "3-7-29. Erecting bottom laterals."; Image #139 (2.75" x 4.5"): "3-7-29. Material track laid on mud sills on Drum Island.";Three 4.5" x 2.75" B/W photos numbered 137, 138, 139
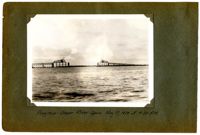
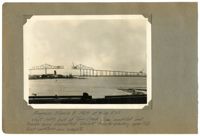
Unnumbered Image (5" x 7"): Progress March 8, 1929 at 4:30 P.M. West (left) half of Town Creek Span completed and traveler being dismantled. Viaduct traveler erecting span 17D. East cantilever arm complete.";One 5" x 7" B/W photo
Image #426 (4.5" x 2.75"): "6-12-29. West cantilever arm complete to L16 U17 and hangers U17 L17 for support of suspended span erected, together with joint L17."; Image #427 (4.5" x 2.75"): "6-12-29. Joint U17 with dummy extension carrying 10" pin hole for jacking pin, etc., for controlling cantilever erection of the suspended span. (Geo. Schnell)."; Image #428 (4.5" x 2.75"): "6-12-29. Portal at entrance to the west anchor arm. Deck truss span 6 in foreground.";Three 4.5" x 2.75" B/W photos numbered 426, 427, 428
Image #54 (2.75" x 4.5"): "1-20-29. West anchor Arm completed to L6."; Image #55 (2.75" x 4.5"): "1-20-29. Falsework footing #3 driven thru dock. Under L6, west anchor arm."; Image #58 (4.5" x 2.75"): "1-20-29. Looking up thru material tower toward viaduct traveler being erected on Span 1D, of Drum Island Viaduct. (see #57).";Three 4.5" x 2.75" B/W photos numbered 54, 55, 58
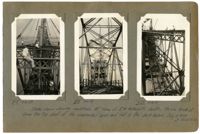
Image #159 (2.75" x 4.5"): "3-13-29. The closing bottom chord joint at L17! Member on left has slotted hole at pin."; Image #160 (2.75" x 4.5"): " Closing joint at L17! 4" slotted hole allows erection of closing chord at any temperature."; Image #161 (2.75" x 4.5"): "3-13-29 Progress."; Image #162 (2.75" x 4.5"): "3-3-29. Closing bottom chords in place.";Four 4.5" x 2.75" B/W photos numbered 159, 160, 161, 162
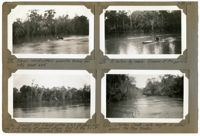
Image #222 (2.75" x 4.5"): "3-30-29. An obstruction in the Chicken Creek channel. Note the water back in the woods."; Image #223 (2.75" x 4.5"): "3-30-29. The motor boat which was used to tow small rafts to the Santee Bridge."; Image #224 (2.75" x 4.5"): "3-30-29. 7 to 8 Ft. of water over the 'mainland' where piles were being cut."; Image #225 (2.75" x 4.5"): "3-30-29. A 90 ft. cypress tree, felled from a boat. Must be cleared and floated out.";Four 4.5" x 2.75" B/W photos numbered 222, 223, 224, 225
Image #218 (2.75" x 4.5"): "3-30-29. Negro wood-cutters enroute home for the week end."; Image #219 (2.75" x 4.5"): "3-30-29. A hollow-log canoe. Duncan at the paddle."; Image #220 (2.75" x 4.5"): "3-30-29. Laurel Hill Island - water 2 to 3 ft. deep over the 5 ft. banks at normal stage. Most of the 85 ft. and 90 ft. piling came from here."; Image #221 (2.75" x 4.5"): "3-30-29. Chicken Creek - note height of water around the tree trunks.";Four 4.5" x 2.75" B/W photos numbered 218, 219, 220, 221
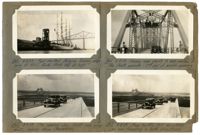
Image #561 (2.75" x 4.5"): "8-8-29. Four-masted Belgian Training ship lying at P.U.C. Dock. Masts 185 ft. high."; Image #562 (2.75" x 4.5"): "8-8-29. The opening day. First cars going east, coming from Charleston."; Image #562 (2.75" x 4.5"): "8-8-29. Free traffic till 4:00 P.M.! Cars now traveling in both directions."; Image #564 (2.75" x 4.5"): "8-9-29. Camera man ready to take movies of the floats parade - 2nd day of bridge opening.";Four 4.5" x 2.75" B/W photos numbered 561, 562, 562, 564
Image #422 (2.75" x 4.5"): "6-11-29. Traveler B (left) at L15 & truss to L16. Traveler A (east side) at L12 and truss to L14."; Image #423 (2.75" x 4.5"): "6-12-29. West cantilever arm complete except floor L16 to L17. Eye-bar hangers U17 L17 being erected."; Image #424 (2.75" x 4.5"): "6-12-29. Assembling eye-bars U17 L17 to joint L17 (See 420)."; Image #425 (2.75" x 4.5"): "6-12-29. Driving 10" pin at U17 with 500lb. overhauling ball - west cantilever arm.";Four 4.5" x 2.75" B/W photos numbered 422, 423, 424, 425
Image #14 (2.75" x 4.5"): "12-4-28. Progress. Complete to span 9W."; Image #19 (2.75" x 4.5"): "12-13-29. Complete to 5W and erecting bent 3W."; Images #17, 18 (2.75" x 4.5"): "12-8-28. Wreck on West Approach after runaway of 14 ton girder which pushed locomotive down grade ahead of it.";Four 4.5" x 2.75" B/W photos numbered 14, 17, 18, 19
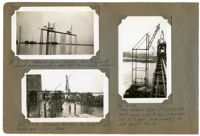
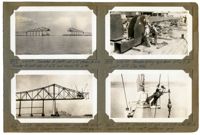
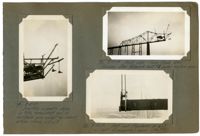
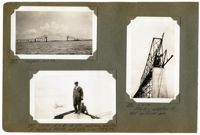
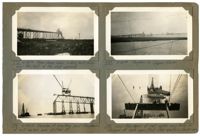
Images #8, 10, 12 (2.75" x 4.5"): Caption under all photos: Dec. 2, 1928. Three views of pneumatic caisson for anchor pier #10, Cooper River Span, which tilted to an angle 29 [degrees] from the vertical. Seven negro 'sand-hogs' trapped and drowned.";Three 4.5" x 2.75" B/W photos numbered 8, 10, 12
Image #49 (2.75" x 4.5"): "1-18-29. West anchor arm, Town Creek Span. Bottom chord erected to L6."; Image #50 (2.75" x 4.5"): "1-18-29. Erecting top chord U3U5."; Image #51 (4.5" x 2.75"): "1-18-29. Material Tower has erected Anchor Bent on Pier 4 (left), and Bent 1 D of Drum Island Approach (right) with temporary tower bracing b't'n. viaduct traveler trusses, assembled, on lighter at left. (See 57)";Three 4.5" x 2.75" B/W photos numbered 49, 50, 51
Image #108 (4.5" x 2.75"): "2-22-29. Detail of lead sheave at heel of boom on span traveler. Note swivel connection (See also #133)."; Image #110 (4.5" x 2.75"): "2-22-29. Looking west from top of Pier 2, toward anchored bent on Pier 1. Falsework columns still in place, but bracing has been removed."; Image #111. (4.5" x 2.75"): "2-22-29. Looking east from top of Pier 2 toward Pier 3 and Drum Island.";Three 4.5" x 2.75" B/W photos numbered 108, 110, 111
Image #120 (2.75" x 4.5"): "2-24-29. Expansion joint at L0. Plates supported on pipe separators."; Image #128 (2.75" x 4.5"): "3-3-29. Top chord - west cantilever arm."; Image #121 (4.5" x 2.75"): "2-24-29. Rocker shoe under end of viaduct girder, providing expansion between anchor arm and viaduct. Supported on cross girder at top of anchor bent.";Three 4.5" x 2.75" B/W photos numbered 120, 121, 128
Image #247 (2.75" x 4.5"): "4-24-29. Spans 10, 11, and 12. Span 10 under erection."; Image #252 (2.75" x 4.5"): "4-24-29. From Span 1E, looking east. Hydraulic fill causeway in distance."; Image #251 (2.75" x 4.5"): "4-24-29. re-erecting viaduct traveler on Span 1E, at Pier 13, to complete East Approach."; Image #253 (2.75" x 4.5"): "4-24-29. East abutment - looking west. Spans 21E to 13E have been erected by C.E. Hillyer.";Four 4.5" x 2.75" B/W photos numbered 247, 251, 252, 253
Image #106 (4.5" x 2.75"): "2-22-29"; Image #107 (4.5" x 2.75"): "2-22-29"; Caption under images 106 & 107: "350 Ton hydraulic jack inside links shown in #105. Looking towards suspended span (left) and towards cantilever arm (right). 10 " [diameter] Pin against which saddle casting bears passes through slotted holes in inside pair of links and its supported by the outside pair, which is riveted to the end of the cantilever arm. Note bearing shims with notch and hole in top, which carry the load while not actually jacking"; Image #117 (4.5" x 2.75"): "2-24-29. Looking straight up at U13 U14.";Three 4.5" x 2.75" B/W photos numbered 106, 107, 117
Image #44 (4.5" x 2.75"): "1-13-29. Span Traveler A entering the west anchor arm, Town Creek Span. Blocking up to change from gauge of 19' 6", as used on viaduct, to 18' 0", the gauge of truss span stringers. Trusses 24' 0" c. to c."; Image #45 (4.5" x 2.75"): "1-13-29. Front view of #44."; Image #46 (4.5" x 2.75"): "1-13-29. Looking east across Town Creek at Piers 2 & 3. Material tower 130 ft. high is opposite Pier 4. Piers 5, 6, 7 and 8, in Cooper River, in the distance.";Three 4.5" x 2.75" B/W photos numbered 44, 45, 46
Image #90 (4.5" x 2.75"): "2-13-29. Erecting assembly shown in #89, completing end of cantilever arm except for dummy bottom chords L12 L13."; Image #91 (2.75" x 4.5"): "2-13-29. West side - Town Creek Span. Removing steel falsework bent #1 under anchor arm."; Image #92 (2.75" x 4.5"): "2-14-29. Joint and floorbeam at L13 ( = Lo joint of suspended span. See #93).";Three 4.5" x 2.75" B/W photos numbered 90, 91, 92
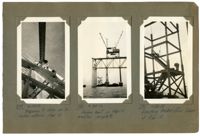
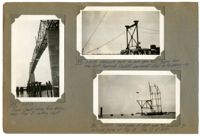
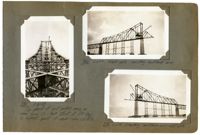
Image #133 (4.5" x 2.75"): "3-3-29 Detail of lead sheave block at heel of span traveler main boom. See #108."; Image #135 (2.75" x 4.5"): "3-3-29. Detail at top of A-frame. Span traveler."; Image #136 (2.75" x 4.5"): "3-3-29. Progress - Town Creek Span.";Three 4.5" x 2.75" B/W photos numbered 133, 135, 136
Image #330 (2.75" x 4.5"): "5-18-29. Progress"; Image #331 (2.75" x 4.5"): "5-18-29. West anchor arm. Note stair tower and office on bottom chord of deck span - at Pier 7."; Image #332 (4.5" x 2.75"): "5-18-29. Deck of bridge from end of east anchor arm. Traveler at L6.";Three 4.5" x 2.75" B/W photos numbered 330, 331, 332
Image #448 (4.5" x 2.75"): "6-18-29. Pulling."; Image #449 (4.5" x 2.75"): "6-18-29. First pile pulled. Time required, about 15 min."; Image #450 (4.5" x 2.75"): "6-18-29. West cantilever arm. Traveler at L19 on the suspended span.";Three 4.5" x 2.75" B/W photos numbered 448, 449, 450
Image #1 (2.75" x 4.5"): "11-9-28. Building office in the Atlantic Coast Line R.R. Yard."; Image #2 (2.75" x 4.5"): "11-9-28. Erecting Span Traveler 'A' at and of West Approach, using 30 ton stiffleg derrick."; Image #3 (2.75" x 4.5"): "11-9-28. Raising boom for Span Traveler. Length of boom 100ft., & weight, 11 tons.";Three 4.5" x 2.75" B/W photos numbered 1, 2, 3
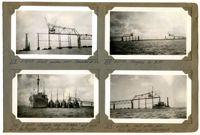
Image #381 (4.5" x 2.75"): "5-31-29. Top chord of east anchor arm, as seen from U1. Peak strut at U10 (top) is highest point of span - elev. 280 ft."; Image #385 (2.75" x 4.5"): "6-1-29. West side - erecting cantilever arm."; Image #386 (2.75" x 4.5"): "6-1-29. Erecting cantilever arm - east side.";Three 4.5" x 2.75" B/W photos numbered 381, 385, 386
Image #387 (2.75" x 4.5"): "Progress 6-1-29"; Image #388 (2.75" x 4.5"): "6-3-29. E.L.D. at U10, watching erection of top chord U10 U12, east side. (See 390 & 391)."; Image #389 (4.5" x 2.75"): "6-2-29. Starting erection of east cantilever arm.";Three 4.5" x 2.75" B/W photos numbered 387, 388, 389
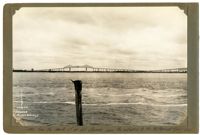
Unnumbered Image (5" x 7"): "The Cooper River Bridge from the Mt. Pleasant Shore. This photo taken by the Bridge Company for advertising purposes, and published thru the Associated Press. (Taken about July 7, '29.) Photo by Jacobs.";One 5" x 7" B/W photo
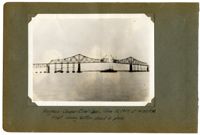
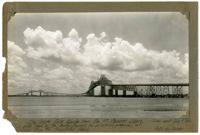
Unnumbered Image (5" x 7"): "The most unique of all bridge pictures, showing North side of Cooper River Span, in the foreground, and the South side of the Town Creek Span, beneath it, in the distance.";One 5" x 7" B/W photo
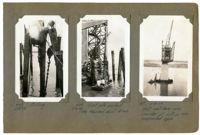
Image #289 (2.75" x 4.5"): "5-3-29. Erecting first bent of falsework at L2, East anchor arm."; Image #290 (2.75" x 4.5"): "5-3-29. Erecting first bottom chord of west anchor arm, Span 7, at Pier 7. Town Creek span in distance."; Image #292 (2.75" x 4.5"): "Same as 290.";Three 4.5" x 2.75" B/W photos numbered 289, 290, 292
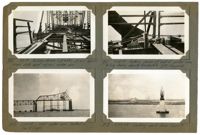
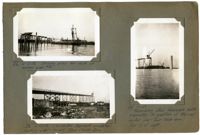
Image #167 (4.5" x 2.75"): "3-15-29. Unloading material from lighters to dock at Pier 4 with stiffleg derrick, for the Drum Island viaduct. (See #143.)"; Image #172 (2.75" x 4.5"): "3-17-29. Erecting first bent of false work for deck span 12. (70 ft. boom has been erected, on left, by 50 ft. boom on right and which has been taken down)."; Image #173 (2.75" x 4.5"): "3-17-29. Progress - from Cooper River. Traveler A removed. Drum Island Viaduct at bottom of grade.";Three 4.5" x 2.75" B/W photos numbered 167, 172, 173
Image #272 (2.75" x 4.5"): "4-28-29. Town Creek Span, looking east from near the end of west approach."; Image #273 (2.75" x 4.5"): "4-28-29. Progress in Cooper River."; Image #274 (2.75" x 4.5"): "4-29-29. Traveler A erecting end floorbeam of west anchor arm at Pier 10."; Image #275 (2.75" x 4.5"): "End floorbeam of west anchor arm hung on stringers of deck span. First steel erected on anchor arm.";Four 4.5" x 2.75" B/W photos numbered 272, 273, 274, 275
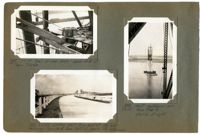
Image #76 (2.75" x 4.5"): Temporary top chord links between U13 and U14, carrying diaphragms for hydraulic jacks - Town Creek Span."; Image #77 (2.75" x 4.5"): "End view of links shown in #76."; Image #78 (2.75" x 4.5): "End view of top chords U12 U13 at U13. (see #87).";Three 4.5" x 2.75" B/W photos numbered 76, 77, 78
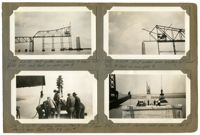
Image #122 (2.75" x 4.5"):"2-24-29. West cantilever arm erected to L17 L18 - Traveler at L15."; Image #124 (2.75" x 4.5"): "2-25-29. Traveler A at L16, its farthest position."; Image #123 (2.75" x 4.5"): "2-24-29. East anchor arm erected to L6. Traveler at L6. Viaduct traveler at right."; Image #125 (2.75" x 4.5"): "2-25-29. East anchor arm at Pier 3.";Four 4.5" x 2.75" B/W photos numbered 122, 123, 124, 125
Limit your search
Photographic Record of the Cooper River Bridge✖[remove]202