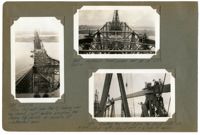
Image #147 (4.5" x 2.75"): "3-11-29. West half of Town Creek Span complete, as seen from end of east cantilever arm."; Image #148 (2.75" x 4.5"): "3-11-29. Picking 150 HP Gas. Hoist, 31 tons, from traveler to dismantle traveler and lower engine to deck."; Image #149 (2.75" x 4.5"): "3-11-29. Erecting material tower on dock at Pier 13.";Three 4.5" x 2.75" B/W photos numbered 147, 148, 149
Image #474 (4.5" x 2.75"): "6-21-29. Erecting the last bottom chord section L19' L21', north truss, east half of suspended span."; Image #475 (2.75" x 4.5"): "6-21-29. Connecting the closing bottom chord at L21'."; Image #476 (2.75" x 4.5"): "6-21-29. Closing B.C. joint L21'. Note 6" [diameter] pin and slotted hole with 7" movement for adjustment, temperature, etc.";Three 4.5" x 2.75" B/W photos numbered 474, 475, 476
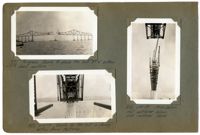
Image #471 (2.75" x 4.5"): "Progress. Ready to place the last 87 1/6" bottom chord section."; Image #472 (2.75" x 4.5"): "6-21-29. Ready for the last or closing bottom chord sections."; Image #473 (4.5" x 2.75"): "6-21-29. From below. West cantilever, below. East cantilever, above.";Three 4.5" x 2.75" B/W photos numbered 471, 472, 473
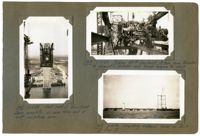
Image #113 (2.75" x 4.5"): "2-23-29. East anchor arm. Traveler Bat L4 Truss erected to L6."; Image #114 (2.75" x 4.5"): "2-23-29. West side - Town Creek Span. Traveler A at L15."; Image #115 (4.5" x 2.75"): "2-23-29. West side - Town Creek Cantilever.";Three 4.5" x 2.75" B/W photos numbered 113, 114, 115
Image #487 (4.5" x 2.75"): "6-27-29. From U10 east (over Pier9) looking over top chord, just before erecting the closing top chords at middle of suspended span."; Image #490 (2.75" x 4.5"): "6-27-29. Hydraulic hand pumps set up at U17."; Image #491 (2.75" x 4.5"): "Erecting the first closing top chord U20' U22. U20 at right. U22, at left, = CL [center line] 1050ft. span.";Three 4.5" x 2.75" B/W photos numbered 487, 490, 491
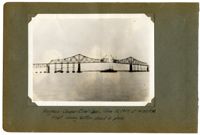
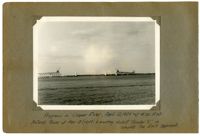
Unnumbered Image (5" x 7"): "Progress in Cooper River, April 26, 1929 at 4:30 P.M. material tower at Pier 13 (right) is erecting viaduct traveler 'C' to complete the east Approach.";One 5" x 7" B/W photo